I wrack my brains every November to come up with an idea for a holiday gift to make and send to family and friends. My criteria for a great gift idea are: 1. The item must be unique and reasonably impressive. 2. It should be relatively easy and time-efficient to reproduce in a small quantity (I usually make a couple of dozen or so). 3. It should be small enough and durable enough to be sent through the mail. I also strive to make these gifts from cutoffs and scraps rather than new stock, thereby helping to reduce my scrap pile at the same time I’m creating my little bit of holiday cheer.
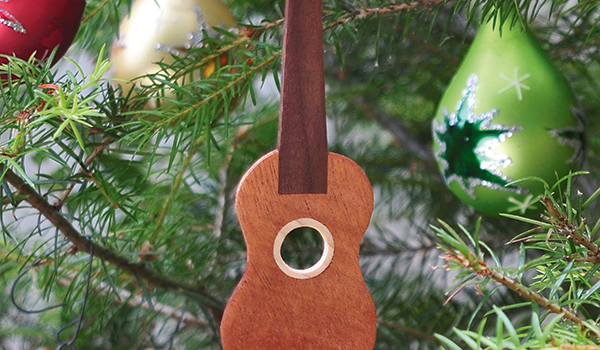
A few years ago, I came up with a gift idea for a wooden tree ornament in the shape of a ukulele (consider it a small guitar, if it better suits your musical tastes). Instead of making each little uke individually (which would violate gift criteria #2), I make these decorative ornaments using what’s commonly referred to as the “log” method of construction. I create a single thick piece that’s shaped and appointed to resemble a uke, then slice it up into multiple thin ornaments. A single log made from scrap 8/4 stock yields eight to nine individual ornaments.
If you’re not instrument oriented, you can use this method to produce thin multiples in any other shape you choose — snowflakes, Christmas trees, menorahs, etc. So put on your elf hat, head for the shop, and start making some seasonal sawdust.
Cutting Parts for the Log
The ukulele ornament, shown in the pattern Drawing, is made from three separate pieces: a body, a neck and a headstock. A simple dado joint connects the neck and body, and the headstock is glued to the end of the neck. A ring of a light-colored wood adds a decorative touch to the ukulele’s sound hole.
The first step in making the ornament is to cut a piece of 8/4 (or thicker) stock 2-3⁄4″ long and 2″ wide for the uke’s body. I used mahogany, which is one wood ukuleles are traditionally made from. Depending on how many ornaments you wish to make, cut as many of these body pieces — as well as all the other parts of the ornament — as required. If you use a cutoff from the end of a plank, make sure there are no major cracks running through the piece.
Now cut the dado that joins the uke body and neck on the table saw. Fit the saw with a dado stack set up for a 1/2″-wide cut, and adjust the stack’s cutting height to 7/16″. Set the saw fence 3/4″ from the close side of the dado blade, to produce a cut that’s centered on the body’s narrow end. For better safety, clamp a straight-edged stick to the saw table, to guide the lefthand side of the body and keep the piece from coming away from the rip fence. Use a push block and stick to slide the piece through the cut.
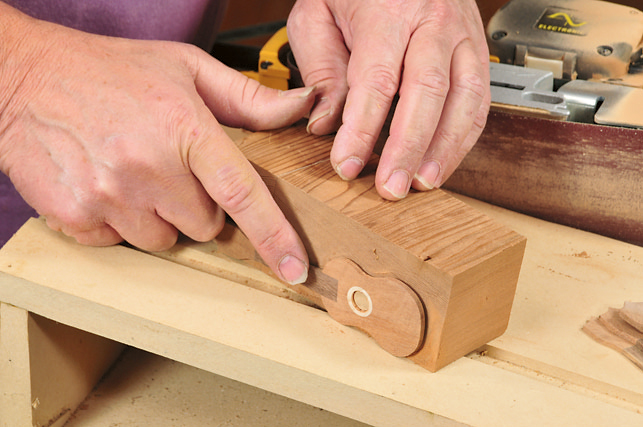
Next, mark the body blank for the uke’s sound hole, as shown on the pattern. Make sure that your mark is centered with respect to the dado cut. Fit your drill press with an 1/8″-dia. bit, to create a pilot hole. With a piece of scrap plywood atop the drill press table, center the bit on the sound hole mark, then clamp the body down and drill a hole all the way through. Without unclamping the body, chuck up a 5/8″-dia. brad-point or Forstner bit and bore the hole to full size.
To give the uke ornament a little more flair, cut the neck from a different (preferably darker) wood than the body. I cut mine from a claro walnut scrap which had a nice, deep brownish-red. Cut the neck piece 2-1⁄8″ long, 1/2″ wide, and as thick as the body blank. For a nice matching look, make the 1-3⁄16″-long by 3/4″-wide headstock from the same wood as the uke body.
Making the Sound Hole Ring
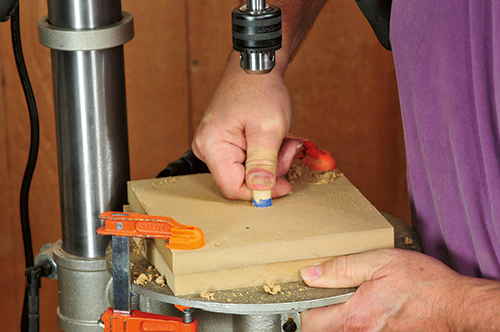
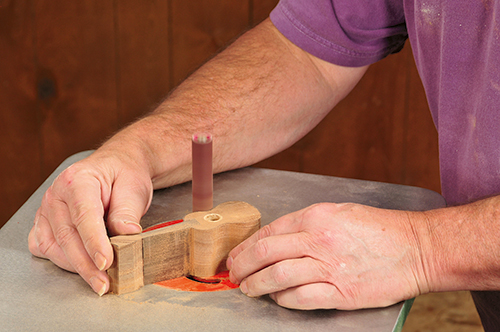
To make the ring around the uke’s sound hole, take a piece of 5/8″-dia. dowel rod (birch or maple), and cut a piece that’s just a hair longer than the thickness of your log. At the drill press, stack and clamp two squares of scrap 3/4″ MDF or plywood atop the table. With the table position fixed, bore a 5/8″-dia. hole about 3/4 of the way through the ply stack and press the dowel into this hole. If it’s too loose, cover part or all of the outside of the dowel with tape.
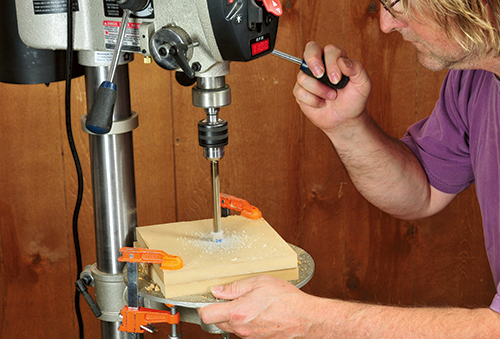
Chuck up a 3/16″-dia. bit and bore a pilot hole concentrically through the dowel. Replace this bit with a 15/32″-dia. pilot point or brad point bit and enlarge the hole. To prevent the dowel from spinning, drill only a little at a time, and withdraw the bit between each advance. Unclamp the plywood squares and carefully pull out the hollowed dowel. If the dowel is stuck, pry off the top ply square, as this makes dowel removal much easier.
Gluing Up the Log
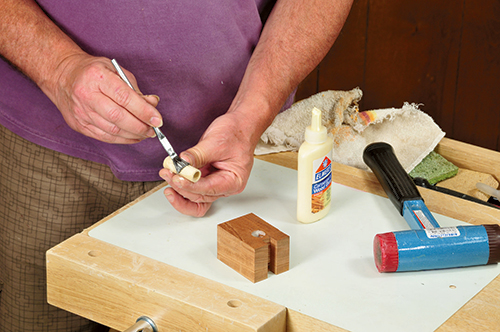
For both safety and convenience, all the ornament’s parts are glued up before they’re cut to shape. First, apply a thin layer of yellow glue to both the inside of the sound hole in the body and the outside of the hollow dowel sound hole ring. Quickly press or lightly pound the dowel all the way into the body so that it’s flush with the bottom of the blank. Next, brush some glue into the body dado, and pound or press the neck in place. Use a C-clamp to fully seat the neck in the joint. Set this assembly aside a while, at least until the glue sets (an hour or so).
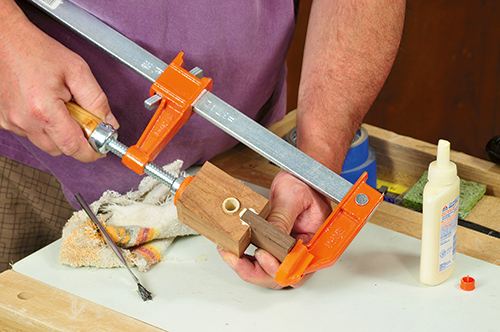
Because the joint between the end of the neck and the headstock is end-grain to end-grain, a two-part clear epoxy glue creates a stronger, more durable connection than regular white or yellow glues. Avoid using “5-minute” type epoxies, as these aren’t as strong and don’t adhere as well as epoxies that take 24 hours to dry.

Squeeze equal amounts of resin and hardener onto a piece of scrap cardstock and mix them very thoroughly (for 30 seconds or more) before applying a coat to the end of the uke’s neck. Set the headstock in place, then clamp the parts together and leave them to dry overnight.
Shaping the Uke
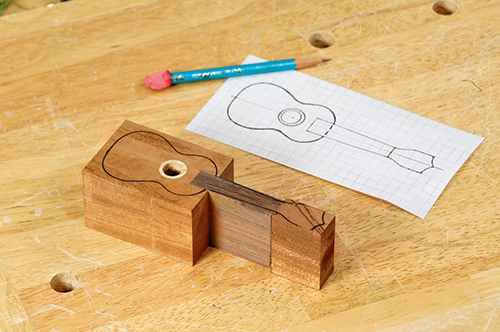
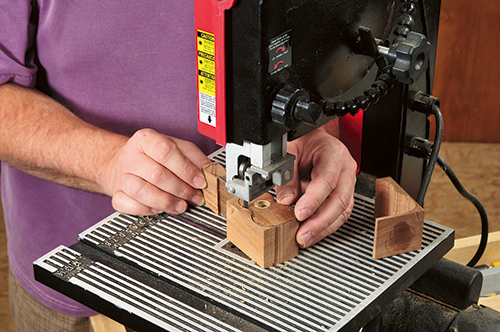
Transfer the body outline pattern shown to the top of the glued-up log, making sure that the pattern is centered. Saw the bodies out using a band saw fitted with a 3/16″- or 1/8″-wide blade. Before making the actual cuts, it’s a good idea to make sure that the band saw’s blade is precisely perpendicular to the table. Cut just outside of the marked lines.
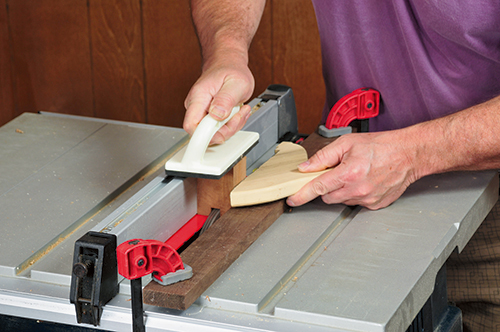
If you’re lucky enough to have a stationary disc or belt sander and an oscillating spindle or drum sander at your disposal, these machines make quick work of sanding the outer edge of the uke log smooth. Use the disc or belt sander on the convex body curves, and the oscillating spindle or drum sander to smooth the convex surfaces of the body and headstock (a 3/4″-dia. spindle/drum is just right for these curves).
If you don’t have access to power sanders, you can also clean up the cut edges of the uke log with a sandpaper stick and elbow grease. To make a sanding stick, press a piece of sticky-backed sandpaper onto the face of a thin scrap of wood. You can also use adhesive transfer tape or regular yellow glue to adhere regular sandpaper to the stick.
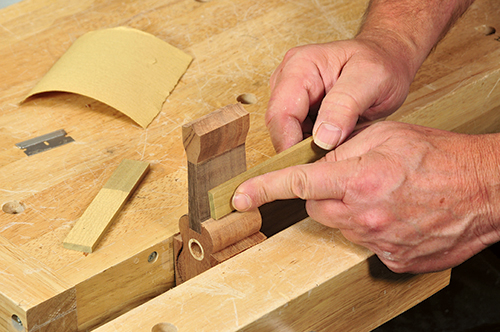
It’s best to make two sanding sticks — a coarse one with 80- or 100-grit paper, and a fine one with 120- or 150-grit paper. A sanding stick is ideal to use for cleaning up the sides of the uke’s neck and the top of the body next to the neck. Stick some sandpaper to a dowel to smooth the log’s concave edges. It’s OK to sand across the wood’s grain and leave some visible scratches on the log; the ornaments that will be cut off are thin, and scratches won’t show very much.
Slicing up the Log
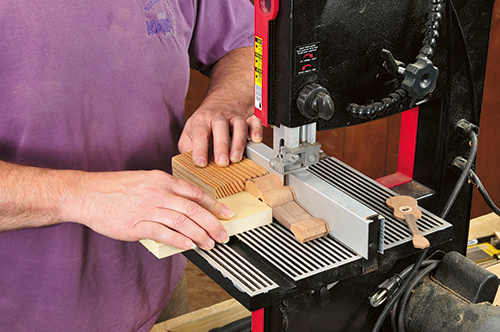
To slice your uke log into individual ornaments, set up your band saw with a 3/8″- or 1/2″-wide blade and position the fence for a rip cut that’s just a skosh more than 1/8″ thick. Now set the face of the uke log against the fence and slice off the first ornament. For safety’s sake, use two scrap wood blocks: one to keep the log pressed firmly against the fence, the other to push the log and ornament slice past the blade. Now flip the log over, and take a slice off the other face. Use a stationary disc or belt sander to remove the saw marks and flatten both faces of the log and square them up relative to the log’s edges. Then go back to the band saw and cut two more ornaments from the log. Repeat this process until the log has been completely sliced up.
Final Sanding and Finishing
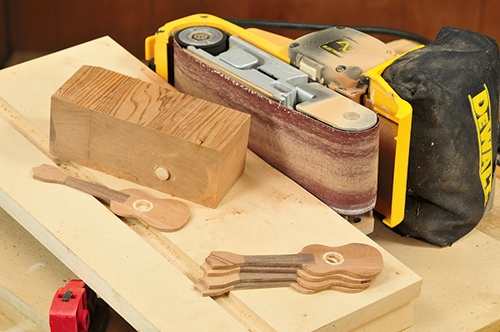
Once all the ornaments have been cut, clean the saw marks off the faces using a stationary belt sander. Even though I have a large, 6 x 48 stationary belt machine, I prefer to use my small shop-made belt sander fixture for this process. The key to success here is to make a jig that allows you to hold each thin uke slice without abrading your fingertips. This jig is simply a thick scrap block that’s slightly longer and thicker than the ornament, with a square edge into which is set a short 1/2″ dowel. The dowel fits into the uke’s sound hole to keep the ornament in place and prevent the belt from hurling it during sanding. You can also use the jig block to keep each ornament secure during finish sanding using a 1/4-sheet orbital sander or a hand-sanding block.
Once all the ornaments are sanded, you’re ready to apply a finish. Before you do, consider adding more graphics to each little uke. You could draw on details, such as the uke’s bridge, strings and tuning pegs, using a fine-point felt-tip marker pen. Or, you may wish to personalize each ornament with the name of the recipient, or a Christmas wish, signature and date. You can finish the ukes any way you like, using a wipe-on oil or polyurethane, or apply a spray finish. If you decide on this latter option, spread the ornaments out atop a piece of chicken wire or hardware cloth. This prevents the force of the spray from blowing them away.
Finally, make a tree hanger for each uke by tying a short length of thread, fishing line or thin ribbon around the neck. If you plan to mail these ornaments, it’s best to sandwich each one between two pieces of stiff cardboard that are taped together. Place the sandwich in a padded envelope, and write “fragile, do not bend” on the outside. And don’t forget to mark each recipient off your holiday list before putting up your feet and having a refreshing glass of eggnog.
Click Here to Download the Full-size Drawing for This Project.


