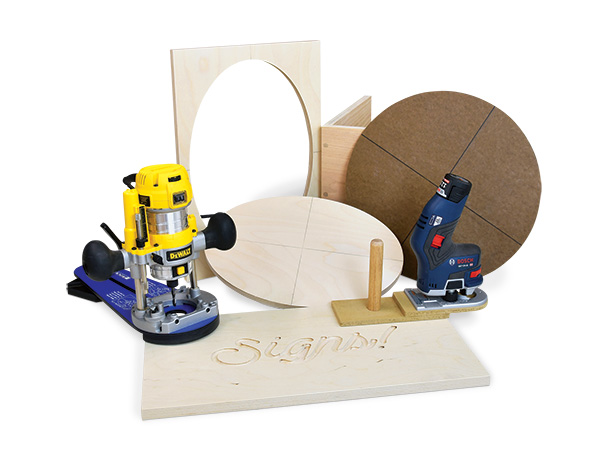
A router table can handle a host of woodworking chores — template routing, jointing and cutting mortise-and-tenon joints. Handheld routers, meanwhile, are used most often for the edge-shaping and trimming tasks at which they excel.
But when outfitted with jigs or a specialized base plate, a router table’s handheld cousins take on a whole new range of useful abilities that prove once again why the router is the most versatile shop tool.
Routing Ellipses, Circles
You can cut circular shapes on a band saw if they’re not too large and with a jigsaw if they are. While both techniques are fast, the resulting shapes don’t always turn out perfect since the workpiece is cut by hand without guidance.
Circle-cutting jigs are helpful, but not for oval shapes. But a combination setup, like Rockler’s various ellipse/circle cutting jig options, enable your router to handle both tasks. These jigs feature a dovetailed jig base with a pair of sliding pivot pins, while the jig itself (a pivoting arm) is mounted under the router. Let’s demonstrate this with a sample ellipse.
Before you begin, understand that the workpiece — both the ellipse and the outer waste — must be fully supported and unmovable. You’ll rout all the way through the workpiece, so a sacrificial surface underneath the work is essential. A sheet of plywood or MDF clamped to your workbench works fine.
You can clamp the workpiece down, too, if it’s large enough that the clamps are out of the way. But you can’t clamp the ellipse you’re cutting out in the center. The answer is to forget clamps and use double stick tape to hold everything securely.
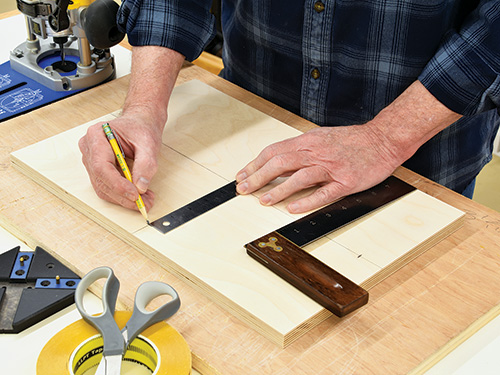
To plot the ellipse, draw center pencil lines on your workpiece for the major and minor axes. Then make marks on each radius to define the size. I’ve marked the lines at 5″ and 7-1/2″ radii for an ellipse measuring 10″ x 15″.

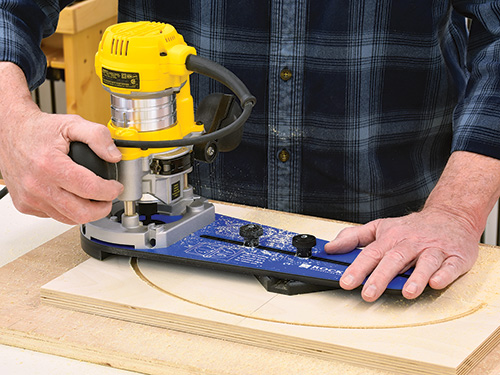
Now, mount the jig base in the center of the workpiece aligned with your penciled lines. The jig base attaches with screws, so if the resulting marks will be visible in the finished piece, you can either screw the base down to what will be the unseen side, or use double-stick tape to secure it. Slip the two sliding pivots into the base’s dovetail slots.
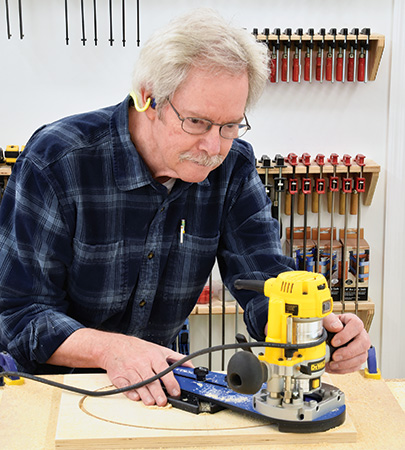
Install a straight cutter into your router — either an upcut spiral or regular straight bit — and set the plunge depth to about 1/8″. We’ll make the ellipse with repeated cuts, not in a single pass. Line up the locking attachment knobs on the jig arm with the pivot pins on the base and slip the assembly into place, which will allow the router to rotate freely around the base. Slide the router until the bit lines up with the radius mark for your major axis, and tighten its knob. Then swing the router around to the minor axis mark and tighten it. The router will now rotate in a perfect ellipse.
and rotate the router to begin the cut. Make subsequent passes, resetting
the depth each time until you’ve cut through the workpiece.
Turn on the router and plunge the bit into the work, then steadily rotate it around the pivots to complete the first cut. Raise the bit, turn off the router and increase the plunge depth another 1/8″, then make another full rotation. Repeat this process until you’ve routed all the way through and slightly into the sacrificial sheet underneath.
I’ve wrapped the cord clockwise around the router. It’s a great tip that I’ve discovered! As you rotate the router, the cord will want to coil around the router and possibly snag. Wrapping the cord one turn in the same direction you’re routing will instead unwrap the cord in a more controllable fashion as you rout.
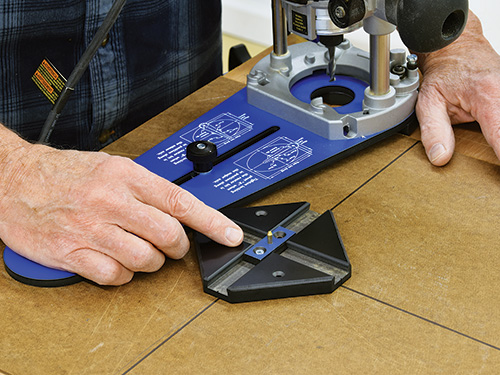
Routing a circle is the same process but even easier. For this, you’ll need just a single pivot pin, which is solidly screwed into the jig base through a provided set of holes. There’s no sliding along the jig base’s slots this time; a simple circular rotation is all that’s required to cut the workpiece.
Routing Signs
Short of using an expensive CNC machine or doing it entirely by hand with careful and laborious chiseling, the best way to create signs quickly and accurately is with a handheld router paired with lettering templates.
Lettering guides, such as Rockler’s Interlock Signmaker’s Templates, consist of a series of polymer capital and lowercase letters, various spacers and punctuation. The guides fit together like puzzle pieces to make full templates of words or phrases, just right for a plunge router equipped with a guide bushing and signmaking bit.
For signs with standardized all-capital letters, everything is the same size; you just spell out what you want with your templates and rout away. Script lettering, however, is more involved. Because the letters are “kerned” to accommodate different widths and make the script flow smoothly, the sign is routed in separate passes with different letter parts and spacers.
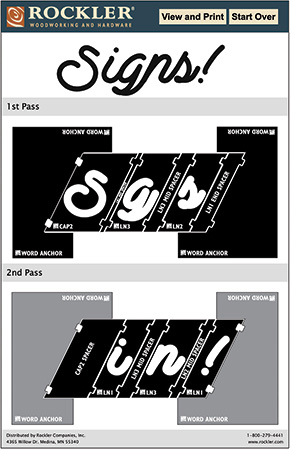
Rockler makes this easy with an online tool wizard, where you simply type in the words you want and it plots the entire template arranged for each pass. You can then print this guide out to use as you arrange the templates on your workpiece.
For this example, we’ll rout the six-character word “Signs!” This is only a two-pass project, but other words can require five or six passes. By the way, the number of passes isn’t dependent on word length but rather letter complexity. For example, the shorter word “cat” is a three-pass routing operation.
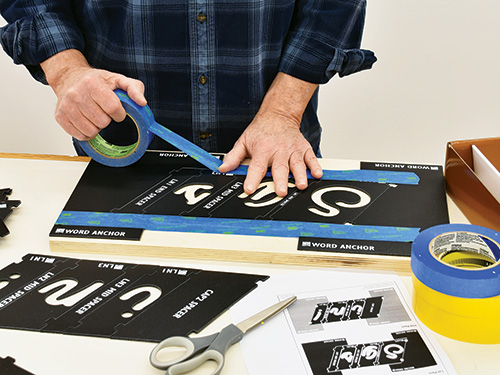
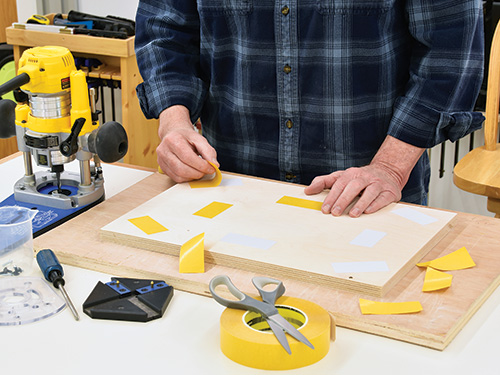
Begin by selecting all the letters and spacers as detailed on the guide along with word anchors on each end, and center the assembled template for the first pass on your workpiece. Separately secure the word anchors first with double-stick tape. These anchors stay in place through all the passes.
Now use masking tape to secure the edges of letters and spacers, and smooth the tape down completely so the router base doesn’t catch on loose edges. Also, it’s a good idea to secure any thin, extended interior parts of letters with a small piece of double-stick tape underneath to keep them from flexing as you bear down when routing.

Clamp the workpiece securely, set the bit to 1/4″ cutting depth and place the router’s guide bushing into the template for the first letter. Turn on the router and plunge it into the work, following the templates as you cut each letter.
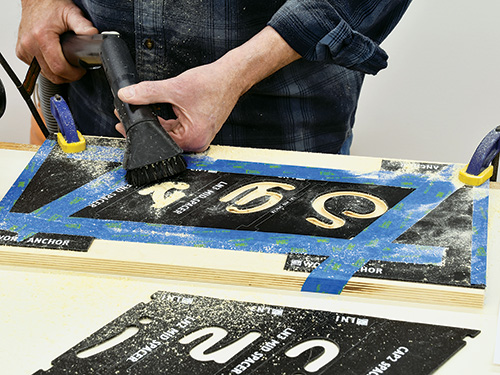
After making a complete pass, vacuum out all the debris, which has a tendency to pack down into the letters. It is essential to check that each letter is fully formed with all waste removed. Chances are, you missed some here and there and will need to repeat the first pass to clear out any remaining waste.
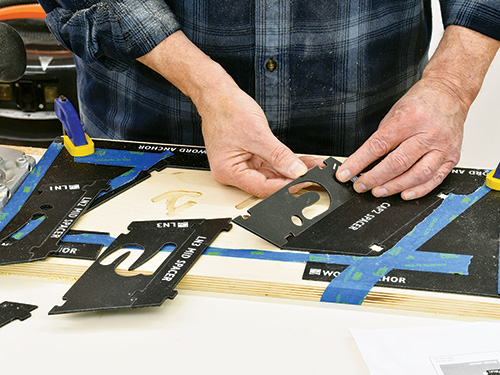
When the letters in the first pass are fully formed, be sure to leave the two word anchors solidly in place but remove the lettering and spacing templates from the center. Replace them with those for the second pass, and tape them down. Make the second routing pass the same as the first to complete this sample sign.
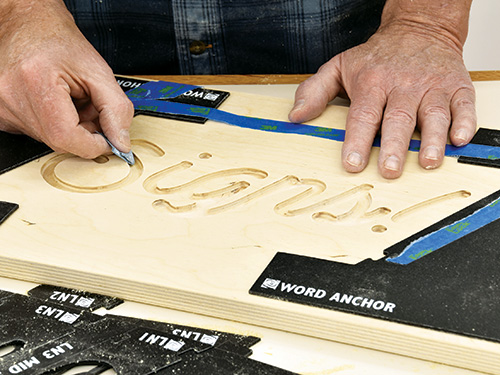
folded sandpaper to smooth and refine each letter. There typically will be
a bit of burning or fuzz left behind, depending on the wood species and bit.
The last step is to remove all the templates and refine the lettering with a bit of folded sandpaper. This will remove any burn marks or light “feathering” around the routed grooves left by the bit. Once sanded, the sign is ready for paint or a final finish of your choice.


