At the beginning of this new year, we heard from a couple of the eZine readers whose questions were answered in the Q&A sections of 2013 (oh, so long ago …).
If you remember Lyle Pellisier, who asked in Issue 340 about how to get multiple concealed hinges to work together, he shared some pictures of the kitchen project that led him to ask that question. – Editor
“Why the five hinges? The door is big, 18-1/2 x 70. It is made of solid hickory. Thicker than the normal. It is heavy. The catalog shows the size and weight needing 3 and 1/2 hinges. The half one was a problem, so I went to four. By the way, they are 165 degree, half overlay. The hinge has a lot to do. They first must lift the door away from the frame so the back corner can clear the frame. Then they have to swing the door out of the way of the opening. A lot of levers. The face frame mounting plates have tabs that register on the front of the face frame.. You cannot gently put them on. They can only move up and down. All the hinges are self-closing, but some are soft. The doors do close, but the binding makes you give them a push. With all the levers, I do not think there is a single hinge pin. All stretched out, the hinge is 5-1/2 inches long with mounting plate. OK, we have four hinges and the wood is thick: why? The plan is to put wire racks on the inside to hold spice or such. Need another hinge for the weight.
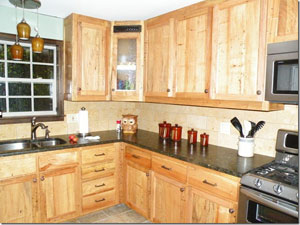
“This is an interesting kitchen. Other than the door we are talking about, kitchen is made of spalted real pecan. Behind the doors we have been talking about is wire shelving on 500-pound rollers. They pull out as the pantries, one on each side of the fridge. I didn’t waste the depth of the refrigerator. Drawers are made with dovetailed sycamore.” – Lyle Pellisier
We also heard from Ron Zega, who had asked in Issue 332 about using oil-based stain over tung oil for a pie safe he was making for a county fair entry. – Editor
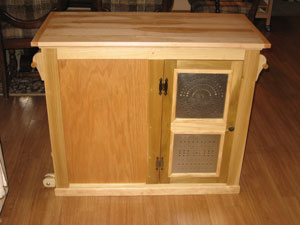
“Here are some pictures of my pie safe that I requested your help on. I finished in time for the fair in August. I received a 2nd place. WhatI did was drive in the nails and put in pegs, which I was able to finish with no blotches. The cabinet fits under my existing kitchen counter. It is my own design after looking at various plans in magazines. I made the wheels out of maple and use the towel rack like a wheelbarrow handle to move it around. The top is a breadboard made out of maple, and the cabinet is poplar. It is a mirror image on the opposite side so I can use both sides of the cabinet.” – Ron Zega
Reader Experiences with Ebonizing Oak, Loosening Torx Screws
Going back in time again, but not quite so far, we also heard some comments on questions in last issue’s Q&A. For instance, a few more tips about creating a black patina on oak, from someone who’s done it. – Editor
“Everything that you said about making the brew for ebonizing oak is cool. There are a few minor points that would help the novice that has never done this. 1. Wash the steel wool with something like Dawn® or Palmolive® dish soap to remove any rust inhibitor or oil before allowing to rust. 2. Use white DISTILLED vinegar. The steel wool should soak in the vinegar for a week or two. 3. Filter before use to remove any residual gunk. Filter through a couple of coffee filters from the office coffee maker. 4. Use the solution within a week or so. (I don’t know why, but that is what I’ve been told.) The action of the solution on oak is almost instant. Within a few seconds, the oak is black. Unfortunately, what you see is as black as it is going to get. After the chemical action is done, the oak should be cleaned with a baking soda solution and clear water.” – Rich Flynn
Plus, another reader shared how he has attempted to loosen factory-tighted Torx screws. – Editor
“In the last issue, your Q&A talked about loosening factory-tightened Torx screws. Your suggestion was correct, but I can add another possible aid. Since they are expecting some vibration on the tools, they likely use thread lock compound at the factory. It can (usually) be broken with enough force if your bit is strong enough, but you can also heat the screw up with a small torch or large soldering iron to allow the thread locker to melt and the screws turn out easily. Takes a little practice to heat up enough to melt the thread lock but not enough to damage anything else. Watch out for any plastic parts nearby or attached to the same area: the surrounding metal can heat up a long distance from your screw. Of course, you have to take care not to start a fire and clean all the sawdust away if you are using a torch.” – Dan Robinson
Another “Starter” Woodworker
We also received some feedback on last issue’s Feedback, where woodworker discussed whether they were “starters” or “finishers” when it comes to woodworking projects. – Editor
“I think of myself as a starter. You see, I like to get a set of plans or draw up an unofficial or homemade drawing, which I do poorly, and study it for a while, then I make sure I have all of the materials that will be needed for that project. I do a lot of wood recycling: things like old buildings, fences and lots of pallets. What my shop is missing is, number one: space, and number two: a planer. I have so much fun in my shop that I have come to think of shop time as therapy. While I am more of a starter, I truly love the whole process from start to finish. The best part of my woodworking time is when I give the piece to the person I made it for and watch their eyes light up. It’s then that I know why am drawn to that room called ‘My Shop.'” – Larry Dennis
Woodworking Wordplay
And we’ll conclude this time with a response to the tale in last issue’s Feedback of a smoker’s “experience” with Dutch elm disease. – Editor
“I thought perhaps he pined away for those cigs?” – Bill Deitrick


