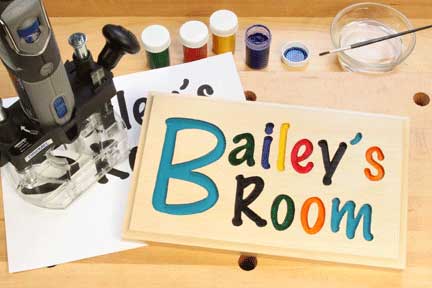
These personalized nameplates make great gifts for kids.
Routing usually involves a template, jig or fence to control the router’s path. However, with a 1/8-in.-diameter straight bit in a rotary tool or trim router, you can safely rout freehand and get precise results. These nameplates are a good way to practice those skills. The key is to take shallow passes and work slowly, following a paper pattern you mount to your workpiece.
Step 1: Create a pattern for your nameplate by enlarging a font on your computer and printing it out. Since this is a freehand exercise, select a font that has a handwritten look to it rather than a perfectly straight, uniform style. That way, if you deviate slightly from the pattern during routing, it will still blend in nicely. Fonts with rounded corners will be easier to clean up than those with sharp corners; you’ll need to define any sharp corners with a hobby knife or chisel where the bit can’t reach. Make the letters large enough so their tightest areas are at least 1/8 in. wide.
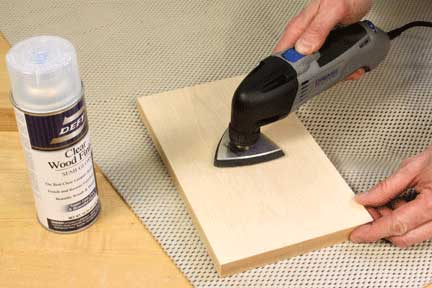
Step 2: Choose a piece of wood for the nameplate that is free of knots or other defects and without a pronounced grain pattern or open pores. Birch, maple, cherry or poplar are all good choices. Size the nameplate to leave at least 3/4 in. around your letters plus extra space if you plan to rout a profile around the edges of the plaque. Sand the nameplate blank up through the grits to 220, and seal its face with two or three light coats of spray lacquer (see Photo 1). The lacquer will make it easier to remove the paper pattern later.
Step 3: Mount your pattern to the blank with spray adhesive. Use a J-roller or a soft cloth to press the pattern firmly into place (see Photo 2).
Step 4: Install a 1/8 in.-diameter straight bit in your trim router or in a rotary tool mounted in a router base. Set the bit depth to 1/16 in. for your first pass. Clamp the nameplate securely in a bench vise so it can’t shift while you work. Adjust your router or rotary tool to its highest speed, and cut the letters (see Photo 3). Take your time and work slowly. With a bit this small and taking a light pass, feed direction isn’t a significant issue here. Use compressed air or a shop vacuum to clear away the debris as you work — it will accumulate quickly.
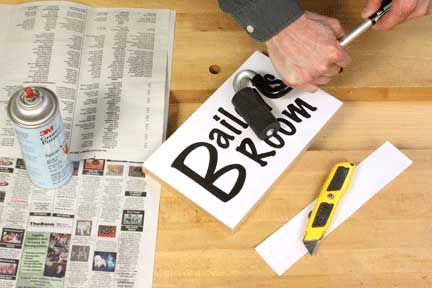
Step 5: Once you’ve trimmed the letters to shape, you can remove the paper pattern before proceeding. An easy way to do this is to flood the paper with mineral spirits and allow it to soak in for a few minutes. The pattern should lift off easily. Wipe away any adhesive residue with more mineral spirits and a soft cloth.
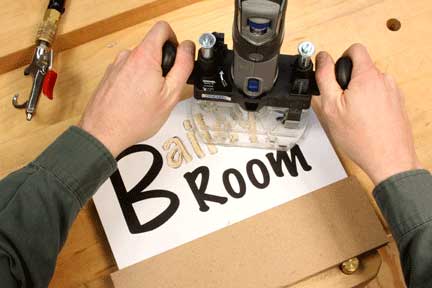
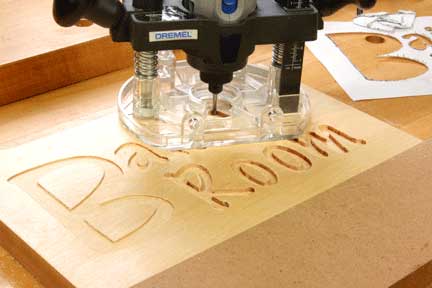
Step 6: Now reset your router bit depth to 1/8 in., and rout the letters again to deepen them for painting. Work slowly and carefully, following the edges you created in the first pass (see Photo 4).
Step 7: Once your letter-routing is finished, mill the edge profile around the face of the namplate. A roundover, chamfer, cove or even a small ogee profile would work well here. When shaping these edges, rout across the end grain first, then make the long-grain cuts to clean away any tearout that happens at the corners. Sand the profiles smooth.
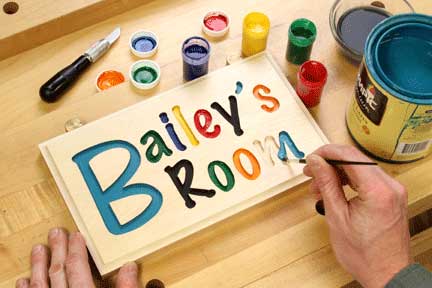
Step 8: Use a hobby knife to trim away any tiny fuzz left around the edges of the letters. Then color in the letters with bright latex or acrylic hobby paints (see Photo 5). Paint both the bottoms and sides of the letter recesses. The lacquered surface will make it easy to wipe off any excess paint.
Step 9: Install picture-hanging hardware to the back of the nameplate, or rout a keyhole slot as we show here so the nameplate can be hung by a screw (see Photo 6).

Step 10: Spray your nameplate with several more coats of lacquer to blend in the profiled edges and seal the paint. Once the finish dries, it’s ready for wrapping!


