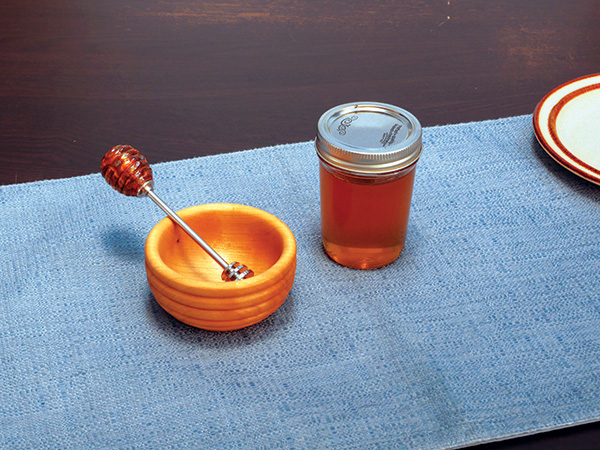
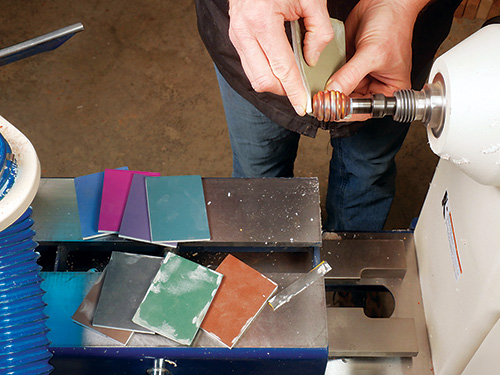
If nothing tastes better in a steaming cup of tea or on top of a slice of toast than a dollop of honey, a special honey dipper like this could sweeten how you dispense that drizzle. Rockler offers a stainless-steel honey dipper with an end that’s threaded to accept any knob or handle you can dream up. I turned mine from a block of swirly colored resin using micro tools with negative-rake carbide cutters from Easy Wood Tools. Rocker carries these tools and 1-1/2″ x 1-1/2″ x 6″-long turning blanks in a variety of fun colors and patterns.
Mounting the Blank, Roughing into Round
Let’s get this little beehive knob underway by crosscutting a 1-1/2″-long piece of resin from a longer block at the miter saw or table saw. Mark the centerpoint on one face, and drill a straight hole into the blank about 7/8″ deep. Use a 5/16″ or 19/64″ twist drill bit to bore this hole.
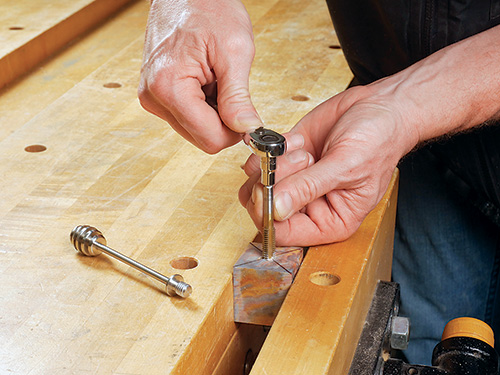
You need to thread the hole with a 3/8″-16 tap in order to mount it on the mandrel we’ll use for the turning process. Insert the tap carefully when starting the threads — it needs to be pressed and turned into the hole as straight as possible, because adjusting the tap for an out-of-straight start by prying it while you twist it in can cause the surrounding surface of the resin to chip and flake. (Don’t ask me how I know this…)
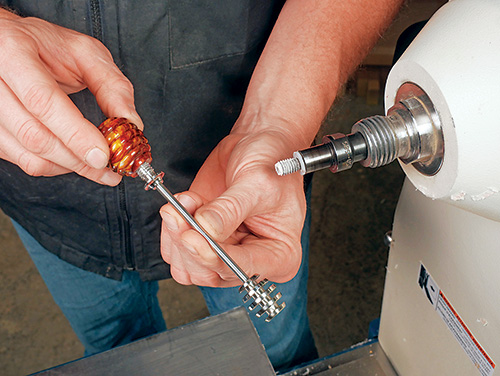
Rockler sells a steel turning mandrel specifically for making handles and knobs for honey dippers like this. Remove the larger steel sleeve that comes with it, and install the smaller of the two included plastic washers onto the threaded end. Screw the resin blank onto the threaded end of the mandrel until it’s snug against the plastic washer. Now insert the mandrel into your lathe headstock’s #2 Morse taper spindle, and tap the end of the resin blank with a rubber or deadblow mallet to seat the mandrel in the spindle.
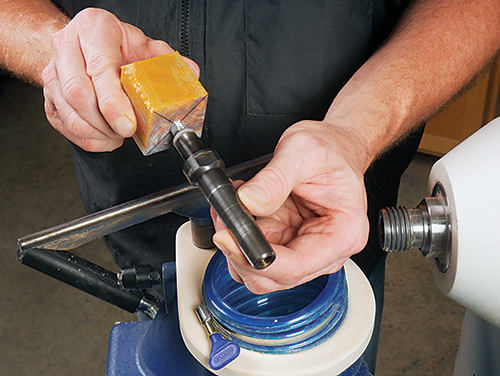
Bring up the tailstock with a live center installed in it to secure the “outboard” end of the resin blank. This will help reinforce the turning when bringing the square resin blank initially into round. Raise the tool-rest on your lathe’s banjo so the edges of your carbide-insert turning tools will be even with the lathe’s axis of rotation. I used negative-rake cutters for all of the steps to follow, and the reason for that is very simple: their top edges are beveled slightly downward to turn chip-prone resins like these smoothly and easily. Incidentally, Easy Wood Tools also recommends these cutters for turning hardwoods to help minimize tearout on tricky end grain.
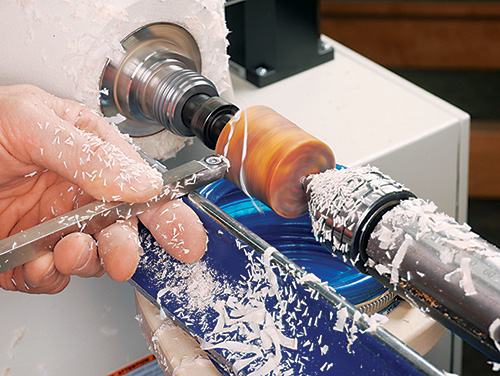
I used a carbide-insert turning tool with a gradually radiused square cutter to turn my square-edged resin blank into a 1-1/4″-diameter cylinder. Keep the handle of the tool held level with the floor when carrying out this roughing work. Be sure to wear eye protection — or better yet, a face shield — to protect your face from shards of flying resin as you carry out this step. They will be plentiful. When you reach the final diameter, go ahead and remove the tailstock. Score a line with a diamond-shaped or thin parting tool to mark the blank at 1-3/8″ long.
Shaping the Beehive
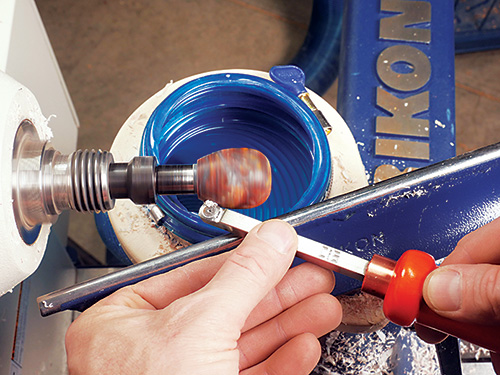
Now turn the cylinder into an ovoid shape, and reduce its length to 1-3/8″. Imagine the form of a hot-air balloon or a guitar pick when carrying out this shaping step, and taper the end that’s threaded into the mandrel until it’s nearly flush with the plastic washer.

Once round, the resin blank will turn with thin, ribbon-like shavings and tiny flakes instead of shards. Resin isn’t terribly hard, so it doesn’t require much force to shape it with sharp tools. But their cutting edges will load quickly, so dust collection helped whisk away the debris while I worked.
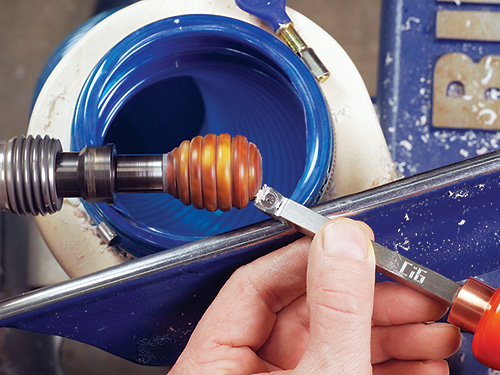
Next, with a round cutter, turn a small cove that flares out from the threaded end of the knob. Make the end of the cove flush with the mandrel washer. At this point, I used the tip of a diamond-shaped cutter to score a series of lines into the turning, stepping it off evenly from the coved to the bulbous end.
I scored each of these lines about 1/16″ deep. They’ll establish the ends of each bead that create the beehive’s outer shape. Use the corner of a square cutter, or the tip of a diamond-shaped cutter, to cut a small V-shaped notch at each scored line down to its depth.
Forming Beads, Finishing Up
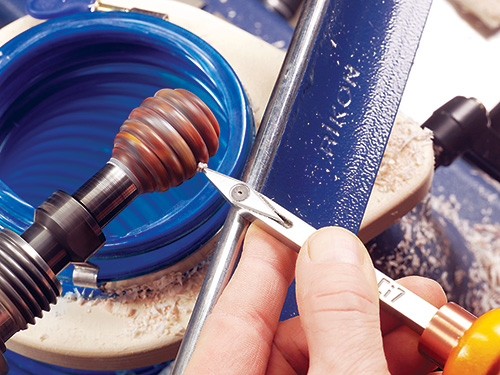
You’re ready to shape the beads with a square or slightly radiused square cutter. It’s an easy process: simply swing the cutter from the top center of each beaded area down to the “V” as you apply the cutting edge to form each half of a bead. Use a very gentle touch to prevent shortening the height of these beads — the goal here is simply to form smooth radiuses. And remember, the resin is pretty soft so changes happen fast.
Once the beads are formed, clean up the lines between them with light touches using the tip of a diamond-shaped cutter. If the beads aren’t as pronounced as you would like, you can also use the point of the tool to cut deeper valleys, then use its sharp edges to help transition the curves again. Resin isn’t wood, but that doesn’t exempt it from needing a good sanding. So, starting with 600-grit sandpaper I bought at an auto parts store, I sanded away any scratches I could see on the knob. I cut the sandpaper into narrow strips, folded over on themselves, to help “sneak” the paper down between the beads. Then I switched to foam-backed abrasives and sanded up through the grits from 1,500 to 12,000. Check your progress by wiping the turning periodically with a clean rag as it spins. You’ll see any evidence of scratches that remain as tiny white lines in the surface. Once done with that step, I polished the surfaces with Novus® #2 Fine Scratch Remover for Plastics and a clean rag, which quickly buffed the resin to a glossy sheen. If you’re satisfied with the look of the knob, carefully unscrew it from the mandrel. Thread it onto the honey dipper hardware to finish up this portion of the project.


