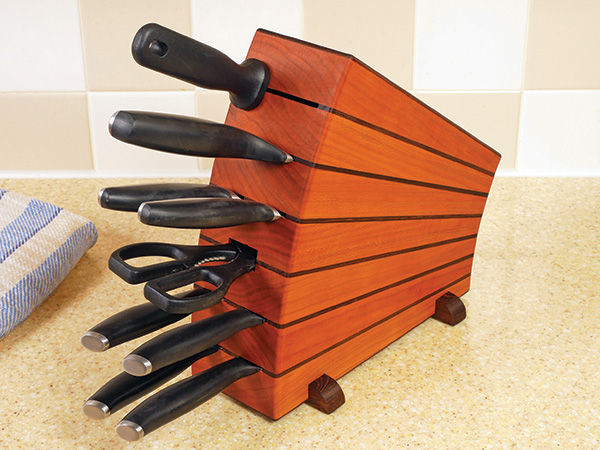
Most knife blocks included with a set of kitchen knives these days are so homogeneous, they’re downright humdrum. If you’d like one that takes up a bit less space than the usual thick block and offers some opportunity for customization, this one might fit the bill. It’s also fun to make! Mine consists of seven wedges of cherry fanned upward in a tilted stack, with 1/8″-thick layers of wenge in between. I like the contrast of these chocolaty brown “pinstripes” outlining all that cherry redness. But you could substitute any two contrasting hardwoods you prefer, provided the one you choose for the wedges can be found in 8/4 thickness. A 42″ length of 8″-wide stock or it’s equivalent will be sufficient. A piece of 4/4 stock measuring 4″ x 48″ will do for the thin laminations and feet.
This knife block will hold a typical set of kitchen cutlery — an 8″ chef knife, a serrated bread knife, a couple of smaller utility/paring knives and four steak knives, plus a sharpening steel and kitchen shears. If you have even more knives to store, you could always add more wedges or widen the block to accommodate three knives widthwise instead of two, as it’s laid out here. Feel free to modify the design to suit your needs.
Time for Some Tapering
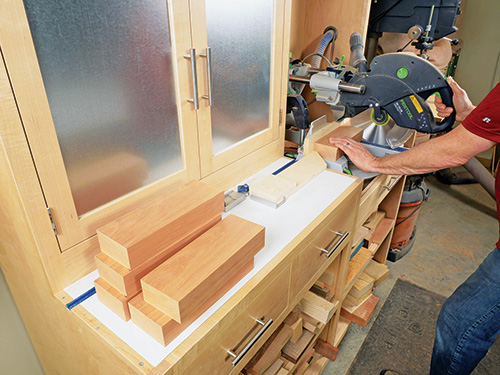
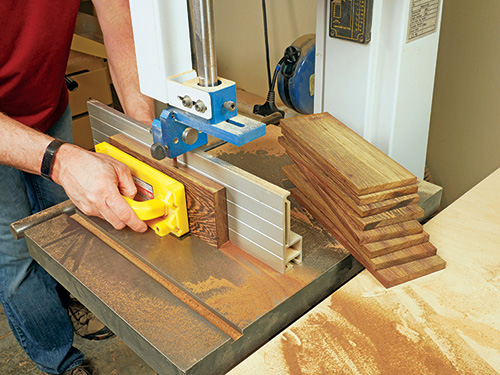
The first order of business is to create the knife block’s seven primary wedges. I ripped my 8/4 cherry into long 3-5/8″-wide strips, flattened one face of each strip on the jointer and then ran them through the planer to create parallel faces. Try to keep this stock nearly a full 2″ thick. Then crosscut the workpieces into eight 10-1/4″-long blanks (one becomes a test piece).
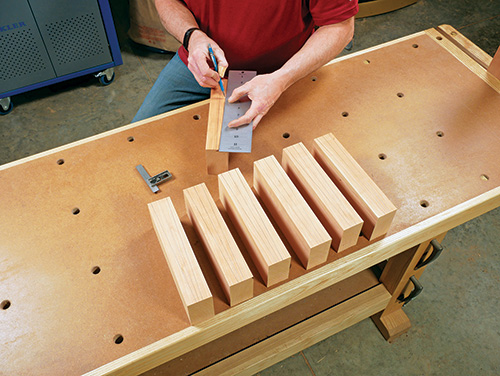
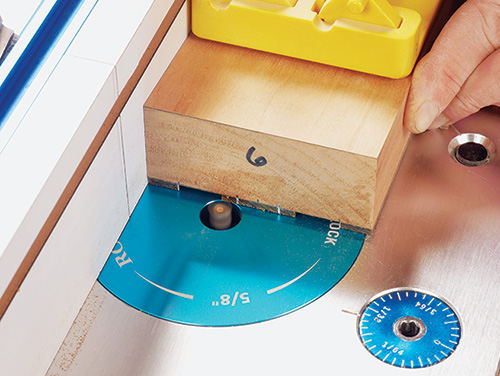
The reason why it’s good to keep these wedge blanks nice and thick is that it will make them easier to clamp upright in your tapering jig for the next step — turning them into wedges. Start by marking a centerline along one edge of each blank, dividing it lengthwise. Now mark two taper lines on either side of the centerline that reduce the blanks from 1-3/8″ thick on one end to 1/2″ at the other end.
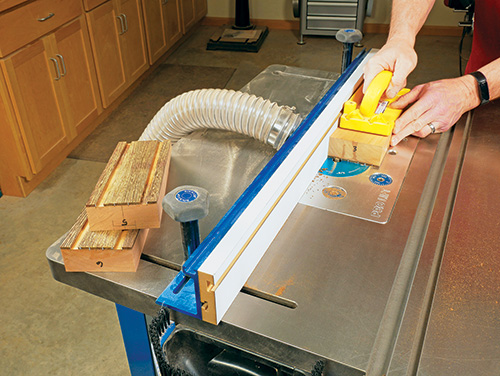
I used Rockler’s Small Parts Taper Jig retrofitted with a pair of Rockler’s long aluminum Hold Down Clamps I had on hand to cut the blanks into wedge shapes. The jig is small enough to accommodate blanks of this length, and the longer clamps pinned them down securely beside the jig’s fence to keep my hands safely clear of my band saw blade. After adjusting the taper jig’s fence to the correct angle, and setting it so that my blade would cut just to the waste side of the layout line, I sliced one face off of the test blank. Make any adjustments, if needed, then cut one face off the other seven blanks, too. After round one of these cuts, I flattened all the cut faces up to the layout lines with several passes on the jointer.
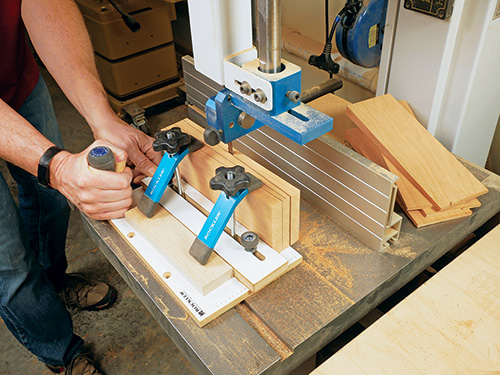
You’ll need to reset the taper jig to cut the second angled faces of the wedge blanks. I also reversed the direction of the blanks from the wide end oriented toward the back of my jig for the first cut to the narrow end of the blanks for the second cut. That arrangement enabled me to keep the majority of wedge shape positioned on top of the jig and securely clamped. When the second faces are cut, head back to the jointer again to flatten them further and remove any waste beyond the layout lines.
Preparing Thin Laminations
You’ll need eight 1/8″-thick “pinstripe” laminations for the knife block, and here’s how I approached the task. I first ripped and crosscut four 3-5/8″ x 10-1/4″ workpieces to size from my 4/4 wenge stock, then resawed them down the middle to produce eight blanks. I had hoped that these workpieces could have yielded three pinstripe layers per blank instead of just two, by making two resaw cuts instead of one, but a couple of test cuts on a scrap piece of wenge proved that cupping or bowing was going to be an issue when the stock was resawn really thin. So I abandoned that option in favor of one resaw cut per blank. Due to the variable nature of wood, sometimes we have to waste a little stock in order to come out ahead with the workpieces we actually need to make, and this was one of those occasions.
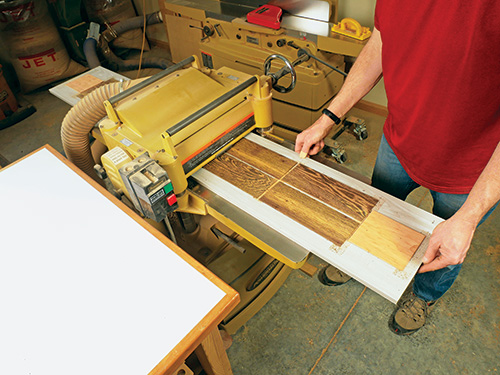
To bring those overly thick laminations down to their final 1/8″ dimension, I needed a way to send all eight through my thickness planer safely. A length of 3/4″ melamine shelf board was the ticket. Using double-sided carpet tape, I adhered all the wenge blanks to the melamine with their jointed faces down (and sawn faces up) so the shelf could act as a carrier board through the planer. It’s never safe to feed stock much thinnerthan about 3/8″ through a surface planer by itself, because at some point it becomes too thin to remain flat. Pressure from the feed rollers could cause the end of the stock to bow upward, get caught in the planer’s cutterhead and shatter — not what you want to have happen! Several passes of the carrier board through the planer reduced the wenge to 1/8″ in a safe and controlled fashion. Just don’t skimp on the tape, and keep each planing pass relatively light, skimming off material in shallow passes.
Once the wenge was pried free of the carrier board, I removed all traces of the tape adhesive, then glued a “pinstripe” layer to one face of six of the wedges. For the seventh wedge that would become the top of the knife block, I glued a wenge layer to both faces instead.
Laying Out and Routing Knife Slots
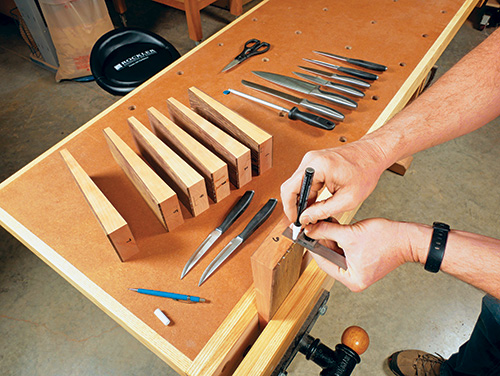
Except for a couple of larger slots that will be required to store a sharpening steel (it’s a 7/16″-square slot for mine) and shears (that one is 5/8″ x 1-1/8″ for the one in my knife set), all the knife slots need only be 1/8″ tall to accommodate typical knife blade Their widths will vary, based on the specific knife styles you own. I routed all the knife slots into the wenge layers only. For the sharpening steel and shears slots, I centered them on the wenge layers and extended the openings into the cherry wedges above and below evenly.
Lay out a slot for each knife on the ends of the wedges. Determine a slot arrangement that maximizes space and groups like knives together. Plan for two knives per pinstripe layer when possible, but keep in mind that the wenge that remains in between and outside of the blade slots is the only material that will glue one wedge to the next.
To rout the knife slots, I used a 3/8″ straight bit, raised 1/8″ above the table. My router table fence guided each of these groove cuts, with the slots extending the full length of the wedges. Try to group your routing passes to take advantage of the same fence setting when you can, even if that means routing a couple of passes on one wedge, then jumping to another wedge out of sequence. It will add efficiency to the whole process. Also, be mindful of the following safety rule: When you’re widening a groove that requires more than one routing pass, set up your cuts so that each pass after the first requires you to move the fence backward, away from the bit. That way, the bit will continue to remove material against its rotation on the side of the slot closest to you (in front). If you find yourself needing to move the fence toward the bit instead, you’ll be cutting the back side of the slot and with the bit’s rotation, which is unsafe. That’s a climb cut situation, and it could cause the bit to grab the stock and pull it through at great speed, potentially resulting in a loss of your control over it.
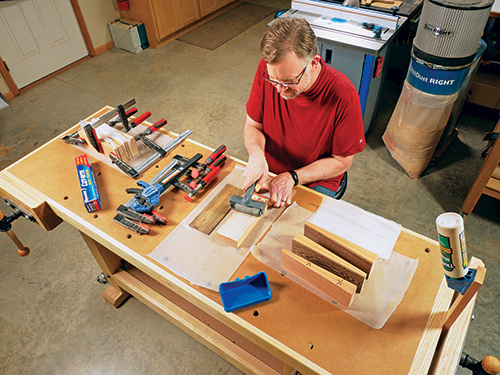
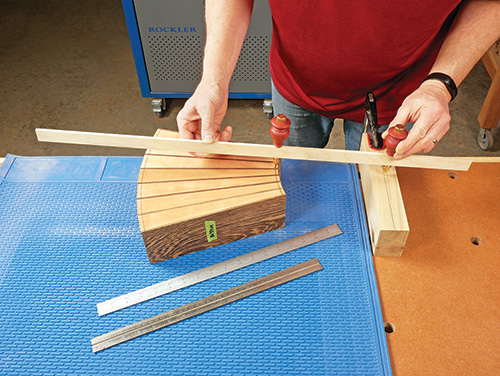
Gluing up the Wedges, One Joint at a Time
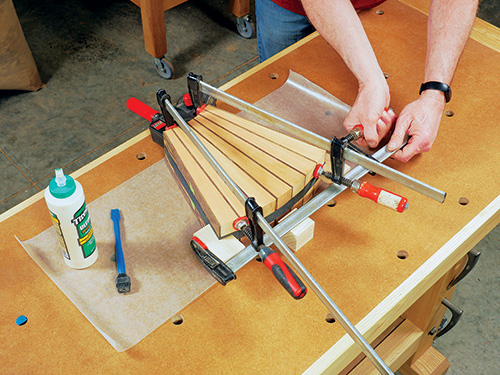
Wedge-shaped workpieces are difficult to glue together, because it’s challenging to apply clamping force uniformly. Here’s how I made the process easier for this situation. I used a strap clamp around the entire assembly, and I glued only two wedges together at a time. If you try to glue all seven at once, they’ll invariably slide out of registration with one another when you tighten the clamps, and the glue is still acting as a lubricant before it tacks up.
I also fashioned a couple of angled scrap blocks and taped them to the jaw faces of a long F-style clamp. That way, the clamp could apply lateral pressure across the wide end of the block where the strap clamp seemed to offer the least effective pressure. I also found it helpful to install a couple more bar clamps at the joints between the first/second and sixth/seventh wedges. These joints often wanted to slide out of alignment, but the clamps prevented that from happening. If the faces of the wedges/pinstripes are flat, it doesn’t take Herculean force to create tight glue seams, but a few well-placed clamps sure helps.
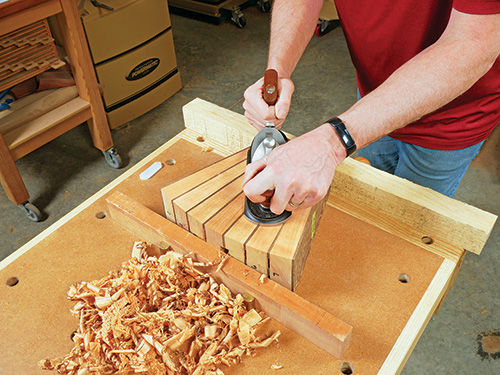
Final Block Shaping
Once all the wedges are assembled and the glue is dry, flatten the faces of your knife block and bring its overall width down to 3-1/2″, either by sending it through your thickness planer or with a hand plane, as I did.
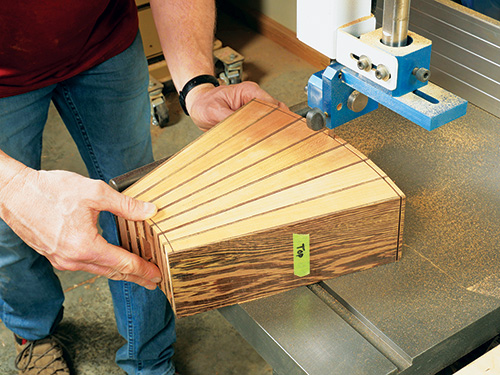
The narrow and wide ends of the block also probably will have small misalignments between the layers, but no worries. Just use a flexible batten or trammel points to draw two radii on the blank — one near the narrow end and one at the wide end.
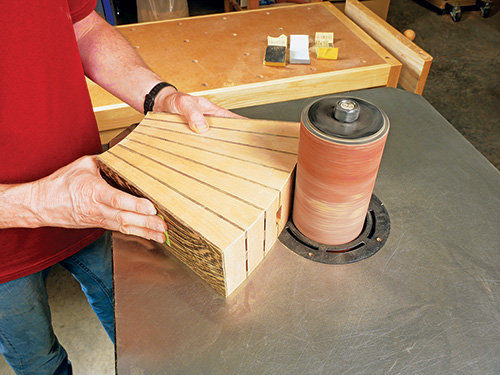
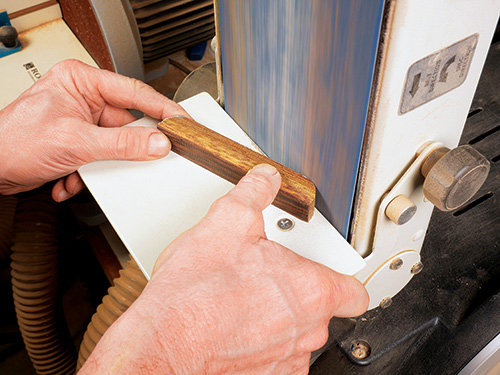
I set the overall length of my knife block at 9-3/4″, using radii of 8-1/4″ and 18″ to create concentric curves. Trim off the excess ends of the block at the band saw, then smooth the cuts with a curved sanding block or on a spindle sander with a large-diameter spindle. I also eased all the sharp edges of the knife block with a 1/8″ roundover bit in a handheld router. I touched up these little details with some hand-sanding.
Adding Feet and a Renewable Finish
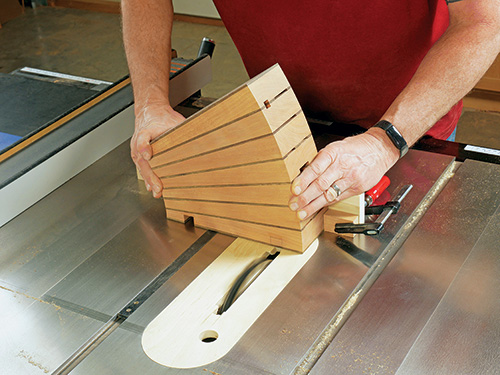
A couple of feet underneath your knife block will make it even more tip-resistant, lift it slightly up off the counter and add an attractive design element. Using a 3/4″-wide dado blade in your table saw, raised to 5/8″, plow a pair of dadoes across the bottom wedge.
I located these cuts 1-3/8″ in from each end of the block. The feet are simply 5″-long “sticks” of 3/4″ x 3/4″ wenge, with their top corners cut and sanded to 5/8″ radii.
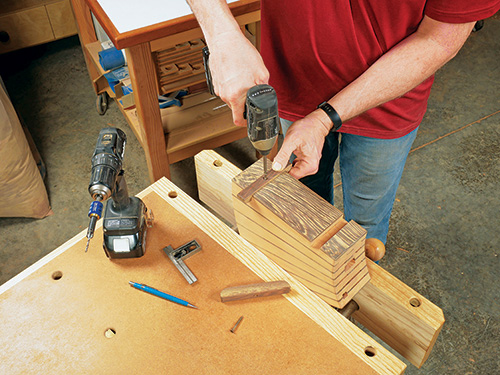
Center the feet lengthwise in the dadoes so they extend out evenly on both sides. Attach each foot to the blank with a single #8 x 1-1/2″ flathead wood screw driven into a countersunk pilot hole.

Any oil/varnish blend would be a good choice for finishing this knife block because it will enhance the color of the wood while also adding a degree of protection from cooking spatters and spills. I wiped on three coats, allowing each coat to dry thoroughly before reapplying. Once the finish cures, this attractive kitchen accent is ready to display your cutlery in style!


