
Building this four-shelf bookcase doesn’t require high-level skills or fancy lumber to add practical, sturdy storage to any room. In fact, if you have a circular saw, router, doweling jig and a sander, you have all the power tools you’ll need. Gather three 8-ft. 1x2s and four 8-ft. 1x4s of red oak from a home center or lumberyard. Make sure the stock is as straight and flat as possible. And while you are at the store, buy a 2 x 4-ft. piece of 3/4″ red oak plywood for the shelves.
Making Side Assemblies
Start by crosscutting four legs to length from 1x4s, according to the Material List. Be sure to make clean, square cuts with your circular saw. Then crosscut four side rails to length from another 1×4. Measure 3″ up from the bottoms of the legs to mark for the bottom edge of the bottom rails.
Mark 1″ in from this edge along the bottom end of the legs, and connect the marks to draw layout lines for the angled “feet” on the bottoms of the legs. Cut the feet to shape. Then miter-cut the top front corners of the front legs at a 45° angle, sizing this cut at 1-3⁄4″ from both the leg’s top end and front edge.
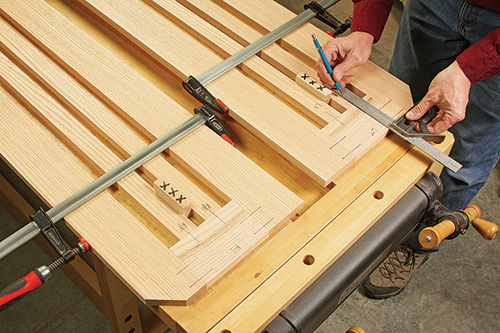
Next, set and clamp pairs of legs and rails together, with the rails positioned between the legs so the top rail is flush with the tops of the legs and the bottom rail’s bottom edge aligns with the angled intersection of the feet. Carefully measure between the inside edges of the rails to determine the final length of the side stiles. Crosscut four side stiles to final length from 1x2s.
You’re ready to mark the ends of the rails and the inside edges of the legs for dowel joints. Plan for two 5/16″-dia. dowels per joint. Position them 1-1⁄4″ apart, 1/2″ down from the top edge of the top rail and 3/8″ down from the top edge of the bottom rail. This way, the dowels will stay clear of the dadoes you will mill later for the shelves.
With that done, mark the inside facing edges of the rails for the side stile dowel joints. Here, the stiles will attach to the rails with a single 5/16″-dia. dowel at each end. Locate these dowels 1-3⁄4″ in from the ends of the rails, and center each of them on the stiles.
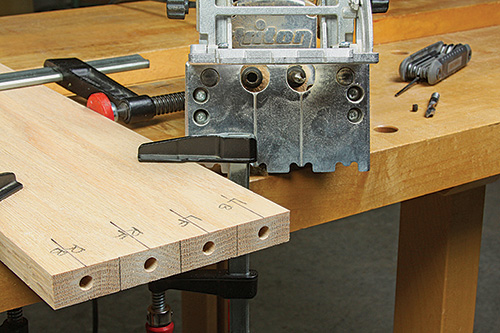
It’s always a good idea to mark the parts of an assembly to keep the orientation clear, so do that for your bookcase sides. Now bore 5/16″ dowel holes in the legs, rails and stiles at your marked locations. Drill each of the dowel holes slightly deeper than half the length of your dowel pins so they will fit in the joints without bottoming out in the holes, which could prevent the joints from closing properly.
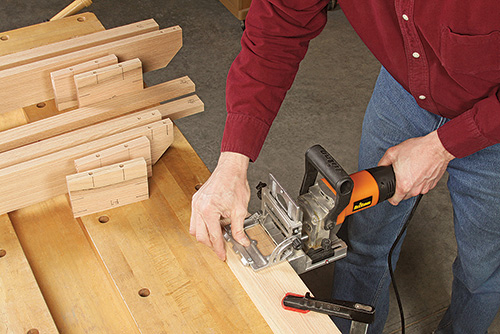
Take a few minutes to sand the inside edges of the legs, rails and stiles up to 180-grit, while the part surfaces are still easy to access. Then dryfit the two side assemblies together, with the dowels in place, to be sure the parts go together well. If they do, spread glue into the dowel holes and onto the mating surfaces of the joints for one side assembly. Insert the dowels, fit the parts together and clamp the side assembly so the joints close. Be sure to glue the stiles between the rails first, and then add the legs. Clean away any glue squeeze-out.
Repeat the process to glue up the second side assembly. When the glue dries, sand or scrape any misalignments between the joints flat. Then sand these assemblies up to 180 grit.
Adding the Shelves
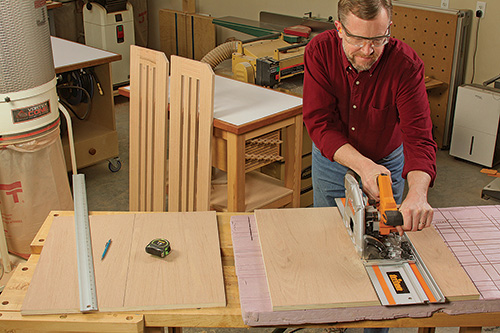
Next, cut four shelves to size from 3/4″ plywood. If you use a 2 x 4-ft. sheet, you’ll be able to get all four shelves from one piece of plywood.
Lay both side assemblies flat with their back edges together, and mark the back legs for the four shelf dado locations. Marking them simultaneously guarantees that the shelves will line up. Make two layout marks for each shelf, 3/4″ apart, so you’ll be sure to cut the dadoes between these lines.
The shelf dadoes must stop 1″ from the front edges of the front legs. So, mark a termination line at the end of each dado location to be sure you’ll stop these dado cuts correctly.

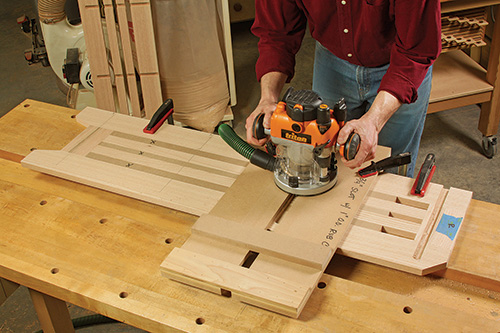
Three-quarter-inch plywood is almost always 23/32″ thick instead of a full 3/4″, but you can buy an “underthickness” 23/32″-diameter straight bit for a router that will cut perfectly fitting dadoes for 3/4″ plywood. It’s a helpful bit to own here. I’ll recommend that you make a simple slotted jig from scrap, to guide the router during dadoing.
It has a 1″-wide slot to accommodate a 1″ outside diameter guide collar, fixed to the router’s base. The jig’s base squares it against the bookcase side assemblies. Align and clamp the jig carefully to cut each dado. Rout the dadoes in three successive passes each, deepening the cut by 1/8″ with each pass. Their overall depth should be 3/8″. TIP: Slip scraps between the side stiles to fill the slots between them during dadoing. This will prevent the router bit from splintering the back edges of the stiles as it passes through them.
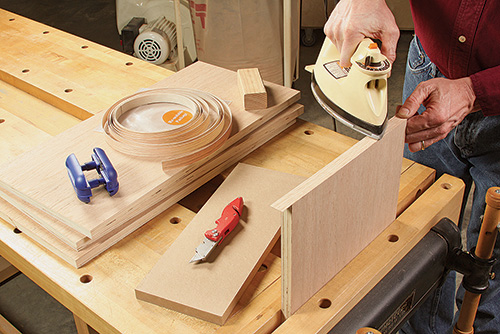
The ends of the two middle shelves will show their plywood cores in the gaps between the side stiles unless you cover them. The easy fix is to apply adhesive-backed iron-on red oak veneer edge tape to the edges of these shelves. While you’re at it, apply a strip of edge tape to the back edges of all four shelves, so the edge plys won’t show up on the back of the bookcase, either. Carefully trim the edges and ends of the veneer tape flush with the shelves.
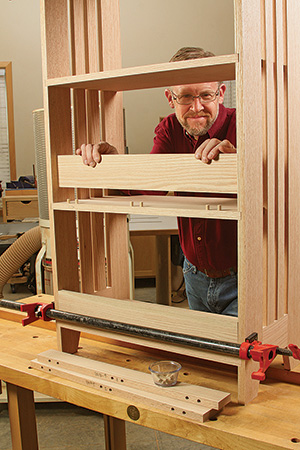
Now, go ahead and dry-assemble and clamp the bookcase with the four shelves in their dadoes. This way, you can measure for and crosscut three lengths of 1×4 to serve as vertical backs for the bottom three shelves. Rip a fourth strip of 1×4 to 2-1⁄4″ wide, which serves as a narrower back for the top shelf. Crosscut it to length and test-fit it, too. Dismantle the bookcase.
Sand the faces of the shelf backs and shelves up to 180 grit. Then lay out three pairs of dowel joints between the bottom edges of the shelf backs and the top faces of the shelves along their back edges. Drill these dowel holes. Be careful to adjust your dowel hole depths to avoid drilling through the shelves.
Reassemble the bookcase to make sure the shelves and shelf backs fit properly together with the dowels in place. If they do, glue and clamp the backs to the shelves — but don’t glue the shelves in their dadoes just yet.
The front edges of the shelves are covered by strips of solid oak trim, to add durability here. Cut strips of 1×2 to fit the shelves and, if possible, rip-cut them to 3/4″ x 3/4″. (Alternatively, if you don’t have a table saw to make these narrow rip cuts, you can glue 1x2s to the shelves first, then rip the front trim to 3/4″ with your circular saw after the glue dries.) Spread glue along the front edge of each shelf, and install its trim strip with the bookcase still dry-assembled. Hold the trim strips in position with clamps or strips of wide packing or painter’s tape while the glue dries.
Finishing Up
Take the bookcase apart and carefully plane or sand the front trim on the shelves flush with the shelf faces as needed, as well as to clean off any residual glue. Then ease the sharp edges around the side assemblies with a chamfering bit in a router. Keep these chamfers small, at just 1/16″ or so, to add a subtle detail. Then cut a 1/8″-wide chamfer around the inside edges of the stiles and rails — it adds a nice shadow line here and makes the sides of the bookcase look less “cookie cutter.” The router bit will leave the corners of these inner chamfers rounded. So, carefully chisel the corners square. Use the same larger chamfer along the front edges of the shelves.
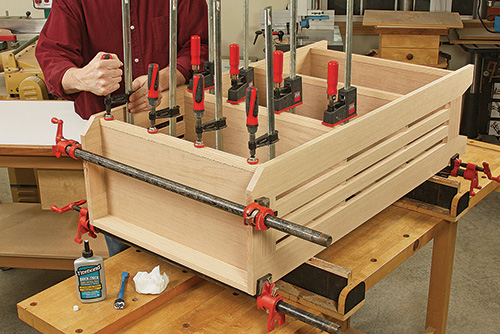
With that done, you can finally glue and clamp the bookcase together! Make sure the shelves seat fully in their dadoes. You may also want to clamp the stiles where they attach to the middle two shelves; narrower, long bar clamps will fit between the stiles and pull these joints tight.
Arts & Crafts-inspired bookcases of this sort will typically be stained a dark “Mission” brown or antique walnut color. Once you’ve colored the wood with the stain of your choice, apply three coats of your favorite clear finish to complete this project.
Hard to Find Hardware
Rockler Undersized Plywood Router Bit Set #60788
Red Oak Hot Melt Edge Banding, 13/16″ x 25′ #44805
FastCap Quad Edge Banding Trimmer #45318


