This “stand up” desk is the final piece you make in the Way to Woodwork DVD series. The program is my solution to bringing together two different approaches to learning the craft of furniture making. I’ll call one “the European method.” Here, the student is left in no doubt that he or she is a novice and the teaching focuses on techniques and practicing them. Enough practice and enough technique will, in the end, add up to achieving the skill set needed to make a piece of furniture. The other approach is the “American method.” Here, the neophyte arrives in the shop and explains the desire to build, “this simple 12-drawer chest-on-chest with a serpentine bow front of fiddleback maple.” Both narratives are, of course, allegorical — but you get the point. Each has merit, but how to combine them?
My answer is to begin with a simple piece of work which you will carry out of the shop that embodies an essential technique. The second simple piece introduces a second essential technique, but it includes what was learned in the first piece. The third introduces another technique, but includes what was learned in making one and two…and so it goes on.
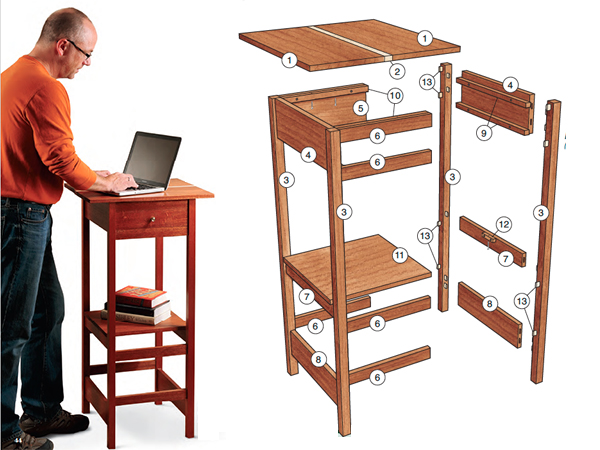
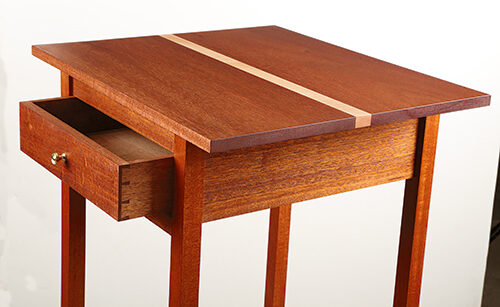
The desk, the final piece in the program, is designed to include a drawer. Because making the drawer is the focus, everything else is contrived to get you to that step with as little fuss as possible. The top does have a little flourish in it, but the legs are straight and square in section. The rails are rectangular in section and of two different widths. They are positioned with deliberate attention to the spaces between and are offset so that joining is simplified.
The drawer is made using the classic method of solid wood handmade drawermaking. It represents the furniture maker’s craft at its best. There are over 30 steps involved in its making and assembly. It contains, arguably, more methodological and technical challenges than any other piece of furniture making.
The Top
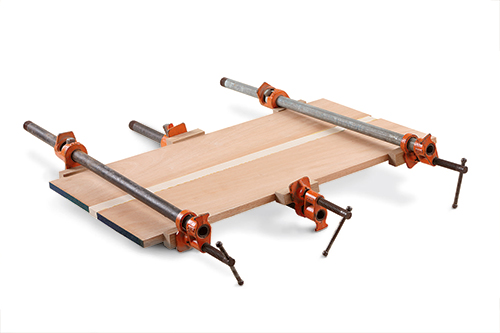
The relief strip of curly maple in the top serves two purposes. It brings a wood grain interest into an otherwise purposefully chosen quartersawn, straight grained, undistinguished piece of mahogany. As well, its white color brings a surprising measure of lightness into the composition of the whole. There are alternative ways to plane the butt joints. Probably, the best way is to plane the joint by clamping the pieces together. First, clamp a piece of mahogany on edge in the vise and then clamp the maple to it using small “C” clamps; then shoot the combined edges in the normal way using an 07 plane.
The Desk Frame
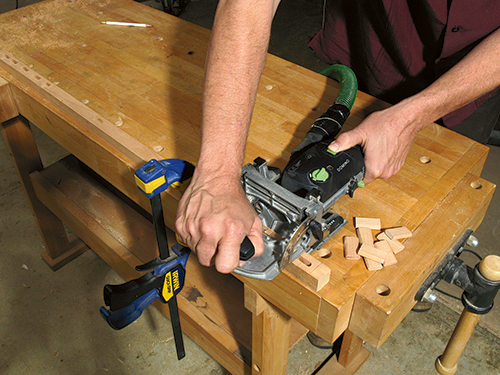
The legs and rails of the desk would typically be put together using mortise-and-tenon joints. I used loose tenons, part of the Festool Domino system. A loose tenon is an excellent alternate form of a mortise-and-tenon. Instead of a peg fashioned on one piece (the tenon), which goes into a mating hole (the mortise), a slot is cut into both pieces and a third piece, the loose tenon, is made to fit the combined slots. This joint is outside the reach of normal bench hand tools. What is required to make the slots is a fast-spinning bit machined to side cut in long grain and end grain, leaving smooth parallel faces and ends.
If you read this site regularly, I’m sure you are familiar with the Festool Domino machine. I’ve used it a great deal but never written about it. To put it in a nutshell, the tool is transformational — bringing about a sea change for furniture makers. What Festool has done is make a hand tool that, when you plunge it into the workpiece, it machines a perfect slot for a loose tenon. As well, they make the loose tenons (“Dominos”). They are made in various sizes to mate with cutter diameters, from European beech, a strong, stable wood that glues well. The dimension of the Domino is imprinted into the beech, and the edges are reeded to fit the rounded ends of the slot and allow excess glue to escape.
Using the tool is largely intuitive. Setting the horizontal fence to position the cut and the stop to limit the depth of plunge are straightforward. Marking the joint is best done by squaring a clean, sharp pencil line on the joint center point on both workpieces. The horizontal fence is designed so that you can easily see the center line and position the tool right on it. Whatever you do, clamp the workpiece to the bench. In this way, you can hold the tool firmly in place to feel the contact of the vertical and horizontal fences. This setup provides all the stability needed as you plunge the cutter to make a clean, accurate slot.
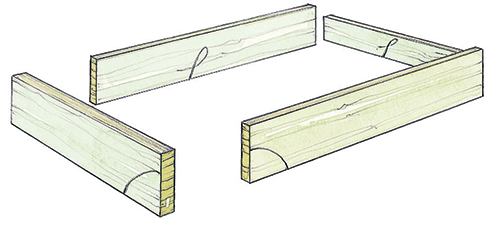
The layout of the rails on the leg is well-shown on the Drawings. If you begin by laying out one of the side subassemblies on your workbench — a front and back leg and the three rails — you will quickly see the simplicity of the structure. Go ahead and cut mortises for the rails as shown.
After a proper test fit, glue and clamp each side subassembly together. This sequence makes it easy to then join the two side subassemblies with the remaining rails. If you are using a Domino machine, you will need to adjust the fence to accommodate the difference between thicknesses of the legs and rails.
With that done, glue in place the top ledgers and the drawer guides.
The Drawer
More than once I’ve written and illustrated the “how to” of making a handmade drawer — come to think of it, I even made a video of the process. Many times I’ve taught it in the workshop, but it’s taken me till now to write down the road map of the work.
For those woodworkers who revere hand tools and their use, a handmade drawer is the “pièce de résistance” (the best item) of hand tool furniture making. Very soon it may be your “raison d’être” (reason for existence — purpose or cause) as machines take over every other facet of small-shop furniture making. These French expressions, rather than a string of superlatives, make the point that a handmade drawer is unique in the craft of furniture making.
In use, the auditory and tactile experience of opening and closing the drawer confirms that singularity.
The road map doesn’t tell you how to do the work. It tells you the steps and in what order to make them. Knowing the steps allows you to do some preparation. I’m bound to say that if you decide to make this drawer without practicing some of its parts, the end result is likely to come with a good deal of defensive excuses. A good practice, for instance, would be to join four pieces — a front, sides and back — without fitting those parts to a case and with no intention of making a bottom.
Drawer Details
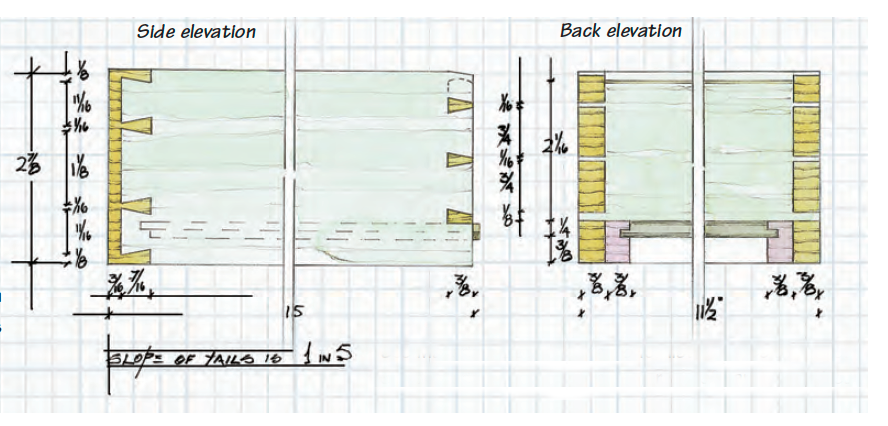
These dimensions make for elegant-looking and refined front and back joints. The hidden detail, the shape described with broken lines, shows the groove. The groove in the front accepts the tongue of the rabbet on the drawer bottom, which is aligned with the lower edge of the back.
Road Map to a Handmade Drawer
Preparation
Front and Back: Plane the ends and bottom edges to a tight fit in the case opening. Leave the top edge of the front 1/32″ proud. Plane the machine marks off the inside faces. Sides: Plane the width to be a push fit in the case. Square the ends and make the same length. Plane the machine marks off the inside faces.
Joints
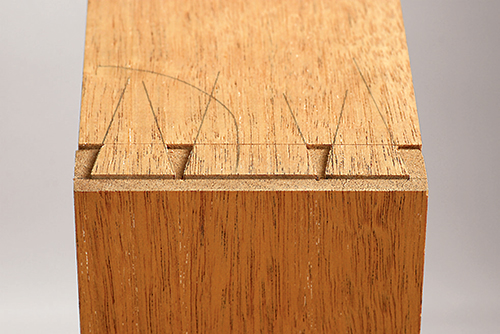
Front: Mark and cut the single-lap dovetail to join the front and the sides. Groove the front to accept the bottom.
Back: Mark and cut the through dovetail which is positioned as a result of the groove in the front piece.
Finish Insides and Glue Joints:
Wax and polish the inside faces, leaving bare the area where the drawer slips go. Glue and clamp the joints.
Bottom
Drawer Slips: Make and attach slips to drawer sides.
Bottom: Make necessary butt joints and thickness to 1/4″ thick.
First Rabbet: Plane one edge of the bottom straight. Mark and cut the rabbet to fit the drawer slip groove. Tongue goes on the bottom face.
Second Rabbet: Insert first rabbet into the drawer slip and knife the shoulder of the second rabbet. Cut bottom to width and make rabbet. Tongue goes on the bottom face. Slide the bottom in place. Plane the front edge to be parallel to the drawer front.
Third Rabbet: Rabbet the front edge. Tongue goes on the top face.
Back Edge: Plane the back edge to 1/4″ overhang.
Fit the Drawer
Bottom Edges: Plane the drawer slips flush to the bottoms of the sides.
Sides: Plane the sides to meet the end grain of the dovetail joints and fit the drawer to the case. Front: Plane the top edge to fit the case.
Drawer Stop
Make and fit the drawer stop. Plane the drawer face parallel to the edges of the case.
Last Touch
The sides and bottom edges on a handmade drawer are not sanded or polished. They are rubbed lightly with paraffin wax, then buffed as though to wipe off all traces of the wax.
Marking Out and Cutting the Joints
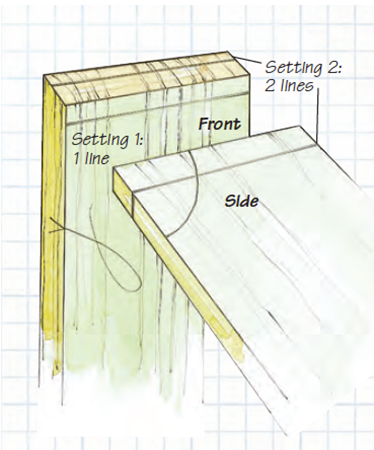
The single-lap joint on the drawer front is marked out by two gauge settings and three gauge lines. The first setting (1/32″ less than the thickness of the side) determines how far the tails stand proud of the pins. The second setting determines the length of the tails and, at the same time, the thickness of the end wall.
Making and Fitting the Parts
Even with only four parts, keeping track of what goes where is impossible without a marking system. This system uses fewer marks than any I’ve seen. The four marks you see on the illustration are all you need to keep order, except to know that the face side marks go inside and down and the quadrant marks meet. Precisely fitted drawers begin by taking the time to fit all four parts to the case opening before you join them. With that said, let’s move on to the first of the steps.
1. Fit the front: Plane one end of the front to fit the case. Check the fit by offering the front at an angle: the goal is an exact reflection of the opening. Crosscut the other end as close as you can and plane it to fit the opening. Go too far and the front will be too short. A prudent approach is to take a shaving off the inside edges, so the wood has a minute taper toward the inside — that is, the face side. Assuming the case has straight sides, the front now fits on three sides. Leave the top edge proud by 1/16″.
2. Fit the back: Fit the ends of the back in the opening, just like the front. To do this, the bottom edge should sit on the bottom of the case with about a 7/8″ gap at the top. Make sure the face side is looking at you as you fit the back because that’s how it goes in the case.
3. Fit the sides: Square the ends and cut to length. Plane the top edge until the side is a push-fit that enters halfway or better. To check that you are planing parallel, turn the side around and enter the front end first: it should slide with the same push-fit.
4. Clean up the inside faces: Plane mill marks from the inside faces before you lay out the dovetails. Mill marks must be removed in preparation for polishing later; the outside faces don’t get polished.
Although all steps are critical, this one may not be obviously so. If you plane the inside of the pin pieces — that is, the drawer front and back — after you’ve cut the joints, they become smaller and therefore loose.
Jointing the Parts
A handmade drawer demonstrates the logic of initially making the joints with the end grain of the pins left below the long grain surface of the sides. You make the front and back of the drawer to fit the drawer opening, then you make the sides so they’re proud of the end grain. In short, the drawer is too big for the opening. But once you plane the sides down to the end grain of the front and back — which act as precise signposts — the drawer fits perfectly!
5. Mark out and cut the single-lap dovetail front joints:
Setting 1
Set your cutting gauge less than the thickness of the side by about 1/32″. This is the amount by which the tails will sit proud of the pins. Knife this setting on the face side of the drawer front.
Setting 2
The second gauge setting determines the length of the tails and, at the same time, the thickness of the end wall. Knife down the end grain of the drawer front and knife around the end of the drawer sides. Lay out the tail piece as per the drawing. Cut the tails as if you were making a through dovetail.
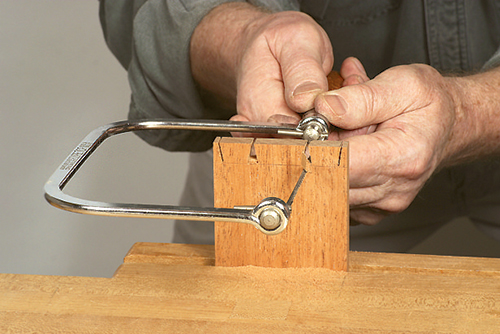
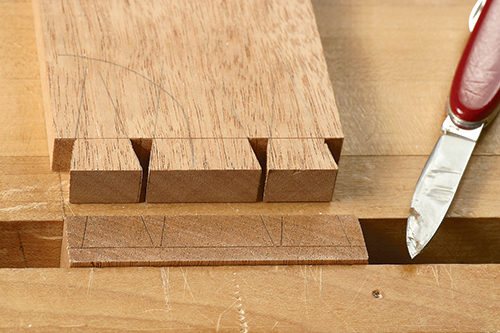
Mark the pins from the tails by clamping the pin piece in the vise so that it protrudes about 1/8″. Position the tail piece to the lap gauge line and align the bottom edges flush. Mark the tails as for a through joint.
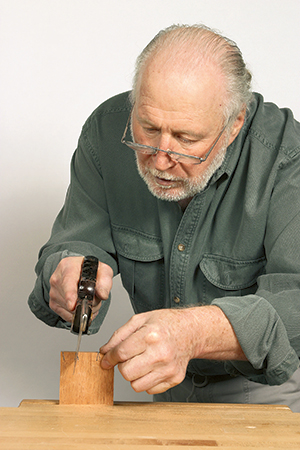
Sawing the pins introduces a new technique. Start the cut on the corner nearest you. Saw across the end grain to establish the correct line, then saw down the vertical line. Avoid wandering in the first line to prevent ragging out the kerf.
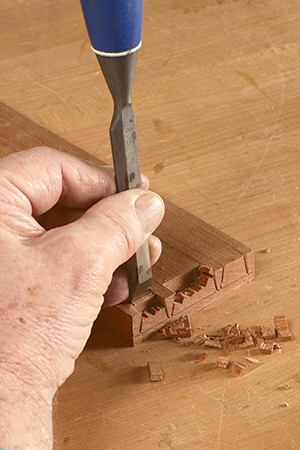
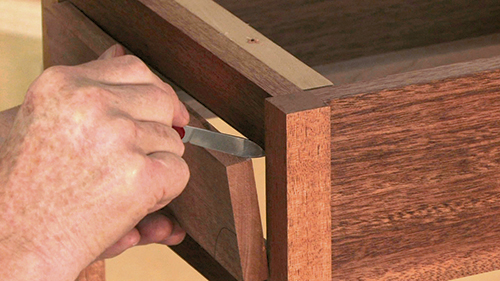
Next, chop out the waste with a chisel and mallet. This is one of the rare woodworking procedures best done sitting down. I use a sawhorse. Lay the drawer front on the bench and, using the widest chisel that will fit between the saw kerfs, begin to chop by positioning the chisel about halfway down the joint. The first piece will come flying out. Make two or three more chops towards the knife line, but keep off the line by about 1/16″.
Next, clamp the drawer front upright in the vise and, slice by slice, cut down vertically with gentle mallet blows. With the bulk of the waste removed, pare to the knife lines by hand.

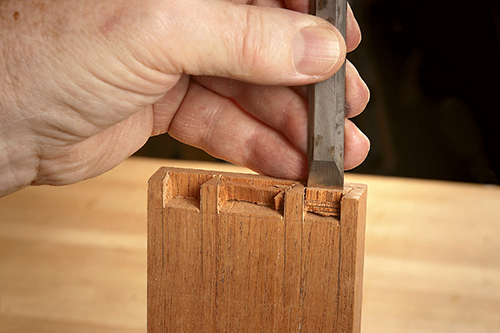
You can’t remove the waste from the corners until the end grain fibers have been severed. Do this on each side with a skew chisel — 1/4″ chisels ground and sharpened to the angle of the tail. Now, by judicious paring, you can clean out the corner waste.
Assemble the two parts using a hammer. With a hammer, you can direct the blows and easily tell which, if any, tail is too tight. By comparison, a mallet will damage the surface of the joint. The surface which is sitting above the end grain is what will later be planed off to make the drawer fit.
6. Cut the groove in the front for the drawer bottom: The groove is easiest cut on a table saw using a 1/8″ kerf blade. It goes through a tail socket so it’s not visible on the side of the drawer. Leave 3/8″ below the 1/8″ groove.
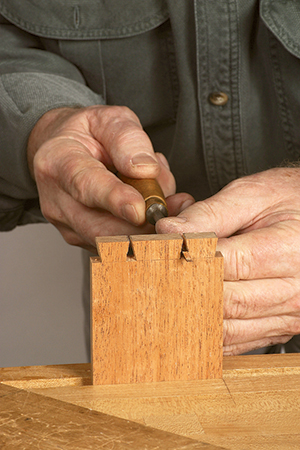
7. Locate the back joints: The top edge of the groove is the line of the bottom edge of the back. Set a marking gauge to the top edge of the groove and gauge the back end of the sides to indicate the first pin in laying out the back joint.
8. Mark out and cut the through dovetail back joints: The bottom pin socket on the back is dovetailed on one edge only. This avoids unnecessary fussing with measurements to position the back so that the bottom can slide past it. Take your measurements from the drawing and cut the through dovetail joints.
9. Radius top edge of the back: Use a plane to gently curve the edge of the back. You may wish to finger gauge pencil lines down each side 1/16″ from the edge as a guide and another down the center of the edge — this line comes off last. Getting a symmetrical curve in this manner is a nice exercise in plane craft.
Polishing and Gluing the Parts
For me, “polish” means apply shellac and wax — the traditional Arts and Crafts finish.
10. Polish the inside faces: Be careful not to get any wax on the joints or the lower surfaces where the drawer slip gets glued.
11. Glue up the joints: Using a shaped wooden paddle, wet all the mating surfaces with glue, but do so sparingly to minimize squeeze-out. Assemble the parts, tap the tails down with a hammer, then close each set of tails one by one by nipping with a bar clamp. Clamping blocks are unnecessary because the faces of the sides stand proud of the ends of the pins. If the joints are as tight as they should be, there’s no need to leave the work in clamps.
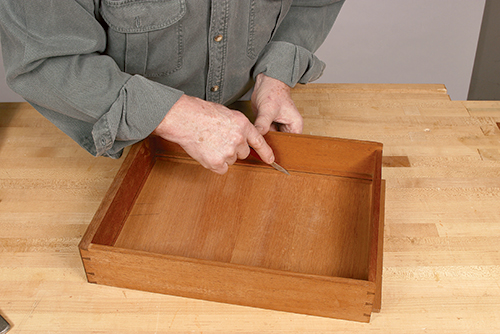
12. Check for accuracy: Measure the diagonals to check for square. Sight across the sides to check for twist. Correct any inaccuracies by pushing or twisting the four parts.
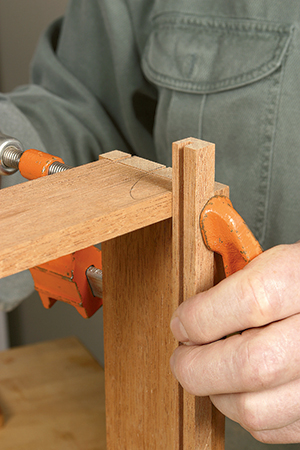
13. Edge clamp the front joint: Because the two outer lines on the front joint are not trapped like the inner glue lines, the glue tends to push the joint open at these interfaces. Close the joint tight with pressure from a small clamp.
Drawer Slip and Bottom Assembly
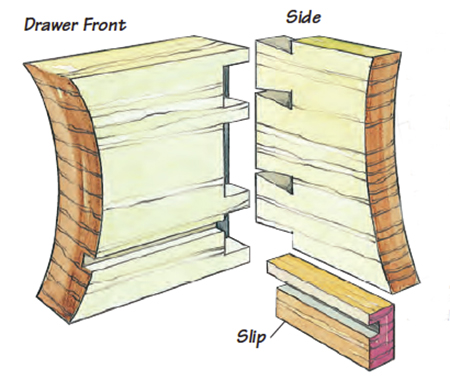
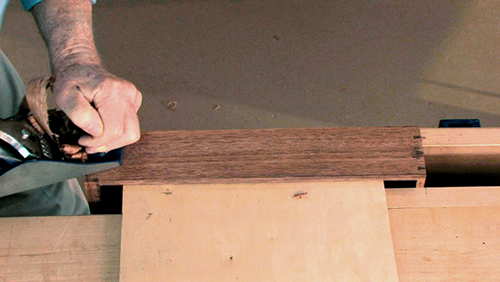
This inside corner view shows the relationship of the groove in the drawer front and the tenon on the drawer slip. Drawer slips are cut from the same quarter sawn material as the drawer sides. Cut the groove on a table saw.
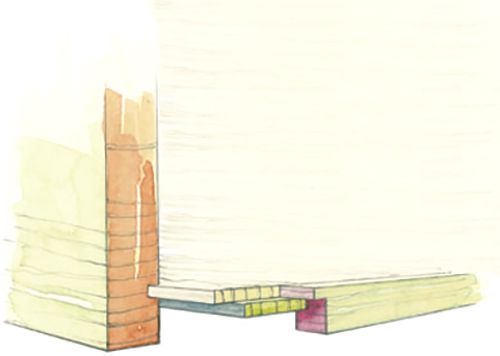
The drawer bottom has tongues on three sides, cut with a shoulder plane. The tongue on the front is on the top face of the drawer bottom. The tongues on the sides are on the bottom face of the drawer bottom.
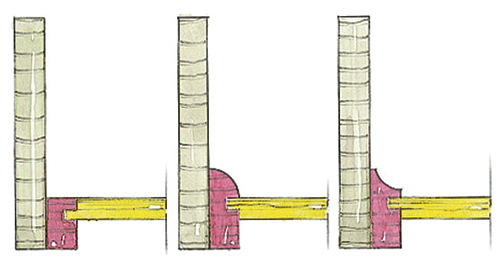
The flush slip with its long shoulder lines presents the most demanding work, although it has the simplest look when finished.
A less demanding alternative is to make slips that stand proud of the bottom, thus eliminating the visible shoulder line.
Making and Gluing the Drawer Slip
Drawer slips add an elegantly functional detail to a handmade drawer. Other designs exist, but only this one leaves a square corner.
14. Make the drawer slips: Cut the slips from the same quartersawn material as the drawer sides. Saw the groove in each slip on the table saw before sawing the slip to width — about 1/16″ wider than need be. Make an extra piece to check the fit of the tongues which you will make on the drawer bottom.
15. Clean up the slips: Plane off the mill marks on the grooved face and the top edge that will be visible from inside the finished drawer.
16. Make the front joint: The slip is held in the groove in the drawer front by a tongue, which amounts to a bare-faced mortise and tenon. Mark the shoulder with knife and try square, cut it with a dovetail saw, and clean up with a chisel.
17. Polish the slip: Shellac and wax the top edge of the slip.
18. Glue the slips into place: Light spring clamps hold the drawer slips firmly to the sides. Check that the shoulder of the tongue is tight to the drawer front, and clamp the top edge of the slip tight to the bottom edge of the drawer back.
Make and Fit the Drawer Bottom
The long grain of the solid wood bottom runs from side to side. This allows for shrinkage and expansion front to back. If the grain were made to run front to back, expansion of the bottom would either jam the drawer shut tight or bust the case open. The bottom has tongues on three sides to fit the grooves in the slips and the drawer front. The tongue on the front is on thetop face of the drawer bottom. The tongues on the sides are on the bottom face of the drawer bottom.
19. Prepare the bottom: Glue up boards to make the bottom; plane to 1/4″thick.
20. Size the bottom: Plane the end grain of one edge straight.
21. Make the first tongue: Mark the tongue with a cutting gauge and cut it with a shoulder plane. Check it for a sliding fit using the spare slip.
22. Mark the second tongue: Fit the shoulder of the first tongue tight to the bottom of its drawer slip and knife the shoulder line of the second tongue, using the drawer slip as a guide.
23. Cut to length: Leave 3/16″ for the tongue beyond the shoulder line you just knifed and saw off the excess material.
24. Make the second tongue: Cut the tongue with a shoulder plane and check it for a sliding fit with the spare slip.
25. Flush the slip and the bottom: Using the spare drawer slip as a guide, plane any excess from the top face of the drawer bottom to make the two parts flush.
26. Insert the bottom and square the front edge: Slide the bottom into place. If it doesn’t fit square to the front, remove and adjust accordingly. The bottom should slide in and out with little effort so it can shrink and expand easily.
27. Make the front tongue: The tongue on the front is on top of the drawer bottom. This means that if there is a little shrinkage in the drawer, any gap will be out of sight on the bottom.
28. Cut to length at the back: Leave the back projecting 1/4″ or less.
Shooting the Drawer
In woodworking parlance, shoot means to “make straight,” hence the expressions “shoot the edge” and “shoot the drawer.” This also explains why an 07 is known as a “shooting plane.”
29. Plane off excess drawer slip: The drawer slips were made wider than needed so they project below the sides after being glued in place. Now is the time to plane them flush with the bottom edges of the drawer sides. Check that they are aligned with a straightedge across the width of the drawer.
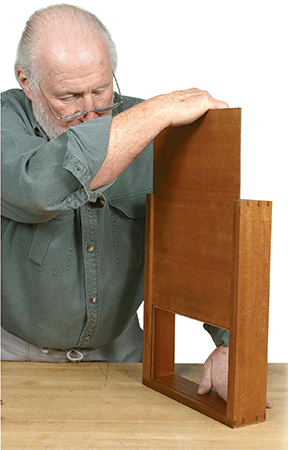
30. Shoot the drawer: To plane, place the drawer side supported on a plywood board that sits atop the bench. The board is about as wide as the drawer is long, and it is long enough to be clamped to the bench. The front of the drawer is clamped in the vise. When you’ve planed both sides down to the end grain of the pins, the entire drawer should enter the case, though the fit may be very tight. Ease the fit a shaving at a time. Working the drawer in and out will burnish any high spots, identifying exactly where a bit must be removed.
Finishing the Front
The three remaining steps will take you to the end of the drawer making process and to a new level of woodworking.
31. Planing the top edge of the drawer to fit the case opening: If, when you made the single-lap joints at the front corners, you didn’t align the bottom edges spot-on, you can make them flush now and still have some drawer front material to plane to fit.
Either way, you now finally fit the front to the opening.
32. Make and glue the stop in place: The drawer stop brings the drawer to rest where you want it — it can be flush, inset or proud; it’s your choice. The stop is a small piece of material, sized about 3/16″ thick.
33. A minor adjustment: Once the drawer stop positions the front correctly, plane the face to be aligned with the case edges.


