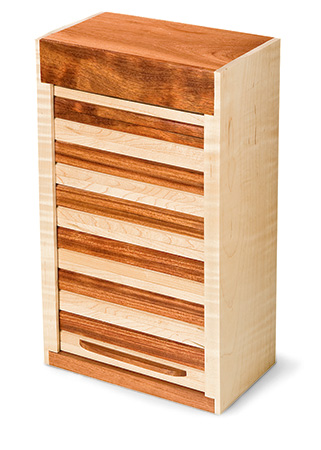
My most satisfying and enjoyable woodworking projects involve making decorative boxes using a variety of designs, joints and colorful hardwoods. These boxes make attractive and unique packages for a wide variety of gifts and (I’ve heard) tend to outlast those gifts by many years. I have made them for friends and family members, and I’ve donated them to local charity fundraising events as well. They’re inexpensive, keep me busy in the shop honing my skills and help me keep my shop “scrap-free.”
I have been intrigued with the idea of building one of my gift boxes with a tambour door, but I wanted something more attractive than the traditional halfround, breadbox type tambour you often see at local gift shops. Plus, I didn’t want to go to the time and expense of making my tambour strips by routing them to shape with one of the fancy (and expensive) new router bit sets designed specifically for that purpose. So I decided to design and make my tambour strips using a mixture of woods to give a nice texture variety and rich, colorful appearance.
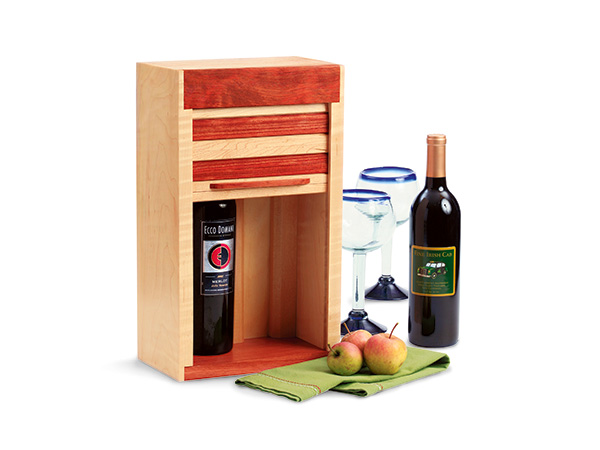
The box is constructed from bubinga and maple and features a tambour sliding door. Other contrasting species, I’m sure, would work just as well. Your overall box dimensions should allow room for the top to retract into its “hiding place.” The box that I’ll walk you through here is sized to accomodate two regular sized bottles of wine, but you can adjust the size of yours as necesssary.
Getting Started

The first step is to make the right and left sides of the box (pieces 1) from 3/4″ maple stock. Keep in mind that the two sides are mirror images of each other; thus the ends and accompanying dimensions must be reversed to make matching sides that face each other.
Using a dado blade in your table saw, form the 1/2″ rabbets on the inside surfaces of each side to accommodate the top and bottom. Now, use a sharp chisel to form the notch on the insides of each side to accommodate the top plate, as shown in the Drawings.
To create the channel for the door, I made a template from 1/4″-thick Masonite®. Attach the template to one of the side pieces. I like double-sided self-adhesive discs but double-sided carpet tape, also works to hold the template firmly in place.
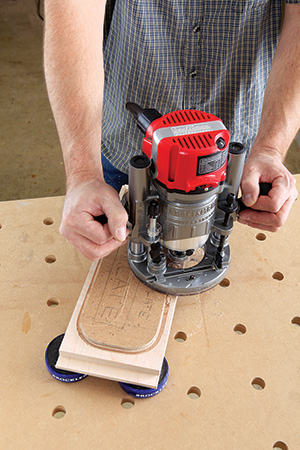
Chuck a 5/16″ straight bit and 7/16″ O.D. guide bushing in your router, and set your depth to form a 1/4″-deep groove. Rout the groove on one side and then repeat the process on the second side. Depending on your experience, you may want to use up a little of your shop scrapwood testing this cut. Once you’ve completed it on both sides, sand the grooves to a smooth inside finish. Apply a furniture wax to the grooves to promote smooth sliding of the tambour door.
Replace the 5/16″ bit with a 1/4″ straight bit (same guide bushing) and use a right-angle straightedge template to form the 1/4″-deep grooves on each side for the internal box back and top, as shown in the Drawings.
The Top, Bottom and Top Plate
As mentioned, I used bubinga as my contrasting species. Now is the time to cut these pieces to size, including the top, bottom and top plate (pieces 2, 3 and 4). Using a 1/4″ straight bit in your router, form a 1/4″-deep dado on the bottom piece, exactly 13/16″ from the back edge (so it aligns with the grooves you already cut on the box’s sides). This dado serves to hold the bottom edge of the internal box back. Note that the top piece is a tad narrower than the bottom, to accommodate the top plate.
Internal Box Pieces
To hide the tambour door from view when the box is opened, I added two internal pieces of 1/4″ thick Baltic birch plywood (no one will see the edges), the internal box back and top (pieces 5 and 6). You can cut these pieces to size now. When they are assembled within the grooves you formed for them earlier, the top will butt up to the back.
Cut the Tambour Slats to Size
The tambour door consists of 14 pairs of alternating maple and bubinga slats (pieces 7 and 8). Each of these 28 slats has a 30° chamfer on one edge, as shown in the Drawings. The best way to create these is to cut 3-ft. lengths of maple and bubinga to the correct width and thickness and form the chamfer along one edge. Since these are small pieces to handle, I recommend clamping each piece in a bench vise and chamfering them with a sharp hand plane. Plane in the direction of the grain and follow up by sanding the show faces smooth.
Once your chamfered stock is smooth, you can crosscut the pieces to length. You should be able to get four slats from each 3-ft. stick, so you’ll need to repeat the process until you have 14 slats of each species. Set the non-chamfered edge of each like-wood slat together, and then alternate pairs of bubinga and maple, matching the chamfered edges. Begin the panel with a maple pair followed by a bubinga pair, and continue the alternating process until complete. This will produce a roll-top panel with nice design character.
Push/Pull Handle
The only other piece that’s made from bubinga stock is the push/pull handle (piece 9). Use the pattern at left to cut this piece to size, and shape the ends using a disc or oscillating sander. Position the push/pull handle on the door’s second maple slat. Drill pilot holes through the parts, and drive two small finishing screws through the back of the slat and into the handle. Disassemble the parts — they’ll be reattached after the fabric is applied.
Assembling the Tambour Panel
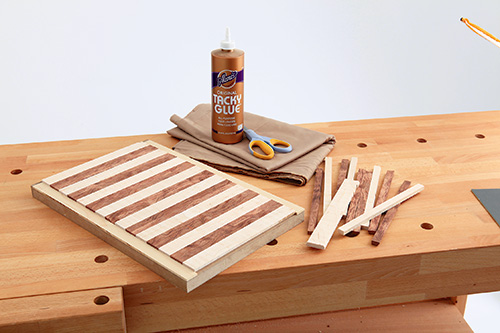
Bottom weight canvas fabric (piece 10) and Aleene’s® Original Tacky Glue® are used to secure the slats in alignment and provide the necessary flexibility to maneuver the curves of the side grooves. These two products are available at fabric stores. It is very important that the slats are perfectly square to ensure that they will close evenly in the enclosure and avoid binding during opening and closing.
I recommend that you make a simple tambour panel jig to hold the slats in alignment during the gluing process. The jig can be made of scrap plywood or MDF. On the flat surface of the jig, screw or nail parallel cleats spaced 8-1/2″ apart. Make sure the jig base is at least 14″ long, and add a similar cleat at one end.
Perpendicular to and between the edge pieces, draw parallel lines one inch apart across the jig opening. I found that these “alignment guides” helped to keep me on track as I lined up the slats. Now use a straightedge and draw a line down each edge of the slats, about 1/2″ in from the edge. You don’t want any canvas (or glue!) to end up in this area, as these ends will ride in the grooves you formed in the sides.
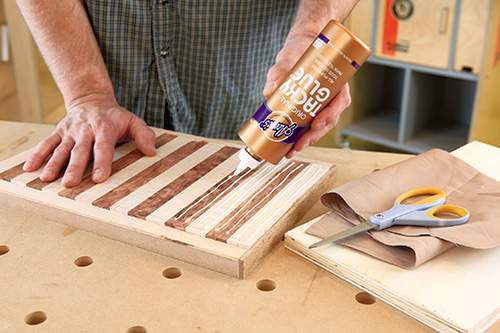
Cut a piece of canvas 6-1/2″ wide and several inches longer than the 14″-long panel itself. Once all your slats are installed in the jig, add a bead of the glue to the back of each piece, being sure to keep the glue well inside of the edge lines you just added. Center the cloth on the jig, leaving approximately 1″ spacing on each side so the slat ends extend well beyond the cloth.
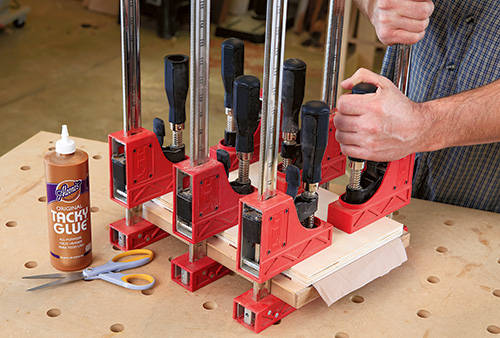
Once the slats and cloth are laid up, place a flat board (with a piece of waxed paper between the fabric and the board) over the cloth and install clamps around the assembly to ensure good contact between each slat and the cloth. After the glue dries, trim off any excess cloth from each end of the panel using a razor blade or sharp utility knife.
Sand and slightly round the slat ends to prevent any binding in the grooves. The door might also require some final trimming on the ends to ensure smooth rolling in the grooves.
I suggest that you apply wipe-on polyurethane finish to the glued-up door before gluing up your box. This allows the finish to be applied evenly along the entire length of each slat, including the ends. At this time, locate the two small screw holes you made earlier, and glue and screw the handle to the maple door slat.
Fitting Process
Sand all of your machined pieces to a smooth finish and dry fit the entire piece together before you begin the glue-up. Carefully check that all angles are square and fit properly. Especially check to be sure the door panel rides smoothly in its grooves. A bit of fine trimming and sanding of the door may be necessary.
Now glue and clamp the sides, top, internal box top and back and the top plate for the first assembly, leaving the bottom and tambour door off. (Note: you do want to ensure that the bottom fits snugly in place at this time — just don’t glue it.) After the glue has dried from this initial gluing phase, retest the fit of the tambour door, ensuring that it slides well in its groove. Then insert the door panel in its grooves and glue the bottom in place, capturing the door in the box.
Glides and Optional Bottle Rack
The next two steps are strictly optional. Install 5/8″ furniture glides (pieces 11) at each of the corners of the bottom to prevent marking or scratching any surface upon which the box may be set. In this case, a simple rack was included to hold two regular-size wine bottles. The wine bottle rack consists of two side rails (pieces 12) and a center divider (piece 13). The Drawing shows these additions, which feature 45° chamfers to nestle the wine bottles. You’ll cut one chamfer on the inner edge of each side rail and one on each edge of the center rail. Using double-sided self-adhesive discs, attach each side rail to the internal box back outer edges and carefully place the center divider in the middle. By using the adhesive discs, it is possible to remove the rails and divider should your gift recipient decide to use the box for another purpose. Two wine bottles will rest snugly between the three rail pieces.
Finishing Up
Do a final sanding and apply two or more coats of Minwax® Wipe-On Poly Clear Satin Polyurethane, following the manufacturer’s instructions. Or, use a similar finish of your choice.


