
It takes just two parts to build this attractive holder for storing or displaying a bottle of your best vino.
Surely you’ve seen these “balancing” wine bottle holders, but maybe you’ve never gotten around to making a few yourself. The process couldn’t be simpler, and these projects make great housewarming gifts or festive table accents. Ours is designed to accommodate a standard sized wine bottle. You can build your holders from any wood you happen to have on hand, but white oak is a fitting choice — reminiscent of vineyard barrels.
To get your project started, print out the PDF of gridded drawings and enlarge them on a photocopier, if necessary, so the grid squares measure 1 in. Cut out the paper template of the wine bottle shape.
Now head to your scrap bin and locate a piece of stock to use for the angled upright of your wine bottle holder. Joint and plane it smooth, and surface it to a final thickness of 1-1/4 in. Rip the upright to 3-7/8″ wide and crosscut it to a length of 11-7/8″. Use the paper template to trace the wine bottle shape onto the blank.
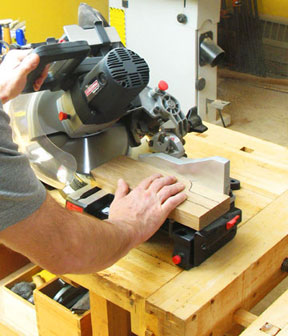
Head to your miter saw, and tilt the blade to a 45-degree bevel angle. Holding the workpiece securely against the saw table and fence, carefully bevel-cut the bottom end of the wine bottle blank. See Figure 1. Save the triangular offcut — we’ll use it as a drilling guide in the next step.
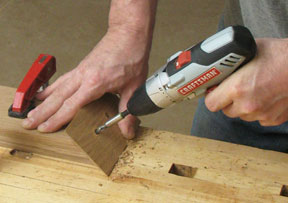
The neck of a wine bottle will pass through a 1-1/4″-diameter hole in the upright, and a Forstner bit is the best choice for cutting this hole cleanly. Notice in the drawings that the hole must be bored at a 45-degree angle to the face of the upright and parallel to the bevel angle you cut previously on its bottom end. You could set up this hole-drilling operation on a drill press, but if you don’t have one, the task is also possible to do with a handheld drill, a pair of clamps and a couple of pieces of triangular blocking. See Figure 2 to familiarize yourself with the setup we used to bore this hole by hand. We took the angled cutoff and fixed it temporarily to the upright workpiece in order to give the drill bit a full contact surface when starting the hole. It also helps keep the bit tracking accurately and squarely through the workpiece. You can fix the beveled edge of this offcut to the upright with double-sided tape or, as we did here, a light coating of glue applied to both faces of a sheet of office paper. Either option will hold the drilling guide in place while still making it easy to break the guide free once the hole is drilled.
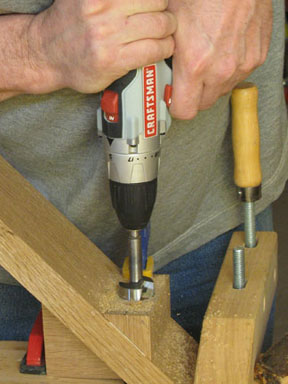
Use the Side View drawing to determine the correct location for attaching the drilling guide to the upright. Once it’s fixed in place, use a second piece of beveled blocking to tip the upright up off of your workbench at a 45-degree angle. Install one clamp on your workbench to butt against the beveled end of the upright, and install a second clamp to lock the lower blocking in place beneath the upright. Orient the upright so the bevel on the bottom end faces up. You’re now ready to drill the angled hole. Mark the centerpoint of the hole on the drilling guide, and slowly bore the hole through it. Use care when the bit begins to exit the upright on its bottom face to reduce the chances of tearout around the exit hole. Remove the drilling guide.
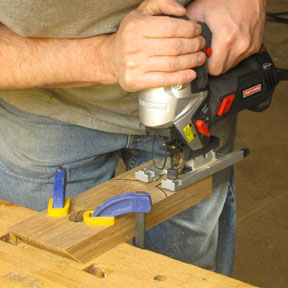
With the hole now bored, clamp your upright over the edge of your bench, and use a jigsaw to cut the wine bottle profile to shape. See Figure 3. It’s always a good idea to cut just outside of the layout lines, then use files or a drum sander to clean up the cut edges and refine the shape. Sand the faces and edges of the upright up to 180-grit, then set it aside.
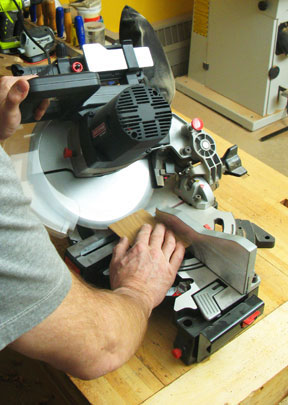
Find another piece of scrap stock for use as the project’s base, and rip and crosscut it to the dimensions specified in the Material List below. Now take your base to the miter saw and tip the blade to 45 degrees again. Carefully bevel-cut both ends and edges of your base piece to give it a tapered profile all around. See Figure 4. Remove any blade swirls or burn marks on the sawn edges with a file, then finish-sand the base.
Cut out the base template from your paper patterns to help you locate a pair of screw holes that need to be drilled next. Mark these locations on the bottom face of your base with a nail or scratch awl. Clamp the upright flat to your workbench with the bottom bevel facing up. Set the base in position, and bore two countersunk pilot holes through the base and into the upright. See Figure 5. Be sure to keep the drill held squarely to the base as you make these holes. Now, spread a thin layer of glue over the beveled end of the upright and the upper face of the base before joining the two parts with a pair of flathead wood screws. See Figure 6.

Give your new wine bottle holder a few coats of protective wood finish, and it’s ready to show off a bottle of your favorite vintage.
Wine Bottle Holder ( PDF )
Upright (1) 1-1/4″ x 3-7/8″ x 11-7/8″
Base (1) 3/4″ x 3-1/4″ x 5-3/8″


