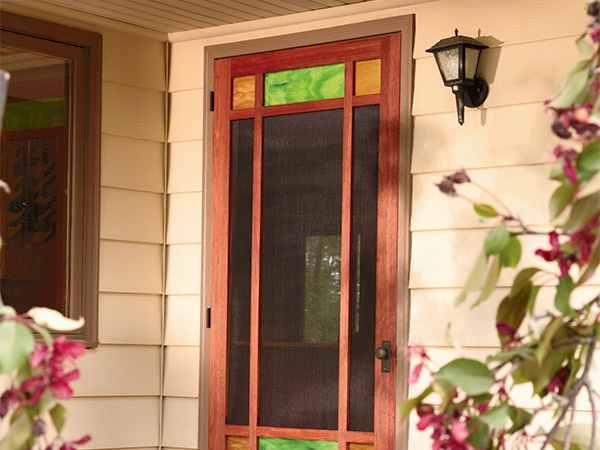
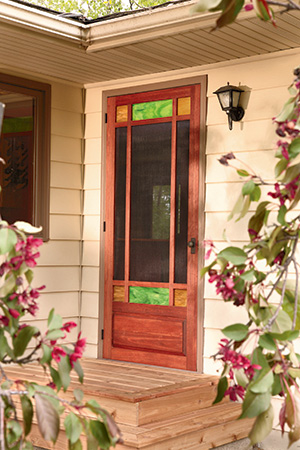
Screen doors are, in my opinion, one of the best inventions of modern times. I mean, think about it … they allow lovely summer breezes to blow through your home, let you hear the birds and the sounds of your neighborhood, all while keeping those nasty biting bugs outside. Like a mythical portal into summer, screen doors allow you to experience the outdoors while protecting you from its extremes. But one problem with many screen doors, especially the bargain types you find at large home centers, it that they are a bit — well, let’s just say it: they’re ugly.
This project not only serves all the important tasks of a typical screen door, but does it with a degree of style that will make any woodworker proud and their loved ones happy. That’s because it is a true woodworking project. With classic mortise and tenon joinery, it is within the skill level of most woodworkers … but this door is not exactly a weekend project. It will keep you in the shop for a few days — but it’s well worth the effort.
The Arts & Crafts style of the door would work well with white oak lumber, a good exterior-use wood species, but we thought that a mahogany look would be perfect. So to play the part of mahogany, we chose Lyptus®, a plantation-grown hardwood. Rockler.com sells it in 1-1/8″ thickness, perfect for our screen door.
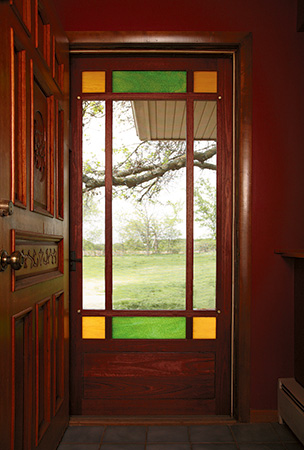
Here are a couple of other important points as you consider building a door for your house. While door openings are pretty standard these days, take the time to carefully measure yours. Our door is 36″ wide as we built it. Don’t buy your glass pieces until you have built your door and measured its openings. Also, our art glass was provided to us by the nice folks at Gaytee Glass in Minneapolis, Minnesota. It’s a standard Kokomo glass that you can purchase from most any quality stained glass company. There are many hues to choose from, but ours are classic Arts & Crafts colors. Some local building codes may require a safety film made by 3M to be applied to the glass. Check your local codes.
Building from the Outside In
Think of this project as a series of frames constructed from mortise and tenon and half-lap joinery. Although there are some really fine door-making router sets on the market (which I highly recommend), as I often do, I decided to go “old school” on this project.
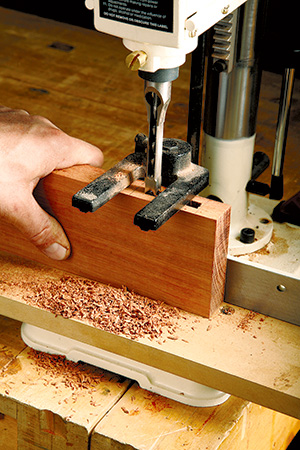
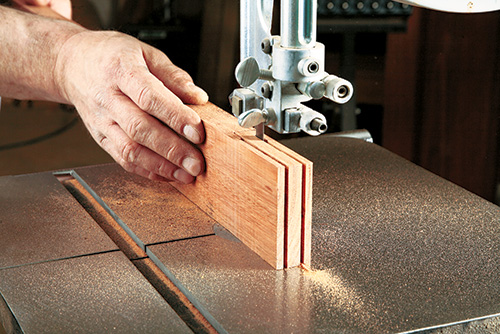
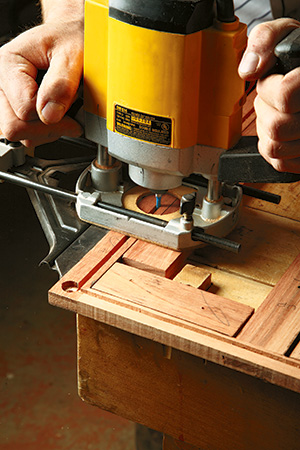
Start by cutting out the large door stiles and the bottom, middle and top large rails (pieces 1 through 4). You can find the Material List. These pieces form the main “superstructure” of the door to which all the other parts are attached. My old school intentions had me reaching for my mortise chisel to chop out the through mortises on the large door stiles, but my first test mortise taught me a couple of things: first, Lyptus is really, really hard and second, if I was going to get this project done in time to use it this year, I was going to need to use my mortising machine. (Hey, if William Morris had had a mortising machine, he would have used it!) Look to the Drawings for the mortise and groove locations on the stiles. I always form my mortises first and then cut the tenons to fit. After I completed all the mortises (large and small) in the large door stiles and rails, I stepped over to the router table to plow the stopped grooves for the raised panel (piece 5). As long as you have it set up, go ahead and slice the corresponding grooves on the lower and middle rails.
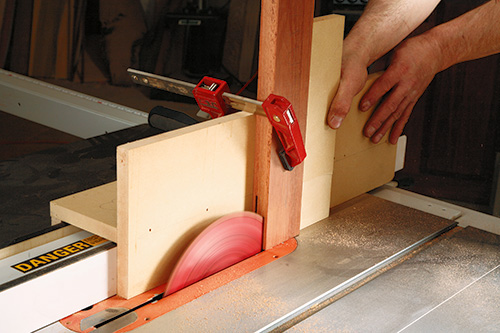
Raising the tenons on the large rails was the next step on the agenda. I used a shop-made tenoning jig on my table saw for this task and finished up on the band saw, but you could use a router table or any other means that you prefer. Take the time to fit these joints well. A door puts a good deal of stress on its joinery.
Somewhere in this time frame, you should glue up the blank for the raised panel, and this brings up an important point. A screen door is an outdoor project and is subjected to the weather year after year. For that reason, I recommend using a highly water-resistant glue, such as Titebond® III or a polyurethane glue of some sort. Once you have the panel in clamps, set it aside and let the glue cure.
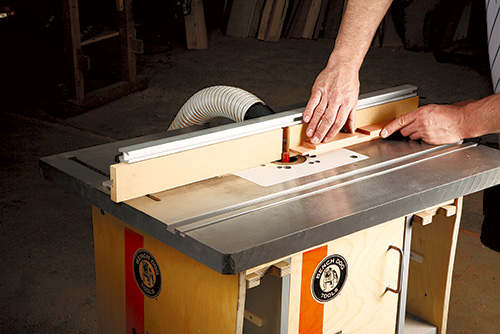
The narrow stiles and rails (pieces 6 and 7) are next up on the machining agenda. Rip these four pieces to size on the table saw, cut them to length, and then go ahead and raise the tenons on their ends. These narrow stiles and rails have half-lap joints that must be marked out and cut. The way I marked out the joints was to dry-fit all the door parts together except the narrow rails. After checking that everything was square and true, I put the narrow rails directly over their mortises, then I marked the joint locations right on the stiles and rails. Again, how you form these half laps is up to you, but I chose to do it on my router table using a miter gauge to push the stock across the bit.
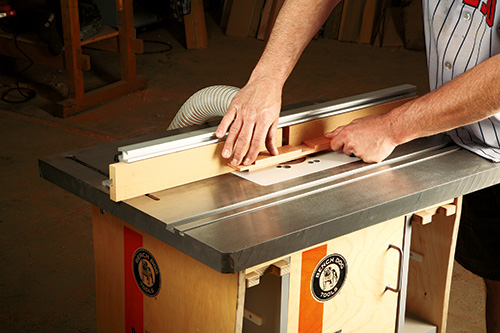
At first blush, you might think that you were done machining these narrow stiles and rails … but you would be wrong. First, I used my router table and a straight bit to start the rabbets that hold the art glass. Second, the inside section of the narrow stiles needs to be reduced to 1/2″ in thickness to accommodate the screen panel. I did this with a handheld router guided by a jig that controlled the cutting depth. Once that material is removed, you can return to your clamped-up raised panel blank.
Take the blank out of the clamps and scrape off any excess glue. I ran the piece through my planer to skin it down and get two parallel faces. Next, I cut it to size and stepped to my router table to raise the panel.
I used a Freud large dimension bit to raise the panel because it has a back cutting function. It sized my panel lip and provided a nice shadow line around the back of the panel, all in one operation. With that done, it was time to dry-fit all of the parts together, and, for me, a pleasant surprise: everything fit exceptionally well on the first try. Hey, sometimes you get lucky!
The final step before I put the main door section together was to stain the raised panel. After the stain was dry, I went ahead and assembled this main door section, using Titebond III. I clamped it together, checked it for square, and left it overnight.
Screening It Off
Once I removed the clamps, there was a bit more machining to do on the main door section. With a router and a bearing-guided bit, finish routing the rabbets on the glass openings. You will need to square up the corners with a sharp chisel. When that task is done, get yourself a straightedge and chuck a straight bit into your router, so you can form all the rabbets on the edges of the screen panel area (see Drawings). Once again, there will be some squaring up to do with your chisel. Now you are ready to make the screen panel.
The screen panel is made up of two outer stiles, two inner stiles (pieces 8 and 9) and two rails (pieces 10). All these pieces are made from 1/2″ stock. Go ahead and cut them to length and width and then step over to the mortising machine again to chop the mortises on the rails. When that is done, I move to the table saw to form tenons on the ends of the inner stiles and the screen rails. Finally, shape the open mortises on the ends of the outer stiles. See the Drawing for all of these construction details. When everything is fitting well, you’re ready to glue up the subassembly. While the glue cured, I went back to the main door section and chopped hinge mortises. (Have your hinges in hand before you do this!) I also installed the door handle and lockset (piece 11). Once it fit well, I took it off and set it aside until later.
I went back to the screen door panel and took it out of the clamps. After a bit of cleanup with a scraper and a hand plane, I grabbed a 1/2″ Forstner bit and drilled little round mortises on the inside face of the panel. (See the Drawing for locations.) Then I drilled 5/16″ holes through the stock at the center of those little mortises. With the panel subassembly complete, I was ready to test fit it in the main door (I suggest using a block plane to help with the fit), and mark the locations for the threaded inserts (pieces 12).
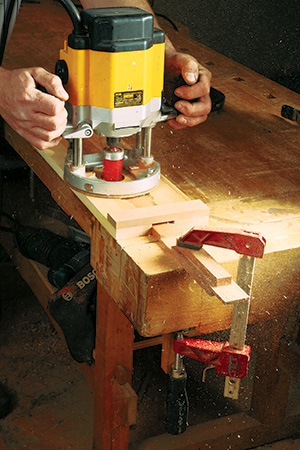
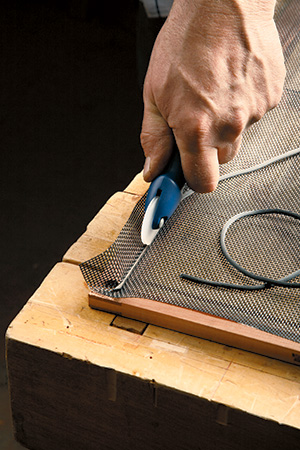
Taking the screen panel to my work table, I secured it with blocks on its inside corners. Then, with a straight bit and an edge guide mounted to my router, I cut a groove around the perimeter of the panel for the screen retaining cord.

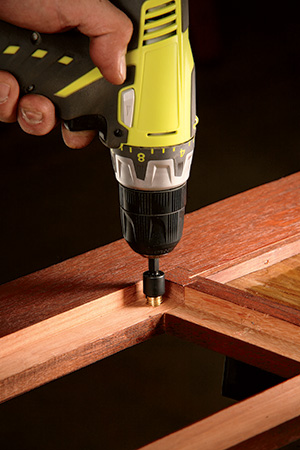
At this point, I needed to mount the threaded inserts. So I drilled a pilot hole for them and used a special little tool to drive them home. Be careful drilling the holes for these inserts (don’t drill through!): the inserts must sit just a little proud of the wood.
I needed to grind down the brass knurled knobs (pieces 13) to the proper length, and I was ready to try to put the whole door together. Well, as you can imagine, there were a couple of minor tweaks to do, and then it was time to sand, stain and finish the door parts. I used three coats of spar varnish for the top coat.
When that was completed, all I had left to do was mount the screen with its retainer strips (pieces 14 and 15) and install the art glass and its retainer strips (pieces 16, 17 and 18) — plus a bead of clear silicone adhesive. The door was now ready to be hung on its hinges, and the strike plate installed.
Final Thoughts
For those of you who, like me, live in a climate that needs a storm door panel in addition to a screen panel, here’s what you will need to do. Cut out the parts for a second screen panel. Once you have all the mortises and tenons formed, take the two inner stiles to your planer and take 1/8″ off of one face. Then assemble the panel. Proceed as you did on the screen door panel, but instead of routing out a groove for the screen, form a 1/8″ deep x 3/8″ wide rabbet all around the inner edge of the frame. Square out the corners and measure for your 1/8″-thick safety glass. When you have ordered and picked up that glass panel, mount it in the frame with clear silicone adhesive. Now you will be ready when the weather begins to cool.
Well, that is it. Now all you have to do is get busy mowing that lawn you have been ignoring while you built the screen door … well, you knew it had to happen!


