
A few years ago, Jo Schwartz was looking for a hobby. “I would tell people, ‘I don’t paint, I don’t draw – and it turns out, I can’t whittle, either.” She did know, however, that she liked working with wood. “I’ve always had a love for the different grains and things like that.”
That’s what originally led her to try whittling – which, in turn, enabled her to find her niche with pyrography. “Everything I whittled would come out looking like little Amish people,” she said. Then, she tried using a woodburning tool to create a face on one of her carvings, “and that’s kind of when I went, ‘Hmm. I like that,’” she said.
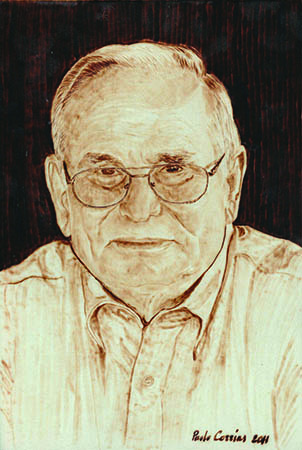
Her early attempts at woodburning included some efforts at trees and landscapes, none of which came out well, but “Once I tried to do a portrait of a human and it actually turned out really well. That’s kind of how I got going.”
One of those early portraits happened to be of former U.S. President Dwight D. Eisenhower. Jo lives in Abilene, Kansas, Eisenhower’s hometown and the location of his Presidential Library. With that woodburning effort, she said, “People actually recognized who it was.”
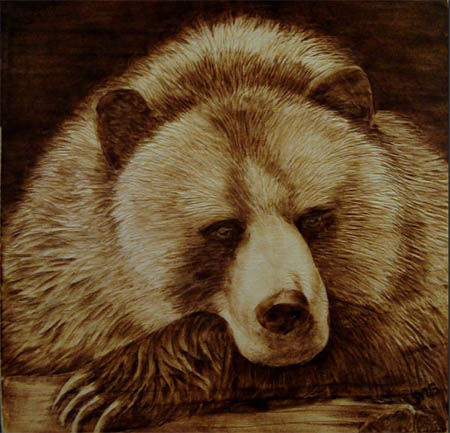
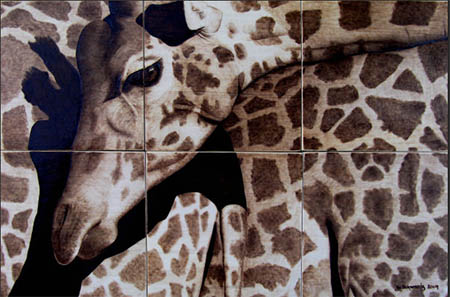
From that start, she has branched out into creating many different subjects in pyrography. “Every single thing you burn, once you finish it, you say, ‘OK, now I wonder how you burn a turtle.’ So then you burn a turtle. So you go, ‘Now I wonder how you burn a fish.’ So you burn a fish.” The learning builds on itself: “If you try a buffalo, you learn something when you’re doing buffalo hair that you say, ‘OK, now I can do a bear.’ Everything kind of ties together.”
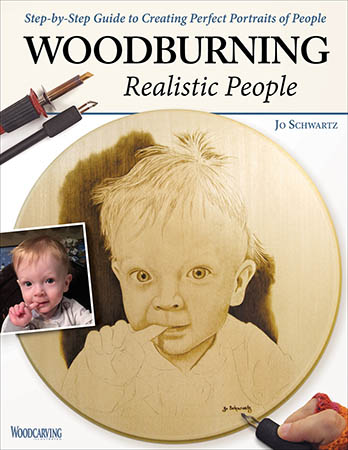
Much of her own learning came through trial and error, but Jo wanted to help others interested in pyrography bypass some of those steps. To that end, she has written a book, Woodburning Realistic People [ISBN 978-1565238800; Fox Chapel Publishing], that on how to create portraits, including tips on creating realistic skin tones and facial features. “In the book, it says how to burn inside the nostrils,” Jo explained. “The same way you do that is [what you use for] inside the ear. You start using it everywhere.”
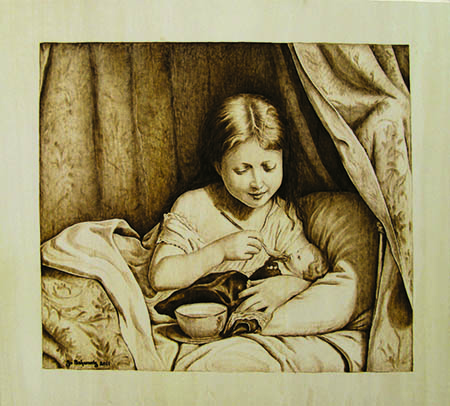
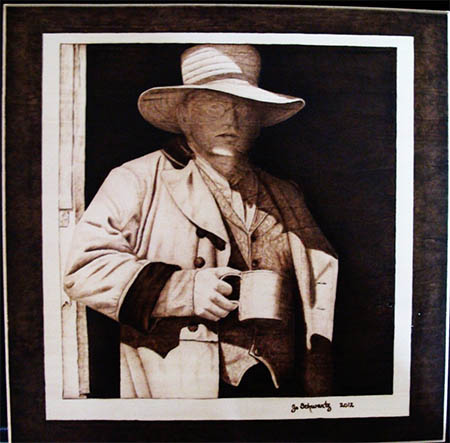
Part of her secret to creating realistic portraits is that she works from photos. “I truly burn what I see, not what I think I should see. And that’s very helpful when it comes to burning eyes or something like that, because people go, ‘Oh, I need to have an arc like this and put in some eyelashes.’ Well, that may not be what’s actually in the picture. One example she gave is a piece she burned from a photograph she took of a man standing in a doorway portraying the mayor of old Abilene. When he posed for the picure, wearing an old-fashioned wool coat, the actual temperature was 110 degrees Fahrenheit, so Jo had to snap the photo quickly. In the resulting image, however, his face was blurred. “So if you look at that burn, you can’t see his features, really.”
When starting a piece, Jo will place a piece of graphite paper between the photo she’s working from and her wood, then trace an outline from the photo onto the wood. (The number of lines in her outlines has been reduced over the years “because I don’t like erasing it all the time.”) As she does the actual burning, she turns the work – and the photo. “I’ll be upside down and sideways, and I’ll take the picture and turn it upside down and sideways as I work.
As for tools, Jo is still using the same tools she started out with, a Versa-Tool (find an updated version here) and a Razertip pen. Each, she says, has its own way of burning. She also rigged up a heat control method for her Versa-Tool by using a dimmer switch, as she prefers a lower heat and a longer working time.
“A lot of the people like to crank it up and have it red-hot on the tip and burn, and I need to come at it from a different angle of being a softer burn. I do it in many layers, but no erasing: once you burn a line across something, each time you burn over it, you darken the line. I do the same motion over and over: touch down, slide to the left, and lift, and that’s how I get such a smooth look to my things. I am never gouging like woodcarvers: they’re used to digging in there and gouging something out, whereas mine looks 3D, but it’s not.”
When using the Razertip, which Jo described as like a delicate pen, she doesn’t feel the need for as much protection against the repetitive motions, but when she’s using the Versa-Tool, she said, “I have an old candy box from Russell Stover’s, it’s about an inch and a half thick, that I set under my wrist and that makes my hand be at the proper angle. I’m not making giant hand motions. All I’m ever doing is just an inch, inch and a half, maybe. And I do turn the wood, not my hand, so that helps, too.”
Additional safety precautions include always angling her work, either against the table or an easel, to allow the heat to rise toward the ceiling – and not her hand. She does, however, put mitts on her hands, both for protection against heat and blisters and to keep the natural skin oils off the wood. “I often cut off the little finger of my leather gloves and I use it on my index finger, twist tied it on there with a bread tie – something to protect me from the heat, because my index finger has been thoroughly cooked over the years.”
Most of the wood Jo uses in her pieces is basswood, “because it’s light and it’s soft and so it burns easily. Oak has a terrible grain for trying to burn: you do a lot of bouncing, bouncing, bouncing through the wood. Pine can be sappy – you can still use it, but it’s just not ideal.”
While noting the often cited quote from artists that the wood will tell you what it wants, Jo acknowledges that’s sometimes true for her, but “sometimes I tell it what I want.” She sources wood both in precut sizes ranging from 4×4 inches to 12 x 12 inches from Heinecke Wood Products, and from local dumpster diving. “The local cabinetmaking shop here in town knows that I do it,” she said. “When they throw out their scraps, I go out there and dig through their piles of rejects and say, ‘I’ll take it!’”
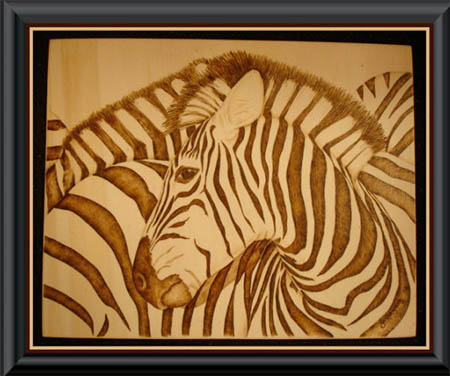
Some pieces of wood call out for specific designs. A piece with zebras on it, for example, was light-colored wood that Jo felt needed the zebra stripe; she didn’t want to “waste it on something where you’re burning a lot of dark.” On another piece, she didn’t notice until she had finished a piece that a part of the wood grain wrapped around the calf of a ballerina’s leg. “That’s when you get excited because, look, that wanted to be on there.”
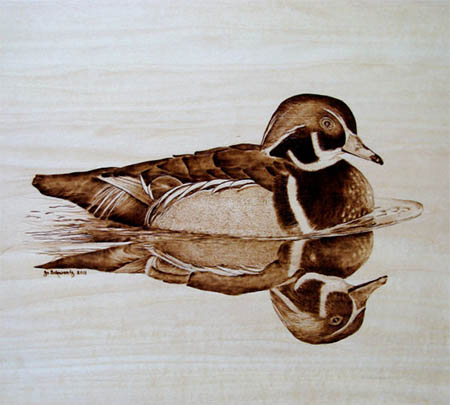
Then there’s the duck she burned on a specific piece of basswood. “I happened to have a piece of wood that I said, ‘Look, this is a beautiful water-looking grain, so I need to find a duck to put on there.” The duck’s reflection appears in the water on the piece. An image she sent in of that particular piece of woodburning is what got Jo started on the path to writing regularly for Pyrography magazine.
These days, she’s sharing her woodburning knowledge through her book and lessons – and even when she went to Antarctica as a shuttle driver for National Science Foundation scientists and support staff at the McMurdo Station on the Ross Ice Shelf. “When you go down, you are there for four to five months, so you have to take your own entertainment. If you have a talent, they ask you to share it with everyone else.”
Jo shipped wood down and, despite not bringing along enough woodburning tools themselves – “only two or three people could burn at a time” out of the several hundred at McMurdo – she ran out and had to ask her husband to ship her some more, since there is no wood available on the icy continent.
Now back in Kansas, Jo offers classes in her Abilene location. “At this point in life, the most fun I’m having is sharing my techniques,” she said.


