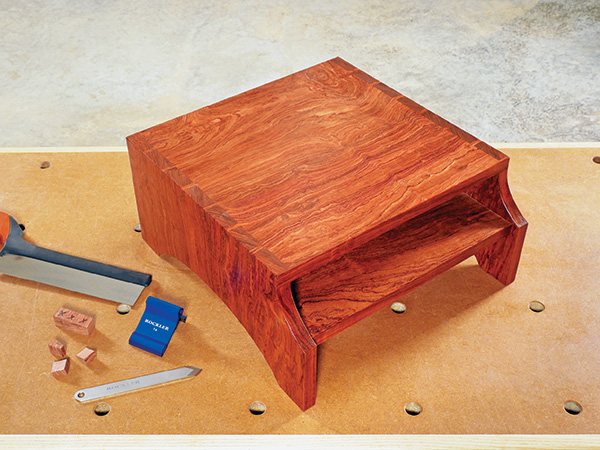
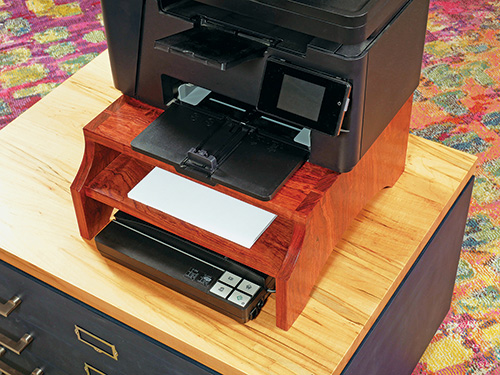
Aproject doesn’t have to have “heirloom” potential to be worth building, of course, and that was the case for this little organizer. I simply needed a way to stack a printer, scanner and a ream of paper to take up less space on my desk. The stand’s through dovetails on top aren’t crucial, but they gave me a good reason to practice my sawing and chopping skills, which had gotten a little rusty. If your dovetailing could use a refresher course too, perhaps earmark this project as one to build before diving into a bigger dovetailing commitment.
Preparing a Long Panel
There are only four parts on this stand’s Material List, so its modest lumber requirement provides a nice opportunity to try an exotic or figured wood you wouldn’t normally choose. I settled on a piece of swirly grained bubinga. Its irregular pattern and reddish color reminds me of marble more than wood!
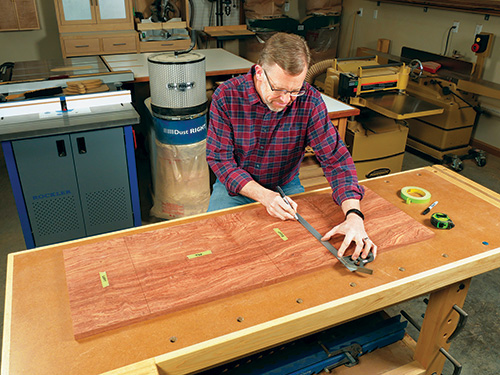
Whatever species you choose, rip and crosscut enough 3/4″-thick stock to glue up a panel measuring 16″ wide by 48″ long. Joint and plane the boards carefully to minimize the glue seams as much as possible, then glue and clamp them up. When the joints dry and the panel comes out of the clamps, plane, scrape or sand any uneven glue seams flat, and sand the panel up to 120-grit.
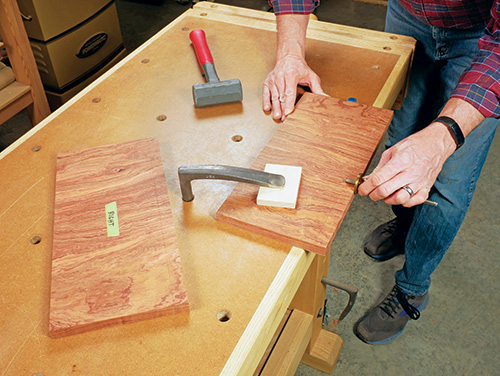
The reason for beginning with a single panel is so you can harvest the individual workpieces from it to harmonize the grain pattern. Square up the ends of the panel. Then, starting from one end, mark an 8″ length for one side panel, a 16-1/2″-long piece next to it for the top panel and another 8″ piece after that for the other side panel. Crosscut the parts to rough size. What’s left of the panel is the shelf. Trim it to 15-1/2″ wide and 15″ long. Finish up this step by trimming the sides to 7-1/2″ long and the top to its final length of 16″.
Starting with Tails
There’s no shame in cutting through dovetails with a router and a dovetail jig, if you’d rather do that. But I like the ability to create narrower pins than my dovetail jig will allow and the freedom to space the pattern as I choose — two big advantages of cutting dovetails by hand.
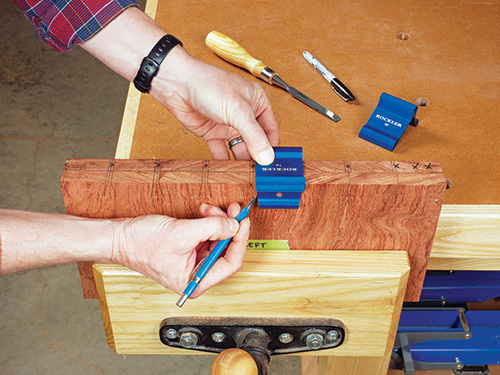
If you like the look of the dovetail pattern shown on the facing page and in the Drawings, we’ll start by laying out the tails on the two side panels. Grab a sharp marking gauge and scribe a baseline for the tails all the way around the top ends of both side panels. Set these scribe lines about 1/32″ wider than the thickness of the top panel (this way, the tops of the tails will protrude slightly above the top panel when the joints are assembled).
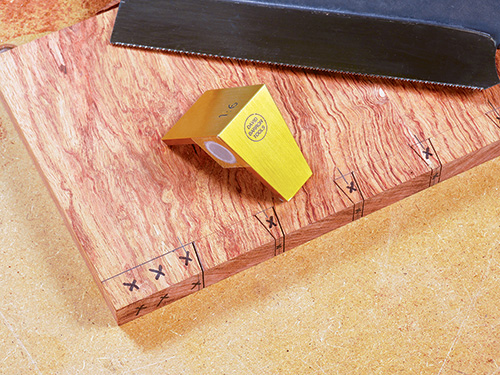
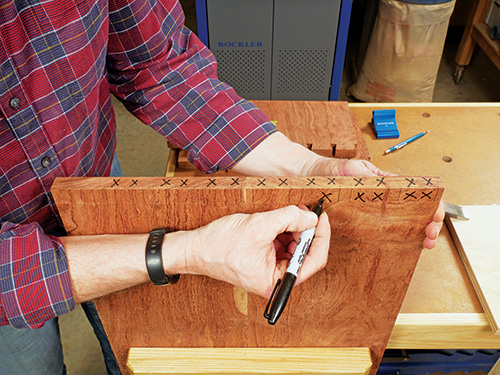
Now lay out the center points of the pins every 2″ across the tops of the sides. This spacing will create a half socket on both ends of the side panels and six pin sockets in between. I did this by first clamping both side panels together with their ends and edges aligned and their “show” faces pointing outward. That way, I could mark the center points on one board and extend the layout lines across to the other board so the sockets would align perfectly.
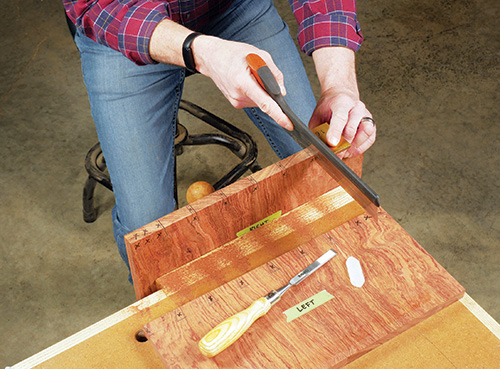
The tops of the pin sockets are 1/4″ wide, so mark those next on both sides of each center line. I then set the angles of the tails to 1:6 (about 10 degrees). It makes the bottoms of the pin sockets 1/2″ wide. Use a fine-lead mechanical pencil and either a bevel gauge or a dovetail saddle square to draw the tail shapes down to the baselines on both side panels. Unclamp the side panels and complete the tail layouts on their inner faces, too. Do yourself a favor right now, and mark the pin sockets with black Xs to avoid confusion later. These are the waste areas to remove.
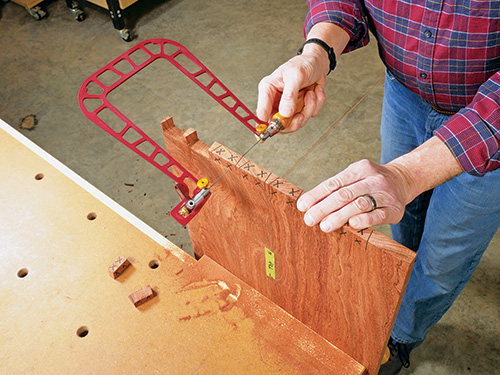
You’re now ready to saw the tails down to the baselines with a dovetail saw, following your angled layout lines. Many will cut these freehand. But if you’re less than confident that you can saw squarely and accurately, there’s another option that makes the process very easy. A number of years ago, I tried out a clever and simple aluminum jig, designed by British woodworker David Barron, that guides the saw blade while making the tail and pin cuts. Rare-earth magnets hold the saw blade at the correct angle while you saw to minimize angle-cutting errors. You can learn more about it at Barron’s website, and on his YouTube videos.
To use the jig, position its angled face toward you and rest the portion of the jig below the magnet on the tail board’s top edge. Carefully align one or the other angled edge of the jig with a tail line, hold or clamp the jig securely and set the saw blade against the jig’s magnetic face. Then start the saw cut with a long, gentle stroke and proceed to cut down to the baseline. Repeat this for every tail layout line on both side panels.
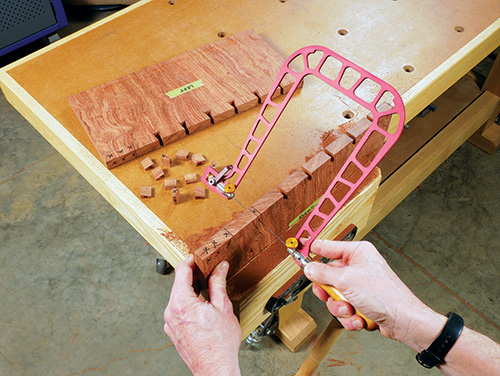
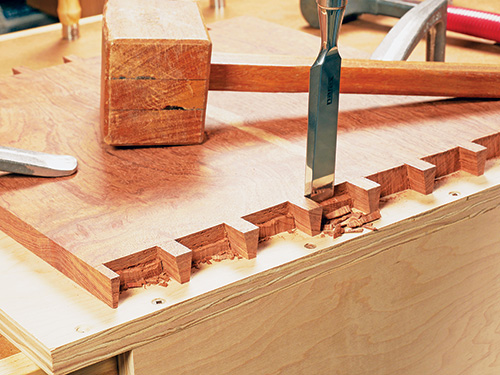
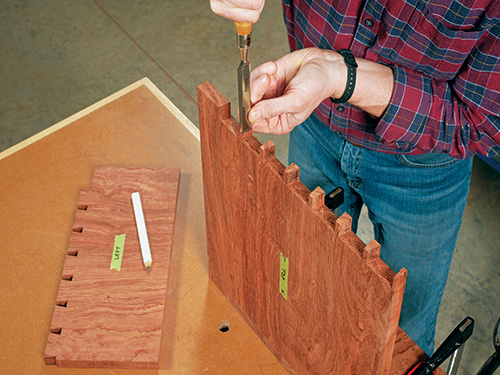
Now remove the waste in the pin socket areas, marked with Xs. To do this, some woodworkers chop all the waste out with just a chisel. I prefer to saw the waste out with a fretsaw first, leaving just a bit of waste at the bottom of each pin socket. Then, I chop and pare the rest of the waste away with the blade registered at the baseline. I work carefully in from one face until about half the waste is removed. When I make these chopping cuts, I tip the handle of my chisel about a degree or two closer to me so I’m slightly undercutting the bottoms of the sockets. When half the waste is removed from all the sockets, I flip the panel over so I can remove the remaining waste by chopping in from the other face. Doing this prevents the chisel from chipping the bottom outer edges of the sockets.
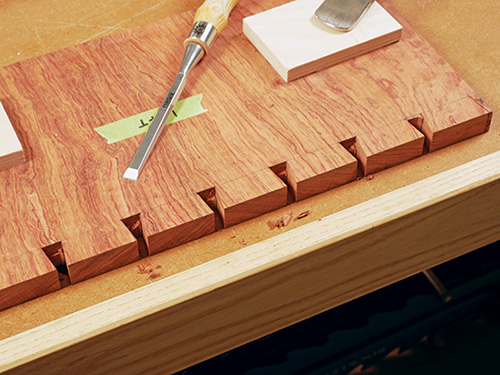
When the sockets are cleaned out, make sure their baselines are flat through the thickness of the side panels. This will enable the pins to slide into them squarely when the joints are assembled. Check the baselines with the blade of a square extended through the sockets; it should rest evenly across them on the baselines. Pare away any remaining waste that prevents this from happening.
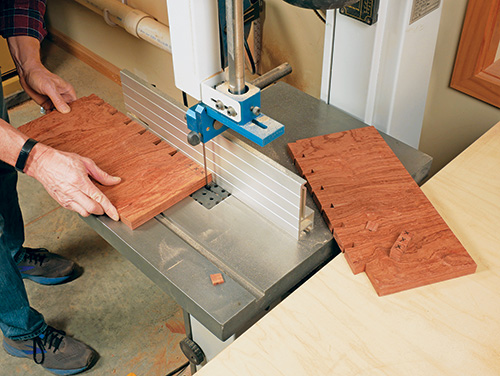
Carefully saw off the tiny half-pin socket waste from the back corners of the side panels and the longer front wastepiece. I did this at the band saw with each side workpiece registered against a rip fence and the blade cutting just to the waste side of the baseline.
Shaping the Pins
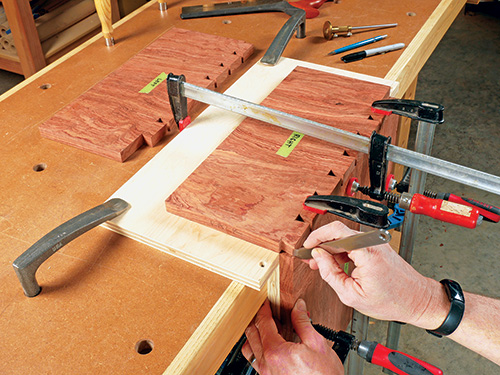
With the tails now cut to shape, rip the top panel to its final 14″ width. Clamp it to the edge of your bench with an end facing up, and lay the correct side panel over it on your benchtop.
Align the edges of both panels, and adjust the tail board carefully so its baseline is aligned with the inside face of the top panel. Clamp the tail board in place. Carefully transfer the angled tail pattern onto the end of the top panel to mark for the pins.
Use a sharp, thin-bladed marking or pocketknife to incise these lines into the top panel’s end grain. Then flip the top panel so its other end is up and repeat the pin-scribing process using the other tail board.

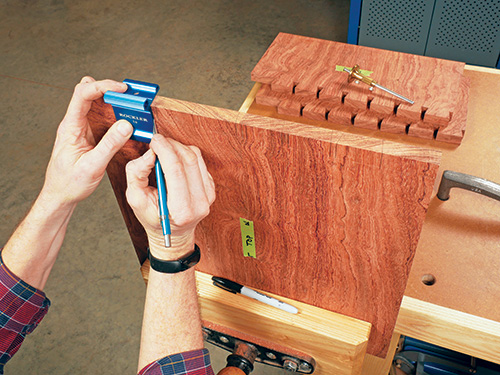
Grab your marking gauge, again set 1/32″ deeper than the thickness of the side panels, to scribe baselines across the faces and ends of the top panel. Then draw straight lines down from the knifed lines on the end grain to the baselines to complete the pin shapes. Mark the large tail socket waste areas with Xs.
Go ahead and saw straight down to the baselines to cut the angled faces of the pins. Again, my Barron jig helped me guide these cuts easily by flipping its orientation around for the pin cuts. Aim as accurately as you can to literally split these layout lines with the saw blade — it will help to minimize the amount of paring you’ll have to do next.
Saw or chop out the large waste pieces in the tail socket areas. Effectively, the process is the same as when cutting out the pin socket areas, but there’s just more waste to remove. Use wider chisels to help speed the process along, and work carefully when you’re chiseling up to the baselines to keep them straight and evenly aligned with one another.
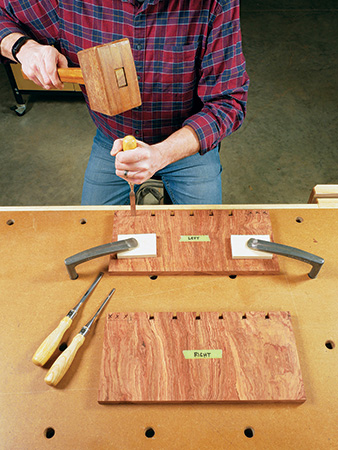
Now, fit the corner joints together, one joint at a time. If you’ve cut carefully, the pins and tails should engage one another snugly, right from the start. If they don’t, you’ve got some paring to do to improve the fit.
The goal here is to pare away as little material as possible so the joints will close without creating gaps between the pins and tails. But, if you remove too little, the panels could crack when tapping the joints together. Pare only from the angled, inside faces of the pins, leaving the tails alone. Work slowly and carefully until the joints fit together.
Installing the Shelf
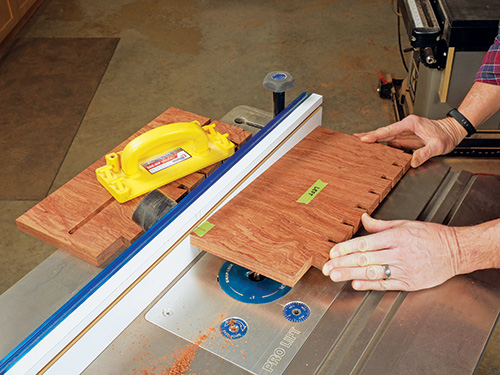
The dovetails are the hardest part of this project, so it’s downhill from here! Chuck a 3/8″ straight or spiral bit in your router table, and raise it to 1/4″ cutting height so we can plow a groove on the inside face of each side panel for the shelf’s stub tenons. Set and lock the router table’s fence 31-1/16″ away from the back of the bit. Identify the cutting limits of the bit by drawing a pair of long vertical lines on the router table fence to mark the bit’s position. This way, you’ll know where to begin and end these groove cuts accurately — they stop 3/4″ from the front ends of the side panels.
Mark the outside faces of the side panels so you can stop the groove cuts accurately. (We’ll be routing these panels with their bottom flat edges against the fence.) Go ahead and plow grooves, then square up their rounded ends with a chisel. When that’s done, cut a 3/8″-thick stub tenon on each end of the shelf. I did this step at the table saw with a wide dado blade buried partially in a sacrificial fence. Trim the front corners off the tenons, shortening their width to 15-1/4″.
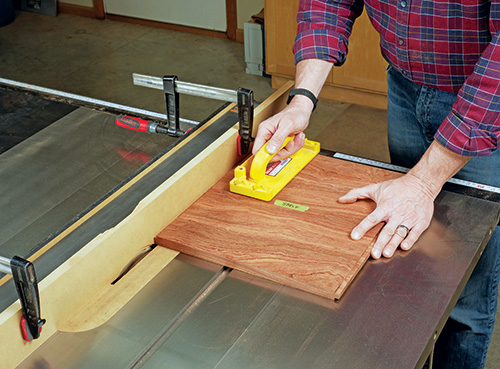
Dry-assemble the sides, top and shelf to make sure the dovetail joints close fully with the shelf in place and the sides are square to the top.
Adding Curves and Finishing Up
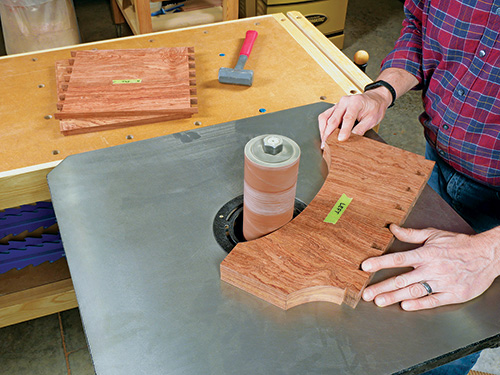
Disassemble the project so you can use double-sided tape to stick the side panels together in a stack with their inside faces touching. Mark one side panel for the large arch that forms the stand’s 2″-wide “feet” on the bottom edge. I made the apex of this arch 2″ and used a large French curve to create the shape. Draw the smaller curve from the front half pin socket down to the front edge of the side panel 4-1/4″ up from the front foot. Saw these curves into the ganged side panels at the band saw. Then sand the curves smooth and fair.
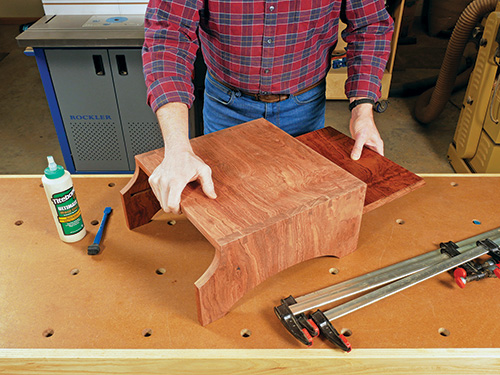
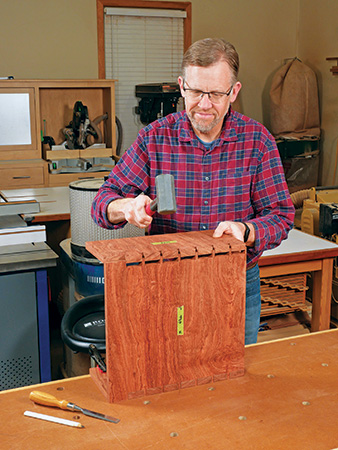
Give all the stand’s parts a final sanding before assembling them. Spread glue on just the dovetails, and clamp up the project with the shelf dry-fitted in place. This way, you can remove the shelf after the glue dries to prefinish it and the interior surfaces of the project next. My bubinga certainly needed no stain, so I simply sprayed it with three coats of aerosol satin lacquer. Once that was done, I flattened the protruding dovetail joints, glued the shelf into its grooves and sprayed the outer surfaces of the project.
Allow a week for the finish to cure, then this office machine stand is ready for use. And you’ll have another hand-cut dovetailed project under your belt!


