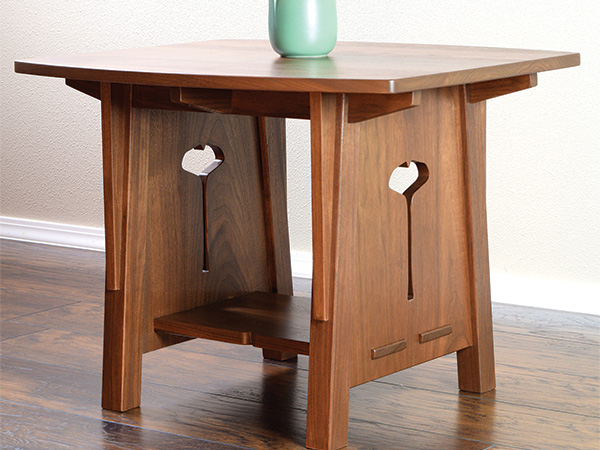
Although it’s my original design, the inspiration for this ginkgo leaf table draws heavily from Japanese influence. Tapered elements that are wider at the base, and rafter-like members that project through legs and posts, are common in Japanese designs — in both furniture and architecture. Other elements of the table, such as the solid panels with leaf cutouts, are reminiscent of Dutch designs dating back hundreds of years. I found that this table’s angled joinery makes it both a joy and a challenge to build.
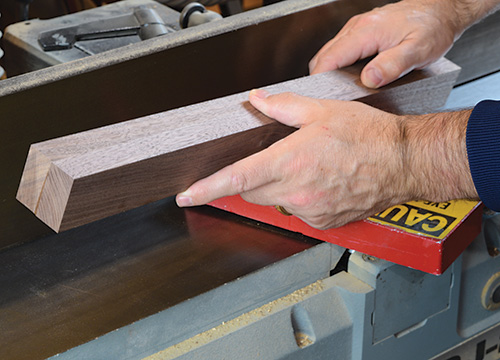
Mine is constructed from solid walnut lumber. If you’re fortunate enough to have 8/4 stock available, you can simply cut the legs from a plank of walnut. My best-looking stock was only 7/8″ thick, so I laminated leg blanks from two strips of wood.

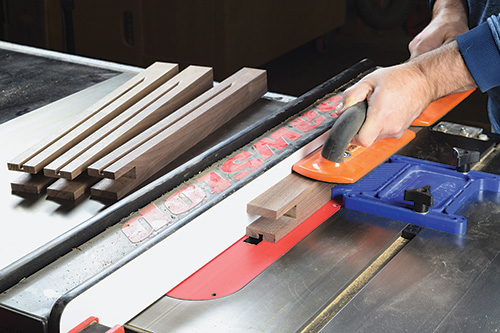
Rip eight strips of walnut 1-3/4″ wide, and glue them together in pairs to make four legs. Once the glue cures, flatten and plane them to a finished size of 1-5/8″ square by about 19-1/2″ long (the legs will be trimmed to final length later).
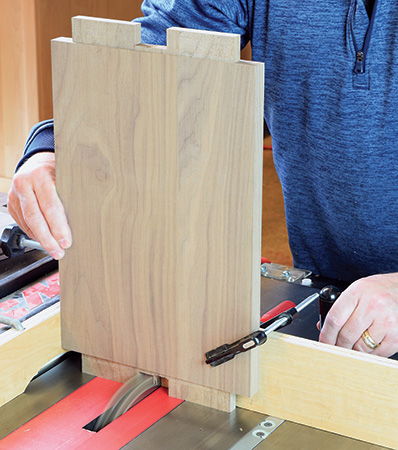
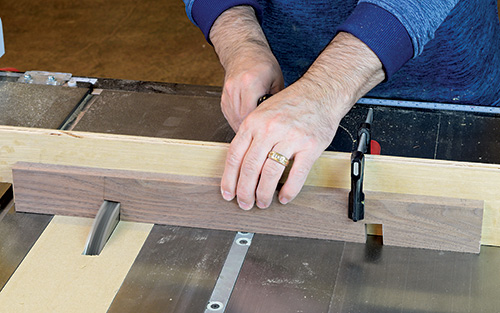
Leave their ends square for now, as the notch at the top of each leg needs to be cut before the legs are angled. Use a tenoning jig and dado blade to form those 3/4″-wide x 2″-deep notches at the table saw. I installed a 5/8″-wide dado stack and cut each notch in two passes, flipping the legs to opposite faces for the second cut. This centers the notches perfectly.
Once the notches are completed, go ahead and miter-cut the top and bottom ends of the legs at a 5-degree angle. This operation can be tackled at either the table saw or on a miter saw. I chose to use a standard blade and my miter gauge equipped with a long auxiliary fence at the table saw.
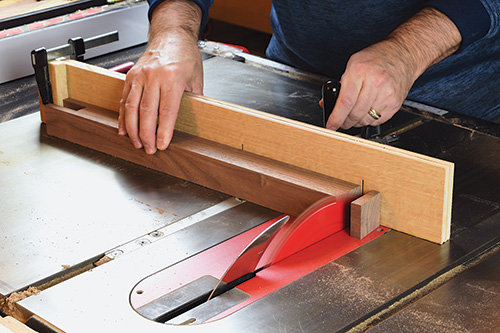
First, miter-cut the top of the leg, then slide the leg down the miter gauge fence, making sure to keep the leg in the same orientation. Set a stop block on the auxiliary fence, and trim the leg to a final length of 18-7/8″ (measured “long-to-short”).
Creating the Side Assemblies
Next, glue up a pair of side panels from 3/4″ stock. Trim these panels to overall size. Their pleasant tapered shape is 5 degrees along each edge, so set a bevel gauge and draw layout lines to mark these taper cuts.
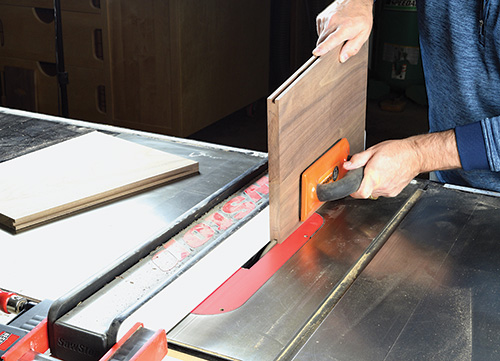
I used a shop-made tapering sled at the table saw to cut the angles uniformly. If your shop isn’t equipped with one, a circular saw with edge guide could also work fine. When you trim off these edges, be sure to save the offcuts for use as the table’s corbels.
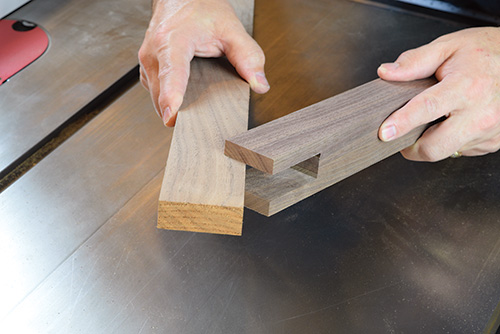
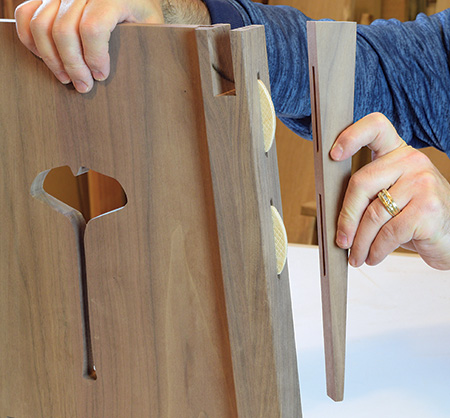
There are a number of ways you can attach the legs to each side panel. Loose tenons or biscuits typically work well for this sort of application, as do splines and grooves. Dowel joinery would be problematic because it wouldn’t allow any adjustment to align the parts. I decided to go with loose splines fitted into grooves in the legs and panel edges.
To mill the stopped grooves, install a 1/4″-wide dado blade in your table saw. Start by setting the blade height to 1/4″, and position the rip fence for a centered cut on the panels. Clamp a stop block to your table saw’s rip fence to limit the length of cut to 15″, so the groove stops about an inch from the bottom of the panel.

Complete all four grooves this way, before adjusting the rip fence for a centered cut on the legs. Each leg receives one groove, also approximately 15″ long. Make some spline stock to fit these grooves, and test fit the legs with the side panels. Don’t glue the side assemblies together just yet, as we have a couple more steps to complete first.
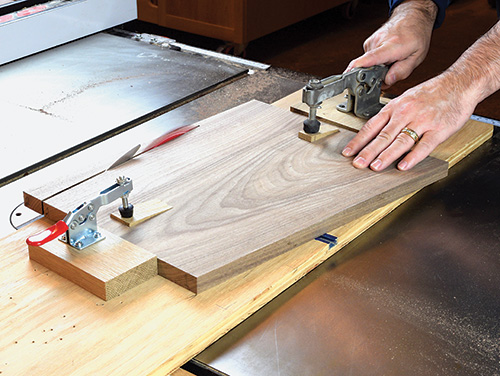
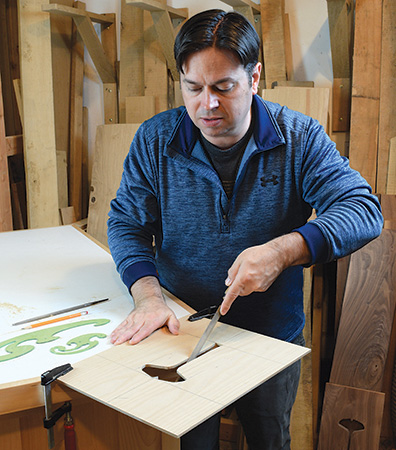
A template is useful to make matching ginkgo leaf cutouts that dress up the side panels. I made a full-size template for them from 1/4″ plywood. Lay out the ginkgo leaf shape on the template using a set of French curves and following the gridded Drawing. Cut out the template’s shape with a jigsaw or scroll saw, and refine it with files.
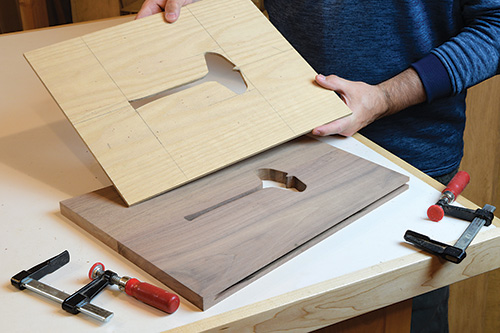
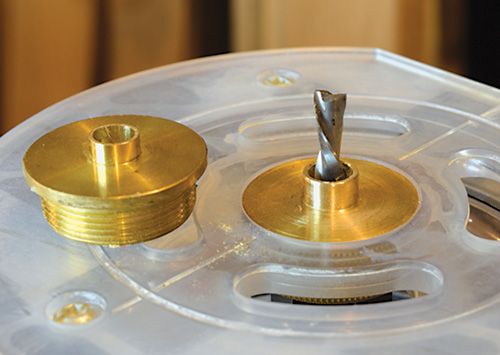
Once the template is complete, clamp it to a side panel, and rough out the shape with a router. I used two different router setups to cut out the leaf shapes. My first was a 1/4″ spiral bit paired with a 7/16″ O.D. guide bushing.
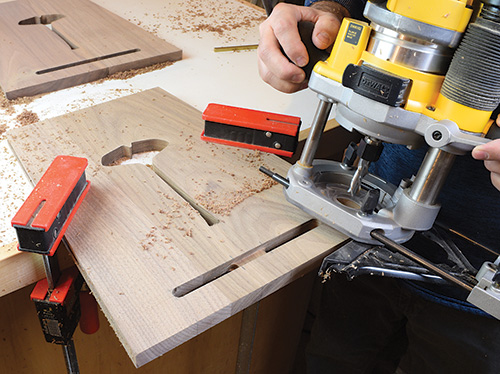
Make several clockwise passes to remove the material, increasing the depth of cut with each pass. This will invariably leave some lines and ridges, so there’s one more step to clean up the cut: I switched to my 3/8″ O.D. guide bushing and made one final clockwise pass around the template cutout. This left a nice clean surface that only required some light hand sanding.
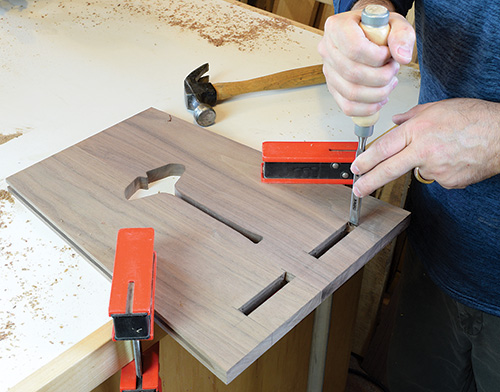
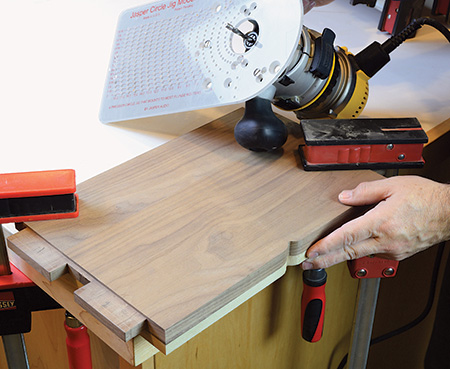
Through mortises in the side panels for the lower shelf come next, and that’s another job for the router. Carefully lay out the mortise locations on both faces of the side panels. Outfit your router with an edge guide and a 1/2″-dia. spiral bit, and cut just short of your layout lines. I plowed the 3″-long x 1/2″-wide mortises into the outside face first.
Then maintaining the same edge guide settings, I flipped the side panel over and extended the mortises to an overall length of 7-1/2″ (I trimmed the material between the mortises to a depth of 1/4″ on the inside face as well to preserve the strength of the panel). Finish the job by squaring up the four mortise ends.
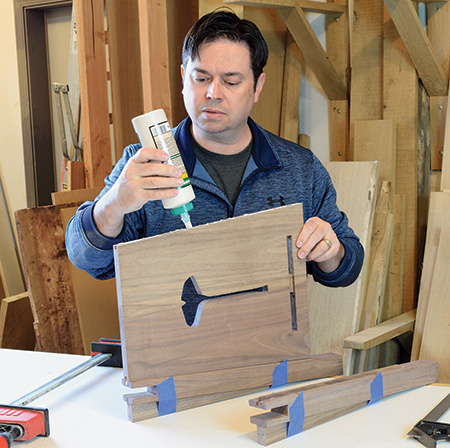
At this point, all the joinery for the side assemblies is complete. Go ahead and sand all the parts you’ve made, and glue a pair of legs to each side panel with the splines installed. Use your panel offcuts as clamping cauls when you bring each side assembly together.
Once the glue sets up, trim the panel offcuts to a length of 12″, and install them as corbels — one on each leg. I used a pair of #20 biscuits to center and attach these corbels on the leg. Align the corbels flush with the top of the legs, and glue them in place.
Making the Shelf
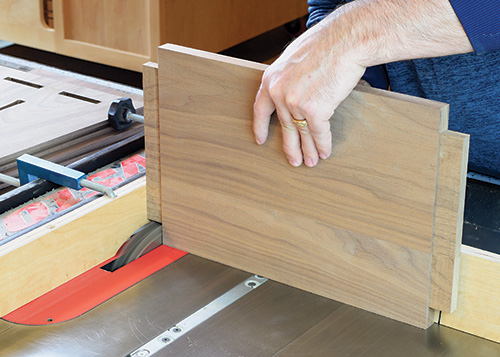
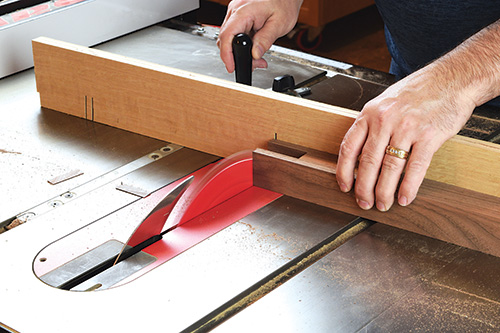
Glue up a panel for the shelf, if you’re working with narrow stock, then cut it to 9-1/2″ wide and 15-3/4″ long. Now switch to a wide dado stack, and install an auxiliary fence on your miter gauge so you can raise a 1″-long tenon on each shelf end.
Make multiple passes until the tenons ease into the mortises from the outside face. Once the tenon thickness is established, turn the shelf on edge and raise the dado blade to a height of 1″ to form its outer shoulders. Finally, turn the shelf up on end, lower the blade to 3/4″ and make side-by-side cuts to separate each long tenon into two with a 1/4″-tall shoulder in between.
I added a V-notch detail in the long edges of the shelf to echo the ginkgo leaf motif. You could make a template for pattern routing these notches, or simply make the cuts at the band saw and sand them smooth. Use a file to refine the point of the “V” here the bit can’t reach, if you rout these notches.
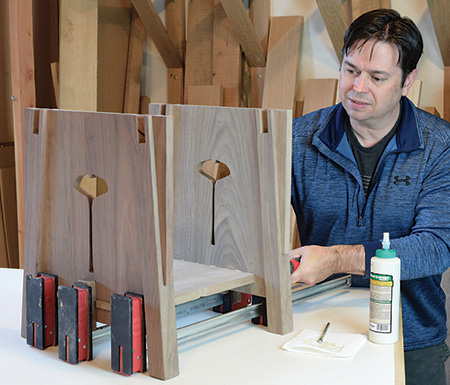
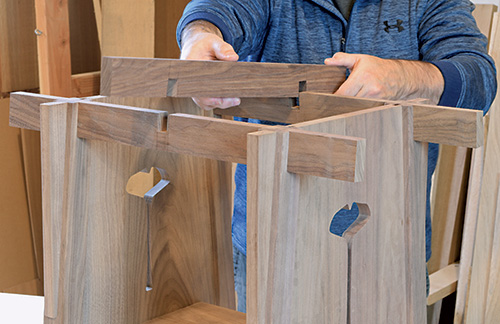
You’re rounding third now and on the home stretch with this intricate little table! For the final glue-up, bring the two side assemblies together with the shelf. Small blocks may be helpful to direct clamping pressure between the protruding tenons. Ease the edges of the clamping blocks to avoid denting or damaging the side panels.
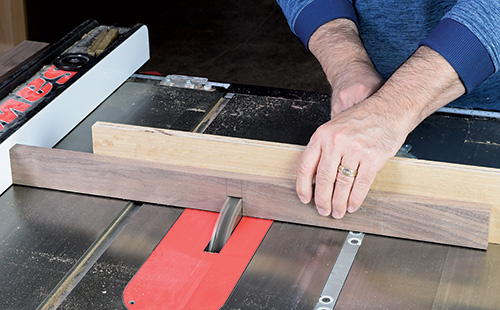
Next up, make the two stretcher rails that will nestle into bridal joints atop the legs. These 3/4″-thick rails are 2-1/8” wide x 24″ long.
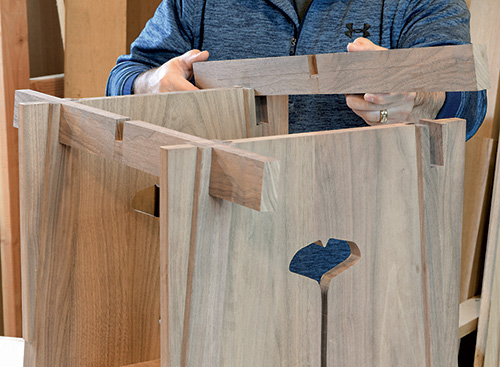
The only wrinkle here is that the top edges of the rails need to be angled to sit flush with the legs.
So tilt your table saw blade to 5 degrees and rip the stretchers to width as needed until the parts fit. Then crank the blade back to 0 degrees and cut the cross rail to size.
Forming Half Laps and Adding the Top
Go ahead and install a 3/4″-wide dado stack so you can form the table’s half-lap joints. Set the blade height to about an inch, and cut a centered notch on the top edge of each stretcher rail. Now two complimentary notches need to be formed in the bottom edge of the cross rail. For this part of the half-lap joint, tilt the arbor on your table saw to 5 degrees, and make the two opposite-facing notches. To locate these notches correctly, install the stretcher rails on the table legs and measure directly from these parts. Use a bevel gauge to mark the exact location of the angled notches.
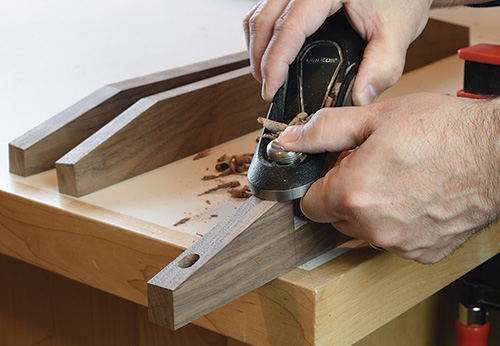
While the cross rail is still a loose component, drill it for the figure 8 tabletop fasteners. You’ll also need one centered and two elongated pilot holes for screws at each end. Then you can create tapered ends on all three rails. Mark a line that leaves their ends about 7/8″ tall. Cut these angles at the band saw, and plane them smooth.
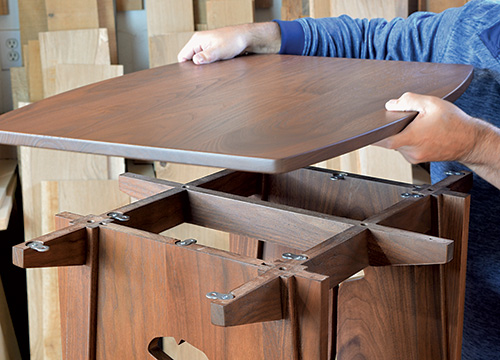
If the half laps fit together correctly, you’re ready to permanently attach them with screws and glue. Countersink and pre-drill the stretcher rails for #8 x 2-1/2″ screws, driven into the legs from the top. The cross rail can be attached in a similar fashion to the stretcher rails with a pair of #8 x 1-1/2″ screws.
All that’s left to make is the tabletop. It starts out as a 22-5/16″-wide x 26″-long panel. Lay out a curved treatment along its edges with a bowstring, so the ends of the tabletop are reduced by the curves to 18-1/4″ wide. Band saw these barrel-shaped curves and sand the top smooth. Round over any sharp edges, and give the table a final inspection with a shop light to check for any imperfections.

As far as finishing goes, I often use a medium color “fruitwood” oil-based stain on walnut projects. While some may argue that walnut doesn’t need stain, I find that it darkens the wood in a pleasant way and tends to unify the parts. If you choose a liquid stain as opposed to a gel stain, the natural grain of the walnut won’t be obscured. After the stain on my table dried overnight, I sprayed on a top coat of pre-catalyzed lacquer in a satin sheen. Attach the top with figure 8 fasteners to allow for seasonal movement, and this Asian-inspired side table is ready to display your favorite vase.


