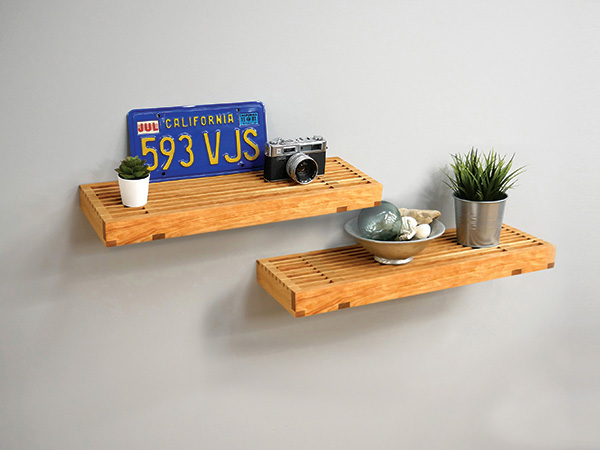
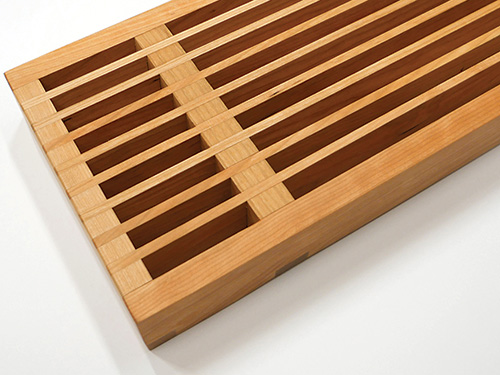
Floating shelves hung on hidden supports are really popular these days, particularly those made of thick slabs of natural edge lumber. My wife and I thought they’d be a good solution for our family room, but we wanted a lighter look than chunky slabs. I’ve seen bench seats made of interlocking slats and crosspieces before, so I mimicked that same concept here. The thin, evenly spaced slats shed weight and add some interesting geometry!
Building this shelf will definitely give your dado blade a workout, with lots of repetitive cutting. But ganging the parts together, and using Rockler’s Cross Lap Jig, will help to speed the process along and ensure accuracy.
Machining the Front Slat
Let’s get this project started by making blanks for all the parts you see in the Material List. You’ll need some 1″-thick stock for the two middle supports, 3/4″ stock for the front and back slats and end supports and 1/4″-thick strips for the eight filler slats.
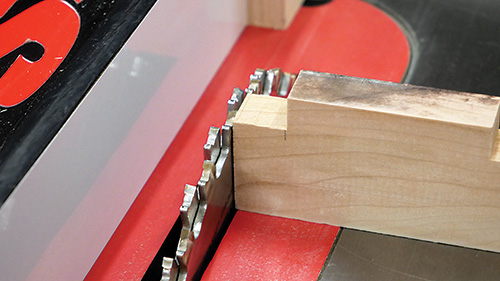
Set up a 3/4″-wide dado blade in your table saw and raise it to 1/2″. With a step-off block clamped to your saw’s rip fence for safety, mill a 3/4″-wide notch into each bottom corner of the front slat, flipping the workpiece end-for-end to make these two cuts. Then reset the rip fence so you can cut two 1″-wide, 1/2″-deep dadoes in the front slat that eventually will house tongues on the front ends of the two middle supports.
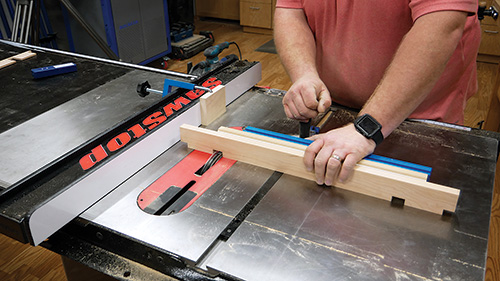
Gang-Cutting with Painter’s Tape
As you can see in several photos here, we’ll be gang-cutting groups of similar parts. It’s a great way to speed the repetitive cuts along. Gather together the filler and back slats into one bundle, and group the middle and end supports for a second bundle. Align the part ends carefully for each grouping, and wrap tape over their top and front surfaces to secure them. I didn’t wrap tape all the way around the bundles in order to keep tape off the saw table and miter gauge fence — all the repetitive cuts will wear through it, leaving tape shreds that can gum up the saw table.
Notching the Filler and Back Slats
Carry out the same process for milling the filler and back slats as you did for the front slat, only this time raise the dado blade to 1-3/4″. Use the front slat as a guide to set the rip fence so you can cut a pair of 1″-wide dadoes in the bundle for the middle supports, flipping it end-for-end between cuts. Then reset the fence to cut a 3/4″-wide notch into this group on both ends. You’ll know you’ve tackled this cutting operation correctly if your filler/back slat bundle ends up looking the same as the front slat does, only with much deeper cuts at each location.
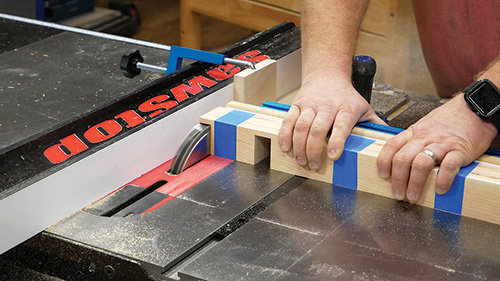
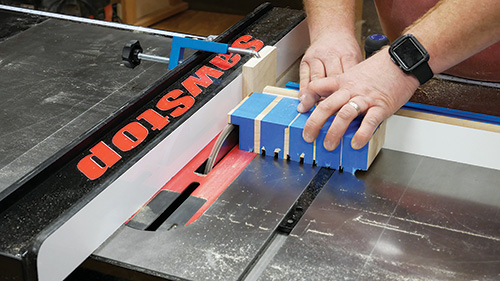
Cross-Lap Jig for Even Spacing
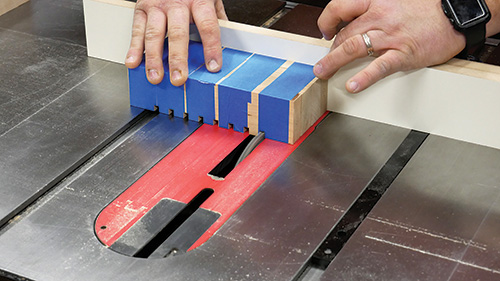
Next, we’ll cut a series of eight 1/4″-wide x 1/4″-deep dadoes into the top edges of the middle/end supports bundle to form the cross-lap connections for the filler slats. So change out your 3/4″-wide dado for one that’s 1/4″ wide, and set it 1/4″ high.
These dadoes need to be exactly 1/2″ apart, which is where Rockler’s Cross Lap Jig comes in handy: it has adjustable metal indexing pins that engage each dado you cut to set the spacing for the next dado perfectly. Go ahead and cut these dadoes, positioning them 1-1/4″ in from the part ends.
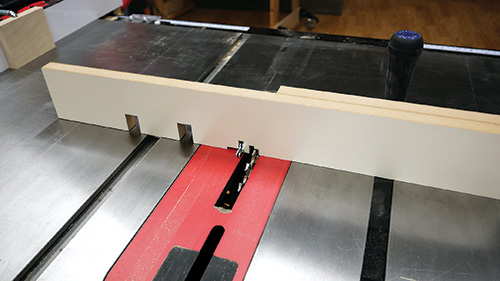
We still need to cut a 1/4″-deep, 3/4″-wide notch into the top back corner of this bundle to finish the cross-lap joint with the back slat, so install your 3/4″-wide dado blade again and clamp the step-off block to the rip fence to mill the notch.
Then, without moving the rip fence, crank up the blade height to 1-1/2″ to cut another 3/4″-wide notch on the other end of this bundle. It will leave a 1/2″-thick tongue on the bottoms of the middle and end supports that fits into the bottom openings of the front slat to wrap up those cross-lap joints.
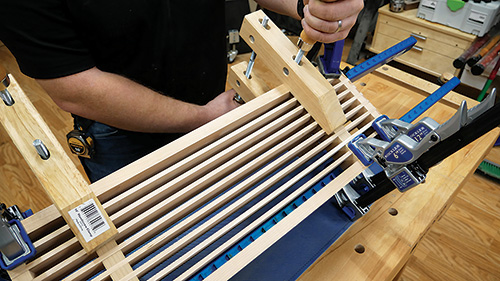
Assembly: A Little Glue Will Do
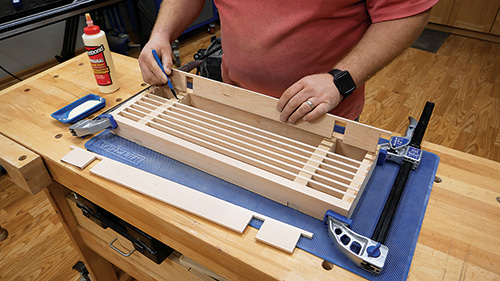
At this point, you’ve got a lot of loose parts that are just begging to get put together! But don’t jump the gun here. Now is the time to carefully finish-sand them all up to 180-grit. While sanding, I made sure to not round over any edges, which could detract from the crisp, clean look of a well-made cross-lap joint When you’re done sanding, clamp and glue the front and back slats together with the middle and end supports to form your shelf’s frame. Apply just enough glue to avoid any glue squeeze-out. Now go ahead and insert the filler slats, applying dabs of glue to each cross-lap surface. As these slats fit into place, you’ll notice that the shelf will become more and more rigid. When all the filler slats were in place, I used long wooden handscrew clamps to press them down tightly to the cross supports.
Allow the assembly to dry overnight, then apply finish. I brushed on several coats of Watco® Natural finish, which really seemed to bring the cherry to life!
Installing Blind Shelf Supports
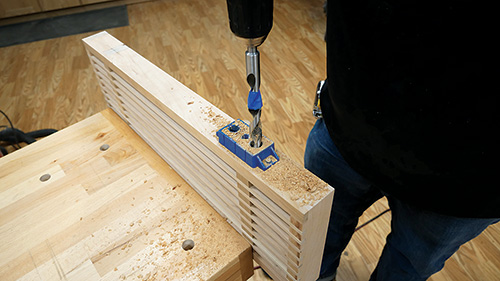
With the assembly process behind you, it’s time to hang your new shelf. I opted for Rockler’s I-Semble Heavy-Duty Blind Shelf Supports to mount mine to the wall. The hardware consists of two differently-sized steel rods that are each welded to a steel plate. The thinner rod component fits into a hole in the shelf and the thicker rod component goes into a hole in a wall stud. The steel plates screw together and fit into mortises in the shelf back to hide the hardware. These Blind Shelf Supports are rated to hold up to 125 lbs per two supports, when installed into stud locations no more than 32″ on center.
Before I routed out mortises in the shelf’s back slat, I used Rockler’s Blind Shelf Support Drilling Guide to bore 9/16″-diameter holes for the rods that go into the shelf. Start by marking a centerline on the back of the shelf and locating two marks that are 16″ on center and align with the centers of the middle supports. Drill the holes 5″ deep.
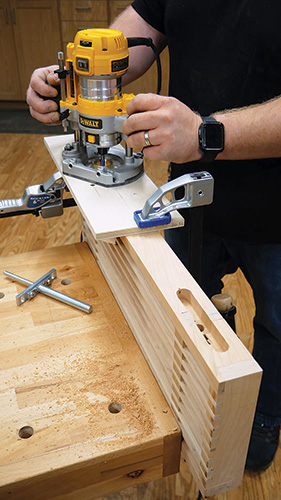
Once those holes are done, it’s time to mortise for the hardware plates. To do that, I created a slotted jig from a piece of 1/2″ plywood with a fence underneath to clamp against the shelf. I routed a 7/8″-wide x 4-1/2″-long slot through the jig’s top panel, centered on it.
With the jig clamped in place on the shelf’s back edge, a 5/16″ guide bushing and a 1/4″ straight bit in my router enabled me to cut a 3/4″-wide mortise for each of the two shelf supports. I milled these mortises 5/8″ deep.
To hang the shelf, I located two 16″ on-center wall studs and established a level line between them. Using the Blind Shelf Support Drilling Guide and a 21/64″ bit, I drilled 3″-deep holes for the support rods into my wall studs. I assembled and leveled the brackets with their included screws, then slid the shelf onto its rods to hang it.
Click Here to Download the Drawings and Materials List.
Hard-to-Find Hardware:
I-Semble Heavy-Duty Blind Shelf Supports (1) #59434
21/64″ Black Oxide Drill Bit, 4-5/8″ length (1) #54702
14mm HSS Brad Point Drill Bit for Wood (1) #56029
Blind Shelf Support Drilling Guide (1) #62744


