If there is a single piece of machinery I couldn’t do without in my workshop, it’s the table saw. It’s the first machine I bought when I set up my first shop nearly four decades ago: an old used Craftsman saw I bought for $35. From day one, I used that saw for all the basic cuts I needed for my first cabinetry projects and custom furniture commissions.
Even though it wasn’t the best saw in the world — it had a weak motor and a puny 8″ blade that was difficult to tilt — that vintage saw did yeoman’s duty, ripping and crosscutting boards (i.e., cutting them both with and across the grain), cutting miters and bevels and grooves and dadoes. As I took on more complex projects, I discovered just how versatile a table saw could be. Using both store-bought and shop-made jigs, I expanded my saw’s repertoire to include cutting tenons and box joints, raising panels and more.
Just What Can a Table Saw Do?
This versatile machine is capable of such a wide variety of cuts, it’s no wonder that a table saw is the centerpiece of most modern shops.
Using nothing more than the basic equipment that comes standard, you can perform all the basic cuts needed for an endless number of traditional woodworking tasks and home improvement projects:
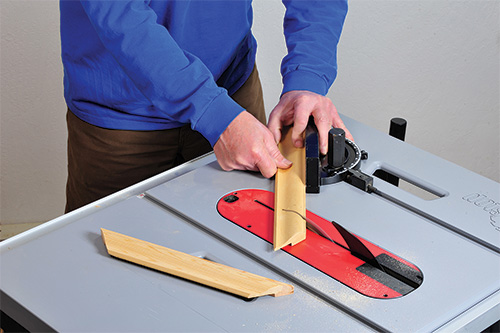
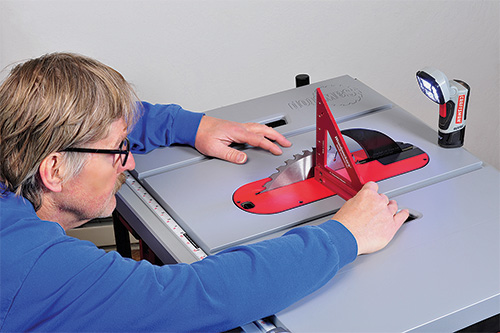
Using the miter gauge, you can cut 45˚corners for picture and mirror frames and small boxes, cases and drawers. The rip fence is used to cut stock to width, panels to size, or to recut boards, thickness wise, to make your own veneers or split stock to book-match the grain for decorative panels. Working with the saw’s blade tilted, you can take compound cuts for frames, chests or planters with angled sides. Fit the saw with a dado blade and you can cut all manner of grooves, dadoes and rabbets, perfect for simple cabinet joinery, say to build a bookcase or display shelf.
By employing a variety of jigs and fixtures, a table saw can perform a vast array of tasks including:
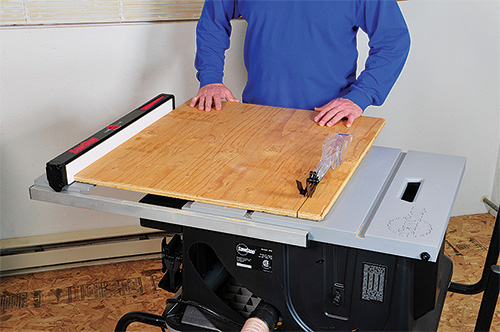
– Cutting large sheet goods to size. Sliding tables, crosscut sleds, and long extension tables can all be used for safely sawing full-sized sheets of plywood and large panels to final size when building cabinets and furniture.
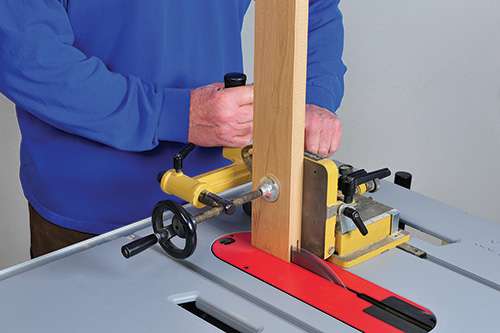
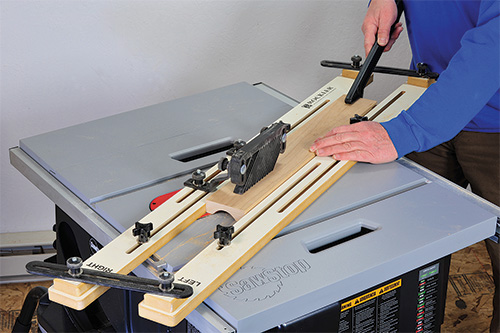
– Sawing tenons for mortise-and-tenon joinery. Tenons are cut by passing frame members vertically past the saw blade using a sliding jig.
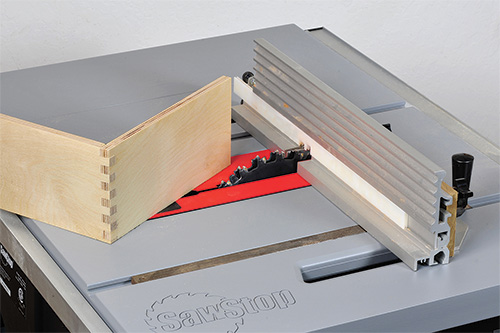
– Cutting box joints. Milled with a dado blade and special jig, box joints are a series of alternating fingers and notches that interlock to form the corners of boxes, drawers, blanket chests, etc.
– Tapering. A tapering jig is used to cut tapered furniture legs and other parts that need to be wider at one end than the other. Bevel-cut tapered staves can be used to build projects with angled sides, like stands and planter boxes.
– Panel raising. By running the edges of a panel vertically past a slightly tilted blade, you can raise them (where the edge is thinner than the middle) for classic looking classic-looking raised panel doors. Smaller panels can be cut using the standard rip fence as a guide; larger panels require a jig.
– Cutting coves and moldings. Using a special fence jig that guides the stock at an angle over the top of the saw blade, you can cut hollow shapes for moldings and trim. (Look online for additional information, including a video, on how to make cove cuts.)
– Shaping stock. Fitting a table saw with a molding head — a special blade with interchangeable cutters — allows you to cut many of the same profiles that you’d normally create with a shaper or router: beads, ogees, flutes, etc.
Choosing a Table Saw
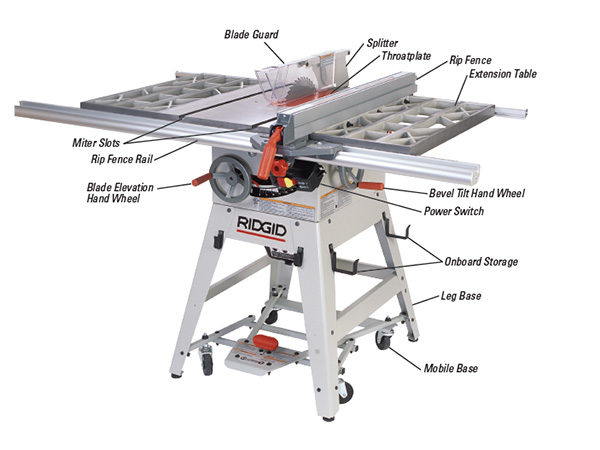
All table saws are basically built the same: a motor powers an arbor-mounted saw blade; controls allow you to raise and/or tilt the blade above a table that supports the workpiece. Beyond that similarity, there are several different types of table saws to choose from, including cabinet, contractor, portable and benchtop. The particular type, make and model saw you choose will depend on various factors, including the saw’s overall size and capacity, how powerful it is, how portable it is, its features and, of course, how well it fits your tool budget. Particular models are better suited to some woodworkers’ needs more than others. For example, it doesn’t matter if your saw is super light and portable if it doesn’t have the power to handle the heavy stock you need to cut and, conversely, a powerful saw doesn’t help you if it’s too big and heavy to move around your shop that must serve double duty as your garage. A quick rundown on the four most common types of table saws will help you decide which one is best for you:
Cabinet Saw
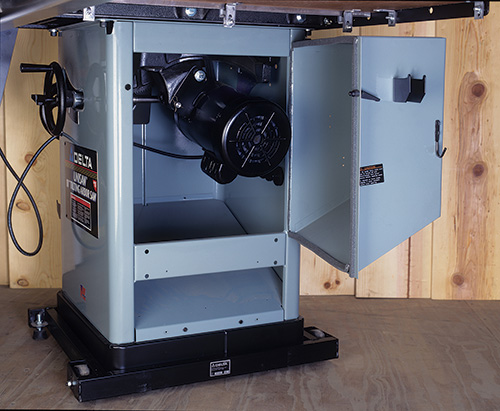
The first choice of professional woodworkers and serious DIYers, the “cabinet” in a cabinet table saw refers to the boxy sheet-metal base that totally encloses the saw’s inner workings. These saws feature heavy-duty trunnions and saw arbors designed to keep their 10″ or 12″ saw blades (depending on the model) running rock solid even during the most punishing cutting situations. Power is supplied by a 2-, 3- or 5-hp induction motor (single or three-phase) controlled by a magnetic motor starter switch. Most models feature a large extension table to the right of a heavy cast-iron saw table and long rails that allow them to cut panels up to 52″ wide or more.
Don’t want to spend big bucks on a top-shelf cabinet saw? Some saws, including JET’s ProShop series, are hybrid models that incorporate some features of cabinet saws into more compact and affordable contractor style machines with partially enclosed bases.
Contractor Saw
The traditional choice of professional contractors and home workshops, the contractor saw includes about three-quarters of the features of a cabinet saw in a lighter and more affordable package.
You can spot this saw by its open-legged sheet metal stand and motor and bracket hanging off the back. Most models feature a 10″ blade, sturdy cast-iron or cast aluminum table and an extension table and fence rails long enough for rip cuts 24 to 30 inches wide or more. Most saws sport induction motors in the 1-1/2- to 2-1/2 hp range: ample enough to power a saw blade through wet construction lumber, thick sheet goods and hardwood stock.
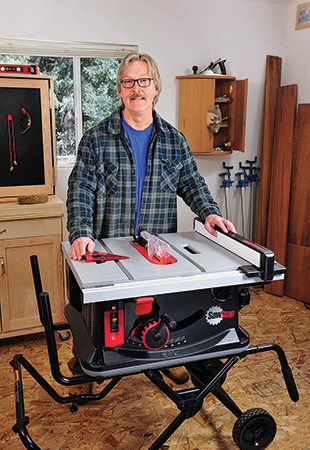
Portable Jobsite and Benchtop Saws

Although lighter and more compact than other saws, portable jobsite and benchtop table saws are impressively powerful and full-featured. Most models use a standard 10″ saw blade and have the same depth-of-cut capacity (3-1/8″ at 90°) as full-sized saws. To get a portable’s weight down, heavy steel and iron parts are replaced by aluminum alloy castings and/or molded plastic. Weighty induction motors are replaced by the same kinds of universal motors used in portable power tools. Although noisier and not as powerful as induction motors, universal motors can handle most light- and medium-duty cutting jobs. Some portables have built-in folding stands with wheels that make them very easy to move around and stow when not in use. Benchtop models have short bases and must be mounted on a work table or stand before they’re ready to run.
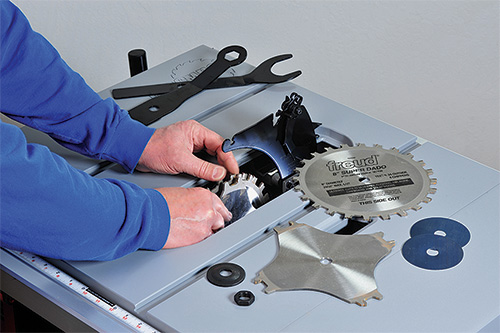
Selecting Blades
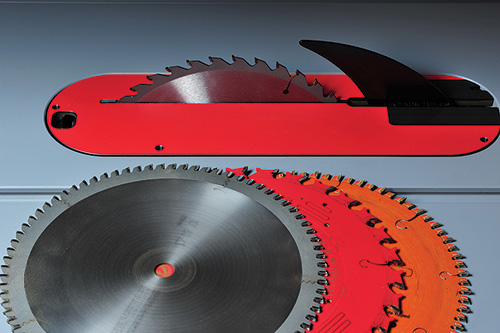
Although just about any saw blade will cut wood, you’ll get better long-term performance with a good carbide-tooth combination or “general-purpose” blade, such as the Forrest Woodworker II. As their name implies, these blades can tackle most of the everyday cuts taken on a table saw. But for the best, cleanest, cuts, choose a saw blade that’s specifically designed for the kind of cut you’re taking.
Crosscut blades, such as Freud’s D1080X Diablo, employ a high number of teeth (60 to 80 on a 10″ blade) with an alternating-top-bevel (ATB) tooth grind to produce square- or miter-cut ends that look as though they were sanded smooth. In contrast, ripping blades have far fewer teeth: typically 24 to 30 on a 10″ saw blade. Each rip tooth has a flat grind and a high hook angle, allowing it to slice through wood fibers along the length of a board. Thin-kerf blades (combo, crosscut or rip) require less motor power to run and generate less sawdust, to boot.
For super-clean cuts in materials such as plywood, melamine, plastics and nonferrous metals, choose a saw blade specially designed for cutting that material.
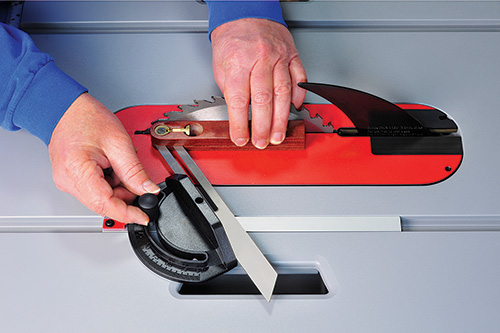
Cutting wide grooves, dadoes and notches for joinery, such as box joints, calls for a dado blade. A stacking dado set sandwiches individual chipper blades between a pair of outer saw blades. You change the width of the groove/dado by using more or fewer chipper blades, with shims between them.
Table Saw Safety
First of all: never adjust a table saw or check a saw blade without first unplugging the saw. Using safe table saw operating practices (see the “Making the Cut” section of this article for more), push sticks and featherboards can help avoid unfortunate accidents — as can the following safety devices specifically designed for your saw:
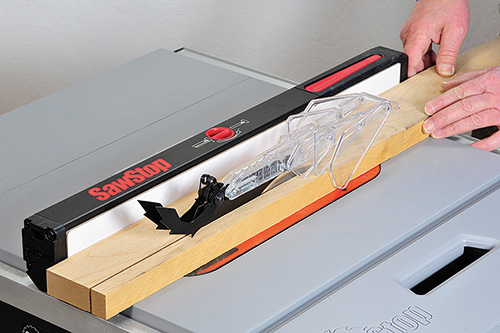
– Blade guard. Most stock blade guards have a hinged, clear plastic hood that surrounds the saw blade, allowing stock to be fed while preventing fingers from straying into the blade. The guard also deflects sawdust and small cutoffs from being thrown up toward the operator. Unfortunately, stock blade guards can be fussy to set up and must be removed for operations such as dadoing, box joint cutting, etc. It’s best to employ shop-made guards during these special operations, or fit the saw with an over-arm-style guard: a clear box-like guard suspended above the saw blade.
– Splitters and anti-kickback pawls. Whether built into the blade guard or mounted separately, a splitter (aka riving knife) is a thin steel vein set right behind the blade. It’s designed to keep the saw kerf from closing up and binding the blade as stock exits the cut, thus preventing the saw motor from stalling and the work from being hurled back at the user. Usually mounted on either side of a blade’ guard’s splitter, anti-kickback pawls are spring-loaded fingers with serrated points that scrape along the top of the work as it’s fed through the cut. They are “one-way” devices that further prevent stock from kicking back.
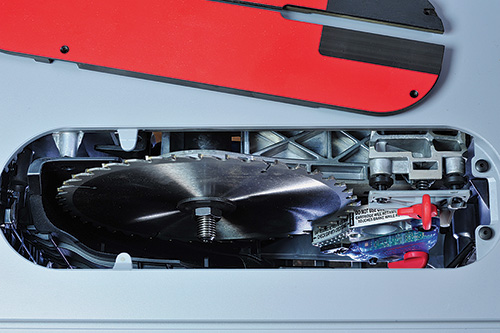
– SawStop. One of the most significant developments in table saw safety is the safety system incorporated into all SawStop brand table saws. The blade on the saw is charged with a small electrical signal. If the user’s skin accidentally contacts the blade, the electrical signal change activates the saw’s safety system: An aluminum brake springs into the spinning blade, stopping its rotation in less than five milliseconds. The blade’s angular momentum drives it down beneath the saw table, removing the risk of subsequent contact, and power to the motor is shut off.
– Dust Collection. Although it doesn’t prevent saw blade-related accidents, using dust collection with a table saw is an important part of protecting yourself from respiratory-related ailments.
That’s especially important because most table saws throw dust around like crazy. Fortunately, most saws these days feature a dust port, which makes hooking the machine up to a portable or central dust collector a simple matter.
Prepare a Successful Cut
Before you take your first cut, it’s important to make sure that your table saw is clean, in good condition and properly adjusted. (You can find hints on how to make this happen in my table saw tune-up article, posted online.) A poorly set up and/or maintained saw is not only bound to be less accurate, but it also can be downright dangerous to use. For example, stock being ripped using an improperly aligned rip fence may kick back suddenly and cause injury. Also make sure your saw blade is sharp and running smoothly, without vibration or obvious wobbling.
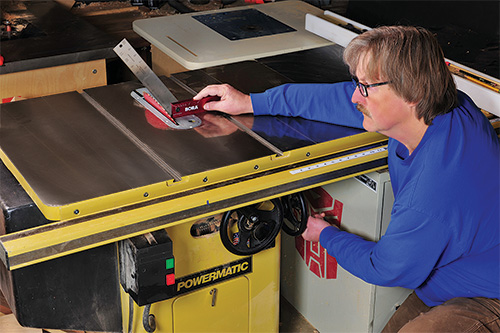
Basic saw prep before any cut should begin with checking the angle and height of the saw blade. Once you’ve mounted and secured the best type of blade for the job at hand, install a throatplate that, ideally, has the narrowest opening that still allows the blade to spin freely. For regular 90˚ cuts, raise the saw blade up to near full height and check the blade’s squareness with a dependably accurate try square, placing the edge of the try square flat against the body of the blade. It helps to put a flashlight behind the square as you sight to see if there’s any light showing between the square and blade. If there is, adjust the angle using the table saw’s bevel (tilt) adjuster (reset the tilt stop if necessary).
For bevel cuts, tilt the saw blade to the desired angle and check it with a protractor, angle block or sliding bevel. After adjustments, it’s very important to reset the height of the saw blade so that only about 1/4″ of the blade protrudes above the thickness of the stock you intend to cut.
From there on, saw preparation depends on the kind of cut you intend to make. When ripping stock, set the distance between the face of the rip fence and edges of a saw blade tooth closest to the fence to the desired width of cut (your fence should already be adjusted so that it’s near parallel to the saw blade, with just a skosh of clearance at the back edge of the blade). If your fence has a built-in cursor and scale, make sure that it reads accurately with the blade you’re using; double-check with a rule if there’s any doubt. Lock the fence, and you’re ready to rip.
To prepare for crosscutting, set the angle of your miter gauge relative to the blade. As when checking blade squareness or tilt, use a try square or protractor/ bevel gauge to check the setting (your saw table’s miter slots should already be set parallel to the saw blade). Now is a good time to set the miter gauge’s built-in stop(s), so you can repeat oft-used angle settings (90°, 45°, etc.) more quickly in the future.
Tilt Right or Left?
Traditionally, table saws tilted their blades to the right, in the direction of the rip fence, as was viewed most practical for right-handed users. A few long-standing models, including the Powermatic model 66, tilt their blades to the left, which helps prevent stock from binding and kicking back during bevel cuts. Taking miter cuts with the blade tilted left is also advantageous, as marked cut lines are on top where you can see them. While many woodworkers still prefer a right-tilt saw, left-tilting saws are popular enough that many makes/models of cabinet, contractor and portable saws are now available as southpaws.
Making the Cut
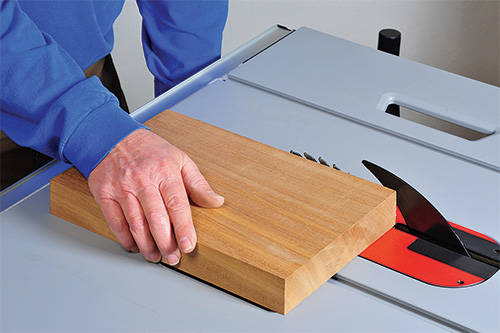
Regardless of the kind of cut you’re making, make sure that the stock — and your hand and fingers — are clear of the blade before hitting the saw’s “On” switch. When taking a rip cut, make sure that one edge of the stock has been planed or jointed so that it’s arrow straight. Set that edge against the rip fence, start the saw, then use a push stick to feed the work into the spinning blade. Feed at an even rate of speed while keeping the work in firm contact with the fence. If your stock is narrow, it’s best to use a featherboard to keep the work pressed against the fence and down on the saw table. Whenever possible, stand to the side of the stock and blade rather than directly behind it. That way, if the workpiece is kicked back, it won’t strike you.
When ripping dense hardwoods or “problem” boards (wood with knots, twisting grain, etc.), the motor/blade may bog down as you cut. In this case, try easing off on your feed speed. If the work starts smoking or binds on the blade, it’s best to turn the saw off immediately, remove the board, then repeat the cut or switch to a different piece of lumber.
Large panels and sheet goods can also be ripped using the rip fence as a guide. If you cut a really big piece, make sure it’s well supported at both ends of the cut with infeed and outfeed tables or supports. You can also crosscut large panels as long as the work isn’t too long or the side that rides against the fence isn’t too narrow.
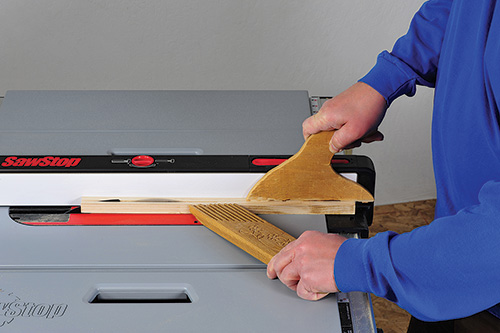
When using the miter gauge, make sure that the end of long workpieces won’t hang up on the rip fence before you begin. Unless your stock is hard to handle, you can use hand pressure to keep the work firmly planted against the face of the gauge (a piece of peel-and-stick sandpaper applied to the face helps keep the work steady during cutting). When you’re ready, slide the miter gauge and work slowly and evenly through the cut, making sure to keep both hands well clear of the blade. After the cut is complete, it’s safest to shut the saw off before removing the workpiece and cutoff scrap: never reach over a spinning saw blade! For long, large, or extra short workpieces, either clamp the work to the gauge’s head or use a table saw crosscutting sled or specialized jig.


