To give us as complete a picture as possible, I contacted two of the people whose Internet postings started the whole discussion, and got them to share their reasons for making these fascinating guards, and their methods of creating them. Interestingly, both made their guards for under one dollar. Since the concept originally came from Europe, I also contacted an English woodworker to help fill in the view from the far side of the big salty.
The first version comes courtesy of Carol Reed, a former college woodworking instructor, lecturer and demonstrator, the author of Router Joinery Workshop (Lark Books, 2003) and a frequent contributor to www.woodcentral.com.
“The guards and fences they use in Europe are considerably different than what we use here,” explained Carol. “They are more inclined to put their engineering dollars into a riving knife; what we call a splitter.” The difference between the two is that while our splitters are stationary, riving knives move up and down and tilt with the blade. “The function of a splitter or riving knife is to keep the wood from binding the blade, thereby reducing the likelihood of kickback.”
“Typically, European fences stop just past the front of the blade. Hence, there is no fence behind the blade to cause the wood to bind. Such a system is inherently safer with regard to kickback. The Unifence, on the Delta Unisaw, has a sliding fence face that can be retracted to the European position, but most American saw fences do not provide that feature.” Of course, even a front position fence, sometimes called a ripping fence here in the U.S., does not entirely prevent kickback, so a good splitter or riving knife is considered essential.
“My objective,” Carol continued, “was to have an effective accessory to the saw that gave me two features: a splitter to keep the wood from binding, and a deflector to prevent sawdust from being thrown in my face, which is typically what happens when you take the guard off. It really came home to me when I was ripping acrylic one day, and tiny molten shards were thrown into my face.”
Why take the guard off at all, I asked her? “You can’t see what is going on under the typical American guard, and human nature demands that we want to see what is going on.” I was well aware that a surprising number of woodworkers remove the guard that comes with their table saw.
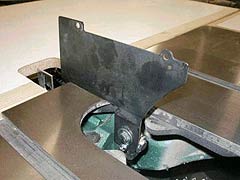
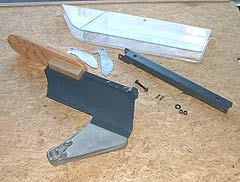
“The next criteria was to spend as little as possible to get a workable solution. I began with the stock guard and decided I really only needed the splitter portion, and would have to devise an adequate deflector. The first thing I did was rip the plastic shroud off the guard and throw it away. I kept the piece of metal it was attached to. I then removed and discarded the anti-kickback pawls. They have caused me more trouble than they were worth, consistently trapping wood between the pawl and the splitter, especially when cutting narrow boards.
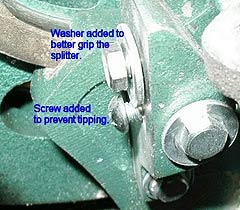
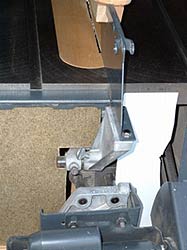
“My original guard attached itself at two points: below the throat plate, and outboard to the extension bar. I cut it in half so that it no longer interfered with my outfeed table. To keep the new, shorter splitter stable, I added another anchor hole to allow two-point contact and, hence, stability.
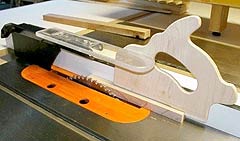
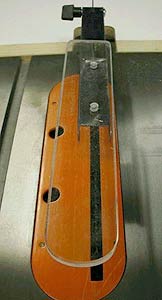
“At this point, I had a stabilized splitter that could be easily removed by loosening one bolt. All that was left was to create a deflector. I attached a piece of clear acrylic, two inches by eleven inches, to the top of the splitter. This piece must be offset not centered so that it allows room for a push stick on the fence side of the blade.
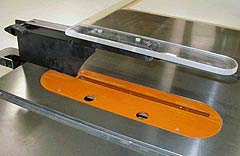
“Once I started to use it, another issue arose. On occasion, I need to remove the deflector, but keep the splitter. I removed the factory pivot pins on the splitter, and replaced them with a T-knob and a bolt. That made the deflector easily removable.”
“Incidentally,” Carol told me, “my design came after seeing Barb Siddiqui’s design. Between us, we refer to it as a ‘hot dog,’ because of the shape of the deflector we both used.” Where Carol used a clear acrylic deflector, Barb fashioned hers from a scrap of wood.
Naturally, I called Barb Siddiqui next. She describes herself as “a woodworker who operates a shop on a tight budget.” She writes a column for beginning woodworkers and book reviews for both www.woodcentral.com and Canadian Home Workshop Magazine (www.canadianhomeworkshop.com) Here’s how, and why, she made hers:
“I still use an older Craftsman contractor’s saw that only cost me $250, so it rankles to think of buying an expensive blade guard. I took the advice of Tage Frid in his book Tage Frid Teaches Woodworking, Book 1 (Taunton Press) and made myself a crown guard. He defines it as considerably safer and more compact than a standard guard.
“I simply tore apart the useless guard that came with the saw and discarded the pawls. The splitter had a series of holes to hold the plastic guard. I used them to pin blocks of wood, like cheeks, onto the splitter. To those, I glued the hot dog-shaped block. The block itself is about an inch and a half wide, and about seven inches long. Mine is tilted slightly to accommodate the shoe style push stick that I use.” Her guard, like Carol’s, cost under one dollar to make.
“This crown guard is common in England,” Barb went on, “and I find it allows plenty of visual clearance as well as protecting my face from flying chips or any kickbacks that rise up off the back teeth of the blade. I can use it for pretty much every cut except dadoing. An unexpected advantage is that the crown guard is small enough so that it is easy to store, and easy to put on. As a result, I find myself using it, and that is the crowning achievement of any safety device.”
From there, it was off to England to check in with furniture maker and woodworking author Richard Jones. Here’s what he told me.
“Yes, crown guards are standard items over here. There are two patterns. The first type attaches to the riving knife, the European equivalent of the splitter, which is also standard equipment. The riving knife rises, falls and tilts with the saw blade, and so, therefore, does the crown guard. The second type of crown guard is on a separate arm away from the riving knife. There are various patterns, but the essential issue is that they cover the blade or blades. If you have two blades; e.g., the main blade and a scoring saw, then the crown guard extends all the way forward to cover the scoring blade as well as the main blade.”
So, there you have it. The origins of the crown guard, which go back to Europe, the path with which they most recently came to our attention, and some simple instructions on how to build your own. Perhaps this will start a trend. The way I see it, any trend that results in safer woodworking is just dandy.

