Sharpening your chisels, plane irons and turning tools is not the glamour task that usually brings a person to woodworking. You almost never hear someone say “Dang, I just can’t wait to get out into the shop to slap a new bevel on that roughing gouge!” But one thing is certain: even though sharpening is not at the top of my “fun things to do” list, woodworking in general is much more fun, not to mention productive and safe, when you are using sharp tools.
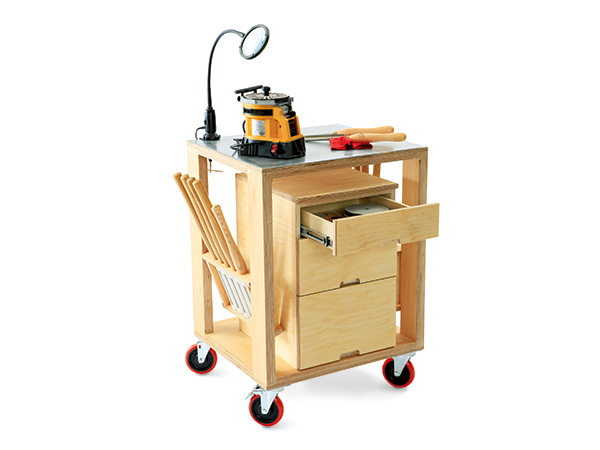
So when I was asked to help create a mobile sharpening center for the Journal, I was happy to get to the task. While this specific cart has a couple of tool holders hanging on the sides that favor woodturning, it will be equally useful for woodworkers who don’t own a lathe. (It just seemed right to accommodate turners — they sharpen constantly.)
Designed with Solid Construction
We chose to make the cart from Baltic birch plywood. The vast majority is 3/4″ thick, with the drawer boxes and bottoms formed from 1/2″ material. You could use any plywood, or even solid lumber for your cart, but voidless composition of the Baltic birch was a big plus in my mind. Just sand the edges smooth and you’ve got a good-looking and durable surface to finish. No need to face the edges. It also glues up great and handles screws (for drawer slides and other hardware) well.
I made the leg components, inner panels and the top and bottom first (pieces 1 to 4). The legs and the top/bottom are just cut from the Baltic birch stock. Glue and clamp the leg components together to build up the legs. While that glue is curing, move on to the inner panels — which have notches to accept the legs at each corner. I roughed out the notches using a band saw, but then I used a simple hardboard template to pattern-rout the exact dimensions (see Drawings). One neat trick here is that I used a 1/2″-diameter pattern routing bit. It left the perfect radius in the notched corner to match my legs — because I then used a 1/4″ roundover bit mounted in my router table to soften the long edges of the legs.
When those tasks were in the rearview mirror, I glued the inner panels to the top/bottoms in order to form two 1-1/2″-thick pieces. I waited for that glue to cure and then joined the legs to the top/bottom subassemblies with glue and screws. I clamped up the whole unit as well, checking and adjusting for square.
Making the Drawer Case
The drawer case is as simple a bit of bread-and-butter woodworking as you are likely to find. The sides, back, top and stretchers (pieces 5 through 8) are just cut from the plywood to the sizes indicated in the Material List. Plow a couple of 3/4″-wide by 1/4″-deep dadoes into the back edges of the sides to capture the back. Look to the Drawings for their locations. Here, I must confess that I used a Festool Domino joining system to locate floating tenons to join the stretchers to the sides. Why? Because I have a Domino machine, and my cart was going to get photographed for a magazine. If those things were not true, I would have simply glued and screwed the entire case together. Either method works, and the dimensions of the parts remain the same either way. (See the Drawings for the stretcher locations.)
Once you have the sides, back and stretchers assembled, the top is secured to that subassembly using glue and screws driven up through the stretchers. Simply made but sturdy — it could hold an NFL lineman and his coaches. Take a few minutes to sand the drawer case smooth and then mount it to the rolling cart subassembly using screws driven down through the stretchers. You are really making progress now.
Adding Three Strong Drawers
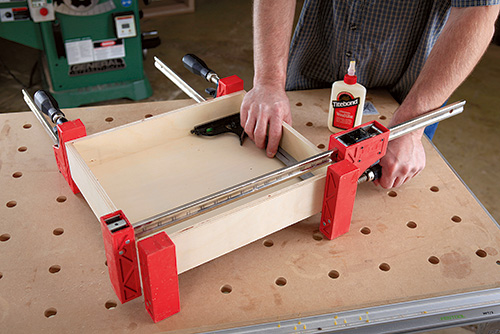
The drawer boxes (pieces 9 through 18), as mentioned earlier, are constructed from 1/2″-thick Baltic birch plywood, but the drawer fronts are made of 3/4″ material. Cut the box parts to size and then step to your table saw and replace the saw blade with a dado set installed to cut a 1/2″ groove. Lock the fence 3/8″ away from the blade, and test the setup to be certain that the plywood fits properly in the groove you are plowing. Go ahead and plow grooves for the drawer bottoms in all four pieces of each drawer box. Next, with the same dado head in the saw, use your miter gauge with an auxiliary fence and stop to form the rabbets at the ends of the drawer sides. Test-fit your drawer boxes, and when you are satisfied, glue and clamp the pieces together. Because these parts are all made of rock-steady plywood, you need not make accommodations for seasonal wood movement.
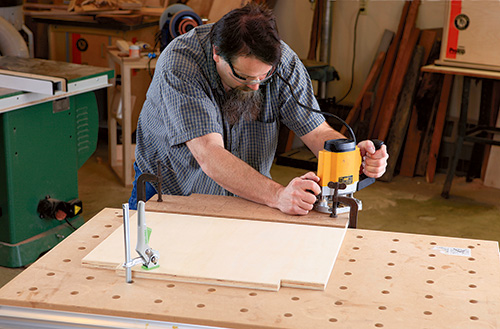
I made my three drawer fronts from a single piece of Baltic birch plywood so that the wood grain would flow through all three drawer fronts. Hey, just because this is a shop project doesn’t mean that we should get sloppy here! Use a 1″ core box bit to form the handle cutouts on the drawer fronts. You could mount regular drawer pulls here; it is really a matter of personal preference.
I attached the drawer fronts to the drawer boxes after I used full-extension drawer slides to mount the drawers into the drawer case. That way, if I was a hair off in my drawer location north or south, I could adjust the drawer faces to accommodate for that miscue. (Not that such a thing would happen to me …)
Making Tricky Tool Holders
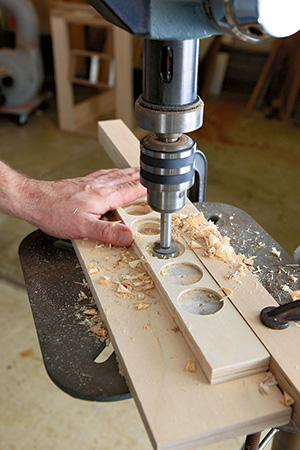
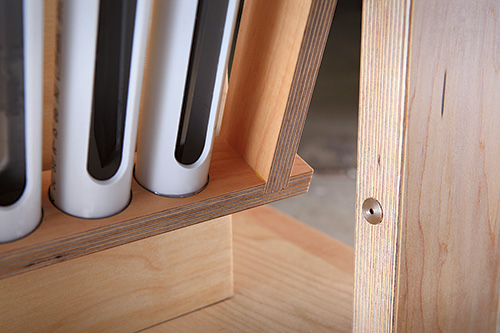
Even though they are just a small part of this pretty substantial project, the tool holders (pieces 19 to 22) took the most thought and design work. They are easy to make: after you cut the pieces to size, both plywood and PVC, take the plywood pieces over to your drill press. Lay out and drill the holes in the top and bottom pieces. First, drill the shallow borings that will capture the PVC pipe tubes. Then, on the top, switch bits and bore the access holes all the way though the plywood. On those same pieces, plow the dadoes that will capture the side pieces. You have one more task on these parts: form the little grooves that capture the shelf pins (from which the whole assembly hangs on the rolling cart). I used a 1/4″ core box bit to make the little groove, but you could just as easily carve it with a chisel. Finally, drill a hole to hold a rare-earth magnet on one end of the tool holder bottom. This magnet will hold the tool holder upright when the cart is not in use. Epoxy that magnet in place.
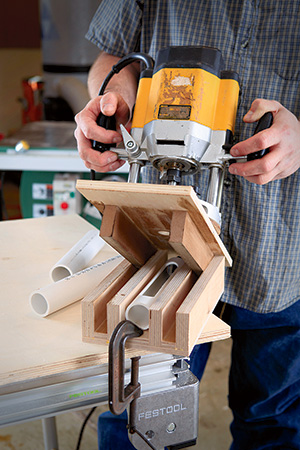
The tubes, while simple in concept, are a little tricky to make in practice (mostly because I decided it would be cool to create a “window” in each tube, so you can see your tool without pulling it all the way out of the holder). To rout that opening, I made a jig that controlled the process. Take a look at the Drawing for details on constructing the jig. I used a 1″ bowl-carving bit in my plunge router. I attached a round 1/4″ MDF piece to the base plate of my router and then glued the sliding top of the jig right to my router. It worked really slick. I clamped the PVC pipe in place and routed the opening in a single operation. The length of the sliding top of the jig allows you to register the length of the cut. Once all the tubes are machined, you are ready to assemble the tool hangers. Secure the PVC in place using clear silicone adhesive and glue and clamp the hangers together, checking to make sure they’re square.
Completing the Final Details
The sharpening cart is nearly finished at this point; there are just a few fun details yet to be completed. First, locate (from the Drawings) and drill the holes to hold the shelf pins on the legs of the rolling cart. After you have done that, mount the casters on the bottom of the rolling cart. I used short lag screws with washers to hold the casters in place. I put the two locking casters on the front side of the cart.
Now hang the tool holders in place. Mark on the leg the location for the metal disk that will align with the rare-earth magnets you installed earlier. Once the hole is drilled, mount the metal disks. At this point, go ahead and mount a rare earth magnet on the long side of the tool holder bottom and a matching disk on the side of the drawer case. They will hold the tool holder at an angle when the rolling cart is in use.
I also mounted a power strip to the back of the drawer case. That allows me to plug in my sharpening machine and magnifying glass — which is ringed with LED lights. While it may seem a bit over-the-top, that lighted magnifier makes a huge difference when putting an edge on a tool. (It’s really great when you can see what you are doing.)
Because I use various sharpening systems, everything from a machine to a slip stone, I wanted the top of the rolling cart to be bulletproof. So I purchased a 1/16″-thick sheet of aluminum (from Lowe’s®) and secured it to the top of the cart with contact cement. Cut the aluminum a bit oversized using your table saw and a carbide-toothed saw blade. The process of securing it is just like applying plastic laminate — which would have worked well here. Apply the contact cement to the aluminum and the plywood top. Allow the cement to dry.
Then lay a few 1/4″ dowels across the width of the top to help control the process of sticking the aluminum down. Position the glued faces toward each other, and start pulling out the dowels and sticking the two parts together. Be careful: once they touch, you are not getting them apart. Roll the aluminum down with a J-roller and then trim off the excess with a carbide 45° trim bit in your handheld router. It will cut the aluminum like butter. Once it was in place, I used some steel wool to texture the top — I have to say, it looked pretty good when I was done.
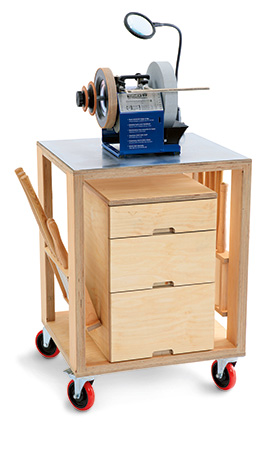
Now apply three coats of Watco Oil natural finish, let it cure, and you are ready to load the cart up with all of your finishing paraphernalia and roll it to wherever you wish to use it. In my shop, it will be hanging out near the lathe.
Click Here to Download the Drawings and Materials List.
Click Here to Download the Drawings and Materials List.
Hard-to-Find Hardware:
5″ Caster (Locking) #37138
5″ Caster (Swivel) #39507
1/2″ Magnets (10 pack) #30810
Shelf Pins (10 pack) #22278


